
Accuracy stems from proper tuning every bit as much as quality marksmanship. Even the best archer in the world cannot shoot to their full potential without a proper tune. So how do we achieve the illusive perfect tune? The rabbit hole is deep and can quite overwhelming, so buckle up while we scratch the surface.
Tuning can include adjusting nock point location, brace height, paper tuning, bareshaft tuning, and diagnosing conditions such as porpoising and fishtailing. It can also include running around in a circle and chasing your tail because your form sucks. Remember to breathe at this point. You can tune your recurve bow for maximum accuracy and efficiency but you must be patient in your approach and equipped with the right knowledge to accomplish it correctly. Let’s start with a basic foundation.
The Perfect Nocking Point Location
The correct placement of your nocking point is essential to maximizing accuracy and preventing tuning-related issues. A nocking point is an piece of brass or serving tied onto the string, allowing an archer to nock their arrows consistently at every shot. Your nocking point tells you how to nock your arrow exactly the same, every time.
A nocking point can be crimped on with brass units made specifically for this application or can be tied in with serving thread. I prefer serving thread, specifically BCY Poly Thread, as you can adjust it up or down after application, it requires no extra tools, and is easy to remove.
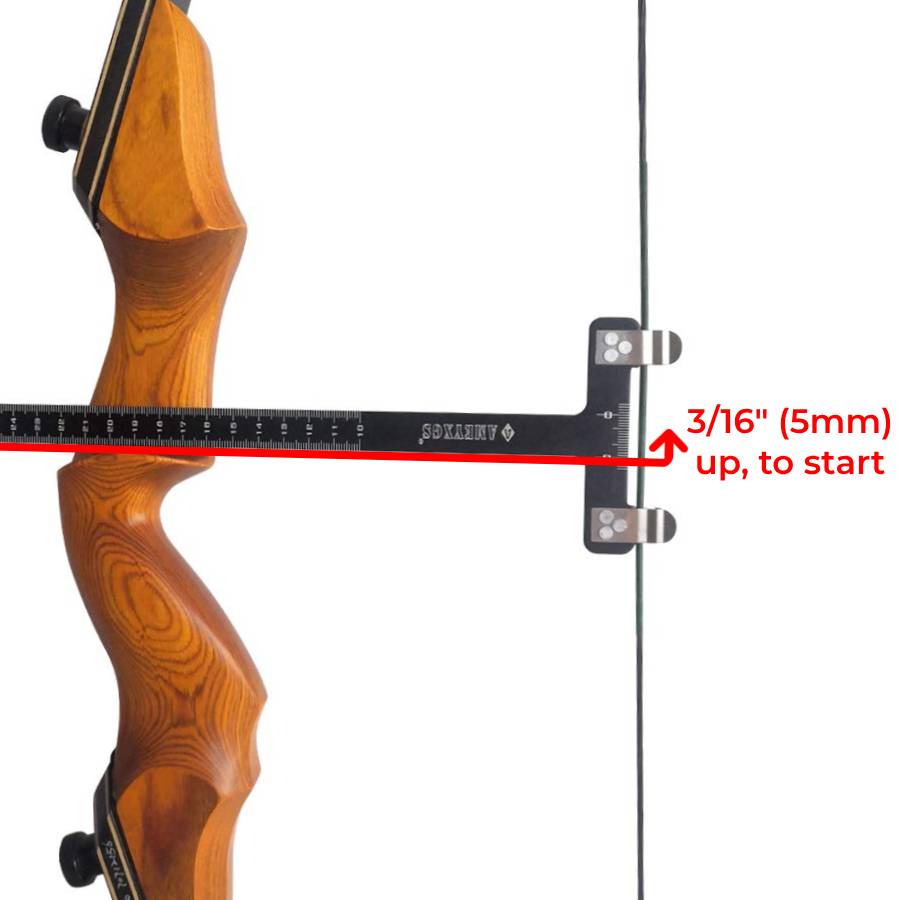
To find your perfect nocking point, you will need a T Square or an L Square (I prefer an L Square). Lay the square across your bow’s arrow shelf as flat and square as possible. You will be looking to see at what point the bottom edge (touching your shelf) intersects your bowstring. Secure your nocking point in place at the height of around 3/16″ (5mm) above your previously observed point of intersection between the T-square and your bow’s string.
It is also worth mentioning that when using crimp-on style nocking points, only crimp the nocking point as tightly as it takes to ensure that it is held in place. The placement of a crimped nocking point must be precise and should only be done after the correct location is found via tuning. Start with a simple piece of string or serving as a placeholder.
Adjust the Brace Height Of Your Bow
In traditional archery, especially recurve bows, a bow’s brace height is measured from the deepest portion of the grip to the bowstring. This is a vital measurement to proper bow tuning because this figure affects accuracy and noise imparted as the bow is shot. Again, clip your archery square to the string and find the measurement to the deepest part of the grip on your riser.

Brace height tuning is done by twisting (shortening) or untwisting (lengthening) a bowstring in order to change the length of the string. This, in turn, adds or removes tension from a bow’s limbs, pulling them closer together or distancing them further apart. Just like when you draw a bow, the closer the limbs are pulled in together (by twisting the string) the further your string will be from the riser. The opposite, of course, is true when taking twists out of the string.
Refer to your bow manufacturer for proper brace height specifications. Once you have the number to set to, it becomes a sequence of trial and error. Too long? Untwist. Too Short? Twist.
If too short of brace height is set, fletchings can make contact with the bow shelf before an arrow clears the string. On the other hand, too long of a brace height leads to short stopping of a bow’s limbs and a resulting loss in power. Increasing brace height makes an arrow stiffer, and decreasing brace height makes an arrow weaker. Another way to think about it: the longer the power stroke (how long the arrow is being pushed on the string) the more energy gets imparted to the arrow which puts more bending action into the arrow.
Before Tuning Your Arrows
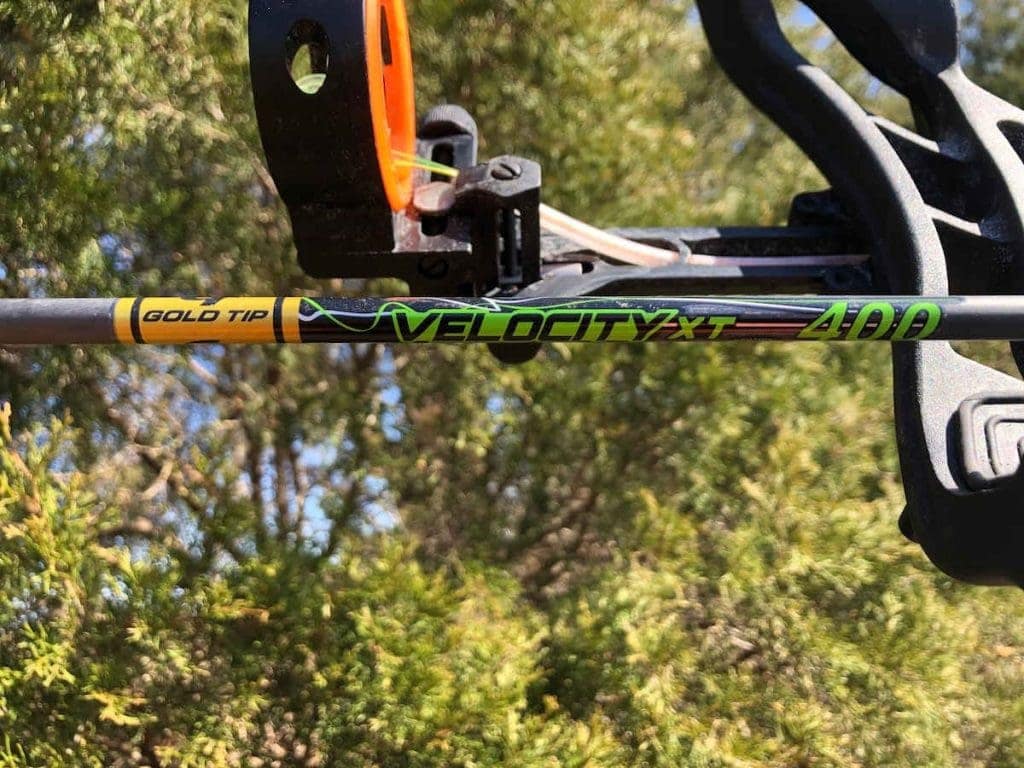
At this point you’ve probably already purchased arrows. Hopefully you followed a spine selector chart and chose the correct spined arrows for your draw weight and arrow length. What you need to know is your arrow length. If you are shooting with a sight, you can follow a spine chart for your arrow length. If you are shooting barebow you may want to consider leaving your arrows full length if you want to use the arrow tip as an aiming aid. The shorter you cut your arrows down, the lower your arrow tip gets in relation to the target. I prefer to leave my arrows full length so when I read a arrow selection chart, I reference the manufacturers stock arrow length and select my spine based off of that.
Now that our nock point and brace height are set I recommend getting a little bit of knowledge to continue. In order to not chase your tail before attempting to tune your arrows you should grasp the Archer’s Paradox and make sure the spine of your arrows are correct. What is Archer’s Paradox? is the article we suggest reading if you don’t have a solid understanding of it.
Without a properly spined arrow, your arrow or its fletchings could be making contact with your riser causing your arrow to display a variety of nock conditions.
Papertune a Bow
Papertuning is a good way to show you exactly what’s happening to your arrow after clearing your bow. In theory it sounds like the end all be all. In practice I’ve found that you shouldn’t stop here but it’s good to start here. You can even skip paper tuning altogether, to be honest. I don’t papertune unless I’m stuck in the garage and don’t have space but I want to tinker. Paper tuning is a very rough form of analysis. Though you can see stuff that is monumentally wrong, you can’t get nitty gritty.

You will need to position a frame capable of holding a sheet of paper at shoulder height. You don’t want to be shooting into the paper at an angle or you can get a false read. The backstop for this arrangement should be placed a minimum of four feet beyond the frame, as to allow an arrow to completely pass through the sheet of paper before making any additional contact.
There exists multiple papertune products for sale but these are typically meant for shops that are tuning multiple bows day in and day out. You can shoot a piece of junk mail and accomplish the same result. White paper does show better but I’ve shot just about every piece of paper I had in my house before and never had a problem. I’ve even hung a piece of newspaper from a tree branch. Anyway that you can shoot squarely through a piece of paper will work. If you don’t plan on doing this every year, don’t put too much effort into building out a rig.
Once your paper is set up and you have a proper backstop behind it, stand at a distance of approximately 6 feet away and fire three arrows. The pattern left behind as the arrows pass through the paper will give you clues regarding any additional required tuning. If you are fortunate enough to have perfect “bullet hole” type of punctures in the paper, then go to the bareshaft tuning section of this article. If any other tear pattern is noted, further adjustments are required. Here is a chart going through the possible tears:
NOCK HIGH
Adjust your nocking point down.
* A nock high can be caused by the arrow bouncing off the shelf from too low of a nocking point
NOCK LOW
Adjust your nocking point up.
NOCK RIGHT
- Adjust rest to left
- Increase poundage
- Reduce plunger tension
- Lengthen arrow
- Spine too stiff (right handed)
- Spine too weak (left handed)
NOCK LEFT
- Adjust rest to right
- Decrease poundage
- Increase plunger tension
- Shorten arrow
- Spine too weak (right handed)
- Spine too stiff (left handed)
NOCK COMBO
Combination of vertical and horizontal tears:
- Fix the vertical tear first
- Fix the horizontal tear last
PERFECT
Looks good. Just in case, move back another yard or two and verify results.
Notice that the sharp, wide tears are your fletchings and indicate where your nock is entering the paper. I’ve drawn some arrows for each tear to drive home the point of what your arrow looks like while it’s flying through the paper. The red is the shaft and the black is the nock and fletchings. The tear tells you at which angle your arrow is flying through the air, allowing you to make the changes necessary to straighten its flight.
Once you’ve identified which tear you have and match it up to the chart, make one of the adjustments on the chart and test again. If trying all or a combination of the fixes does not work, your arrow spine is not correct. Borrow or buy a weaker/stiffer spine as needed. Another tell that your spine is incorrect is if your component is on the very edge of its adjustment. For example, your spine is too stiff and you find yourself adjusting your plunger until it’s so loose it may come apart. We want all of our adjustable components to be not too far off from it’s center. Another example is if you are adjusting your rest and you can’t adjust it any further left or right. This can mean your spine is wrong and even if you can bareshaft tune this correctly, the efficiency of your bow is being robbed.
You can paper tune with a bareshaft, by the way. All of the tears and fixes are the same. If you aren’t starting with prefletched shafts I would advise you to paper tune with bareshafts. Fletching will correct the arrow’s flight and you’ll miss getting closer to a correct tune this way. If you are starting with fletched shafts, paper tune as best you can and then move on to bareshaft tuning.
Bare Shaft Tuning
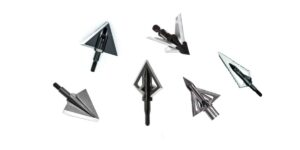
Bareshaft tuning can now be used to get deeper into our tune. This test uncovers any deficiencies in arrow flight that have been concealed by the flight stabilization of an arrow’s fletchings. If you’ve paper tuned and got a perfect hole we know our arrow is tunable at this point. You may ask “Why tune further?” if you’re already shooting straight. If you are a hunter and put a broadhead on the tip of that paper tuned arrow you may quickly find out. A broadhead will cause extra planing off the front, will be harder for the fletchings to correct, and will amplify anything wrong with your tune. We want our groups to be as tight as possible and our shot to be as forgivable as possible and we do that by bareshaft tuning.
Bareshaft tuning is done by shooting several normally fletched arrows into a target from a set distance while maintaining the same point of aim. If the grouping of the aforementioned arrows is consistent, you will then shoot a bare unfletched arrow into the same target while once again maintaining the same point of aim as before. The differences observed between the impact point of your fletched arrow group and the bareshafts will guide you to what adjustments, if any, will be made.
To get started, take aim at about 15 yards away and shoot three fletched shafts at the same point of aim. We want a solid, average sized group for your shooting capability. Form, release, and consistency is everything at this point. If you are a brand new archer and your fletched shafts are far apart and not grouping, your time is better off spent working on shooting until your groups are very consistent. If you can group your fletch shafts consistently, lets move on.
We’re now going to shoot three bareshafts at the target at the exact same point of aim from the same exact distance. If you’ve only got a half a dozen arrows and don’t want to strip off half of them to bareshaft tune, just use one bareshaft. Still shoot three or four, but mark on the target after each shot where it landed so you can still know what your group looks like. Again we are going to work on the vertical nock orientation and then finish with horizontal.
Bare Shaft Group High
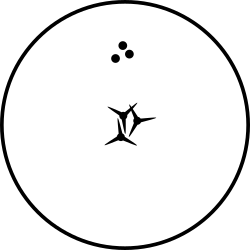
If your bareshafts are grouping high, as shown in this diagram, we will want to slowly make incremental changes to our nocking point in 1/32″ to 1/16″ or 1 – 2 mm increments. A high grouping bareshaft shows that the arrow is being pushed up at an angle so we should bring the back of the arrow up by bringing our nocking point up. Remember, small changes and test after every change.
Bare Shaft Group Low
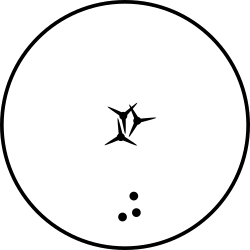
If your bareshafts are grouping low, as shown in this diagram, we will still make small changes to our nocking point in 1/32″ to 1/16″ (1 – 2 mm) increments. Low grouping bareshafts indicates that our arrow is angled with it’s tip pointed down so we need to bring the back of our arrow down by adjusting our nocking point down. Remember, small changes and test after every change. Be warned that if you go down past zero nocking point height, the back of the arrow can kick off the shelf and give you a false indication. Return to the beginning of the guide for nocking point placement.
Bare Shaft Group Left
Now that your bareshafts are vertically grouping in the same place as your fletched shafts, we can make horizontal adjustments. If your bareshafts are grouping left as shown we can assume that your arrows are over spined or in other words stiff. The remedies for stiff arrows are as follows:
- Increase point weight
- Decrease Plunger Tension
- Adjust rest to the right or reduce side plate thickness
- Lengthen the arrow shaft
Bare Shaft Group Right
If your bareshafts are grouping right as shown here, we can assume that your arrows are under spined or in other words weak. The remedies for weak arrows are as follows:
- Decrease point weight
- Increase Plunger Tension
- Adjust rest to the left or increase side plate thickness
- Shorten the arrow shaft ( ¼” to ½” at a time)
Each time you make an adjustment, it is imperative that you shoot and evaluate the results. If your groupings spread even further, you may have adjusted the wrong way! When adjusting your point weight use 25 grain adjustments. Remember that at some point your form and consistency is the limitation. Don’t force yourself into chasing perfection when your release isn’t consistent. You’ll drive yourself bonkers; I know, I’ve done it.
Never cut your arrows down until you verify with point weight. In other words, if you are wanting to shoot 150 grain tips, verify that 125 grain tips shoot well and 150 grains shoot weak. Then and only then should you cut your arrow down in ¼” to ½” increments.
If you change arrows to change spine, be sure to account for the diameter of the arrow. When changing from a larger diameter to a smaller diameter you are effectively changing your centershot. Think of it like shaving off the side of the arrow touching the riser. The arrow tip will move laterally towards the riser to take up the gap thereby changing your centershot and point of impact.
Notes for left handed shooters: the left and right groupings are swapped for you but the up/down stays the same.
Proper Clearance
If you’re unsure whether or not your arrows are clearing the rise correctly, there is a simple, cheap procedure to check. Checking for proper clearance before chasing a tune is a smart thing to do for your own sanity. For clarity, I am referring an arrow’s ability to clear the arrow rest and riser region without making undesired contact along the way.
This contact can be due to the arrow’s fletchings or the shaft itself and will produce similar detrimental effects on your bow’s accuracy. The following is a list of steps that will assist in checking for proper arrow clearance and making needed adjustments along the way.
- Buy a Spray Powder – Something like a simple athletes foot spray is a great indicator. Some other common favorites are spray on talcum powder, dry deodorant, or even flour.
- Apply Powder to Arrow Shelf– Spray the powder all over the arrow shelf where any contact may be made. These areas include the arrow rest and the entire arrow shelf (both bottom and side).
- Shoot An Arrow And Check Results– You will now shoot an arrow and check all powdered areas for signs of “tracking” in your previously applied powdered substance. “Tracking” would be anywhere that the powder has been stripped away or moved.
- Make Adjustments As Needed– If no tracking is noted, you are free of clearance issues. However, if the opposite is true, adjustments are needed. Study the location of the contact points between your arrow and rest, and then adjust components or spine accordingly.
Common remedies for clearance issues include:
- Slightly rotating your arrow’s nock to offset the fletching location
- Switching to lower profile fletchings
- Adjusting centershot
Once you are assured that your arrow is properly clearing the shelf with no contact being made you can continue onto more fine grained tuning like the aforementioned bareshaft tuning.
Tuning To Perfection
Achieving the perfect arrow flight is crucial for accuracy and arrow penetration. A proper arrow setup avoids erratic arrow flight and poor arrow flight performance. The key is ensuring the arrow has the proper spine, your bow is set at the proper brace height, and your nocking point is correct. From that point you can paper tune and then bareshaft tune to make fine adjustments to get as close to perfection as your current form allows.
Please leave a comment with your experience or your tuning method. We always appreciate any feedback from our readers.


Conversation | 6 comments:
Thank you. I found your article very informative.
Just a heads up… You have this correction proposed for both bareshats impacting left AND right. “Purchase arrows that have a stiffer spine rating than the ones you are currently shooting.” This is the proper correction for bareshafts impacting to the right of the fletched shafts. However, bareshafts impacting to the left are already too stiff and call for weaker spine.
Hey Jeff, thanks for the heads up!
I found this article very useful and informative.
Having gone through the tuning process with my compound bow it was a relief to see that the process is very similar for my recurve.
I will be revisiting this article often.
Thank you.
Excellent presentation and very informative, great job explaining each step in plain words that even a novice could understand. Each step was very easy to understand and follow your instructions. Thank you so much for sharing your knowledge and expertise with us newbie’s. I will definitely be on the lookout for more of your tutorials on bow building. Again many thanks for your help.
Excellent study. Question: what challenges faced by those of us that shoot off the shelf?