
Special Thanks to Sam Harper for allowing us to republish his tutorials and build along instructions. His expertise and knowledge in bow-making have greatly benefited many readers, and we are grateful for his generous permission.
In case you’re wondering why I post my build-along on several pages instead of just putting it on one page so you don’t have to keep clicking around, it’s because there are a lot of pictures and some people still use dial-up and have old computers with low RAM.
The last English longbow took 10 pages. This time I’m going to do it in five pages! Oooo!
The Story behind this Bow
In case anybody wants to know, today is Saturday, June 9, 2007. As I’m writing this, my new English longbow is cooking in the hot box.
That gives me some time to transfer my pictures from the camera to the computer and start my write-up.
I stopped making bows back in August (well, actually I’ve made one since then), but a friend of mine asked me to make an English longbow for his daughter’s birthday which is in October.
She’s into Renaissance festivals, and things like that, so he wanted something authentic. I made the mistake of telling him that if he really wanted an authentic English longbow, it would have to be made of Yew.
I told him Yew was too expensive, and I would come up with some kind of substitute. He insisted on making it out of Yew, and he was going to buy me another Yew staff for myself as payment.
The problem is that my skills aren’t that great, and I’m just too intimidated to try to make an ELB out of Yew. It would be a huge waste if I messed it up.
So I’m going to use a substitute. When I finish it, I’m going to send him pictures and let him decide if he wants it or not.
The Materials
Do you remember my first ELB out of hickory and Osage? I had hoped the hickory backing and Osage bow would mimic the color of Yew sapwood on the back and heartwood on the belly.
At the time, the Osage was bright yellow and didn’t look at all like Yew. The Osage has since then darkened up quite a bit, and it does look kind of like a Yew ELB now.
I discovered, though, that Osage, while being great in compression, is just too heavy for this design. Osage is better for short bows. For longer bows, Osage is too heavy which slows the bow down and creates a lot of handshock.
I wanted to try some juniper. I used to have a perfectly straight-grained piece (which is extremely rare), but stupid me, not knowing what I had, used it to make a bow rack. I haven’t been able to find a good long straight-grained piece of juniper since then.
I originally thought juniper would be too soft and brittle for an ELB and that it wasn’t good in compression, but I read somewhere that it has very similar properties to Yew.
I knew it was light, so I figured it would probably be a lot better than Osage or anything else I might try. But, alas, I couldn’t find any.
So I’m going to make this bow out of pecan and maple. I wanted to have a hickory backing, but I haven’t been able to find hickory lumber anywhere.
The Hardwood Barn, where I usually get my wood, has these huge gigantical pieces of hickory, but I just don’t have the facilities to cut it down to size.
I met John Beecroft at Canton trade days, and he told me he got a bunch of hickory at Austin Hardwoods in Dallas, TX. I went to check it out, but all they had was pecan.
Pecan is in the hickory family, but from what I’ve read, it doesn’t have the same bow-friendly qualities as other hickories have.
Still, I had looked for a long time and decided to settle. It was too difficult to sort through the stack at Austin Hardwoods in Dallas, but I found a fairly straight-grained piece at Precision Hardwoods in Austin, TX.
This will be my first attempt at making a bow out of maple. I’ve used maple in handles before, but not limbs.
Hard maple is supposed to be the best, but I have no idea what kind of maple this is. I got it at Gulf Lumber here in Tyler, TX, and it was just labled “maple.” We’ll see how it does.
Preparing the Backing
If you’re going to use any kind of wood for a backing, the grain has to be absosmurfly straight. The whole purpose if having a backing on any bow is to prevent splinters from lifting.
Having bad grain on a backing is about like not having a backing at all, so it defeats the purpose.
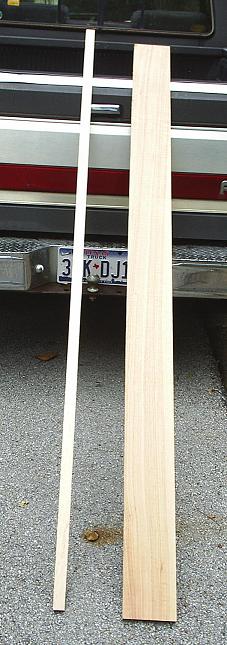 <—Over here to the left is a picture of two pieces of wood. The one on the right is my pecan and the one on the left is my maple.
The grain on the pecan isn’t perfectly straight, but I think it will do. I’m going to make this bow between 30 and 40 pounds, so it should be just fine.
By the way, I just learned how to post pictures and write text beside it. It’s a space saver, and it might even have other uses.
 The maple is just a little over an inch wide. I figured the pecan might warp a little when I ripped it, so I decided to cut it a little wider than an inch. Sure enough, it warped. —>
I went ahead and cut a piece about 1/8″ thick with the band saw to use as a backing. You don’t want to go any thicker than that with a wood or bamboo backing.
At this point, you could use a lam grinder to grind the backing down and get all the tool marks out of it. I didn’t use a lam grinder, though.
I just used my belt sander with a wooden block to hold it down. I got all the tool marks out of it.

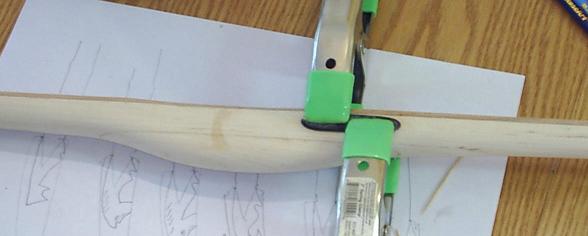
 That warpage would just never do, so I decided to use the string method to get it straightened out. I made a mark at the center of the length and a mark at the center of the width, and a + at the intersection.
Then I ran a string along the length with squeeze clamps hanging off each end. I made small little adjustments on each end so that the string would run through the + in the middle and still be pretty even on both ends.
I made pencil marks on both ends under the string. I had about enough room on either end to make the tips a little more than 1/2″ wide.
I measured out an 8″ handle area in the middle, and then used the aluminum yard stick as a straight edge and drew pencil lines from the tips to the handle area.
I highly recommend getting an aluminum yard stick because they don’t warp like wood, and they’re great for long straight edges.

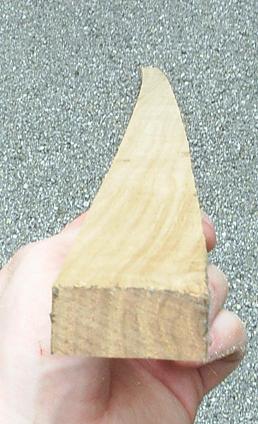
Then I cut that out (the part in red) with the band saw and sanded to the lines with the belt sander. Here is the result:

It’s much better now, huh?
Preparing the maple
I don’t remember if I told you this or not, but I’m making the bow six feet long. Paul’s daughter is around 5’6″ tall, so I figured six feet will be plenty of length. Long bows are supposed to be long, after all!
I started with a piece of maple 6 ft 7.5 in long. I cut 7.5″ from the end with the worst grain and used that as a handle.
I didn’t glue on a riser section on the last ELB because ELB’s are supposed to bend through the handle. But I didn’t really like the feel of a bendy handle, and it was hard to make the handle round and comfortable without weakening it.
So I’m gluing on a riser section so I’ll have a little more flexibility to make the handle comfortable.
But first, let me tell you the dimensions of the maple and how I went about tapering it. After cutting off the 7.5″ from one end, I was left with a six foot piece of maple that was 3/4″ thick and 1.25″ wide.
It will probably be a little more narrow than that when I’m done with it.
Then I found the center point and measured 4″ on either side, giving me an 8″ handle section.

I measure about 1/4″ (maybe slightly more) from the back on each end of the maple and drew a straight line along the 3/4″ side from the handle section to the mark on the end. Kind of like this:

You may find it difficult holding your straight edge against the edge of the maple and drawing that straight line because your straight edge rocks while you make the attempt. There are two ways to get around that.
The easiest way is to use a lovely assistant to hold one end of the straight edge while you hold the other and draw the line.
I haven’t had a lovely assistant since February of this year, so I just used a squeeze clamp to hold the straight edge in place while I drew the line.
After band sawing off the area in red, I used the flat part of my belt sander to get the tool marks out. You see, unless you can cut a perfectly straight line with a band saw, you’re going to have a few dips.
Those dips will become hinges when you bend the maple. That’s true even when you’re just gluing the thing up. If you sand until you get all the tool marks out, it will be perfectly flat, and it will bend evenly when you glue it up.
The glue-up
Before gluing up, I want to make sure all of the surfaces to be glued have been sanded with a pretty rough grit. I use 40 grit on my belt sander, and it creates a good gluing surface. So I sand the back of the maple.
One side of the pecan backing has already been sanded to get the tool marks out. I also sand that 8″ area on the belly of the maple, and I sand the 7.5″ block I’m going to glue on to the belly.
After doing a dry run, I put a 2×6 on my kitchen counter for a table and put some hy-top plastic wrap on it.
Don’t use Sam’s Choice!!! I layed the backing on it and the maple so the side I was going to glue would be facing up.


 I used smooth-on for this glue-up. Just a spoon of the glue and the hardener was all it took. Be sure not to use one spoon for both because then you’ll inadvertently mix them.
I mixed them up with a wooden stick, then used that stick to glob on the glue, then used a seam roller I got at Lowes to spead the glue.
Be sure to put the glue on both sides to be glued. That ensure you won’t have any dry spots.
I put the backing on the maple and pressed down all along it. Then I glued on my 7.5″ handle piece. I wrapped the whole thing up in the plastic wrap and put it on my form belly down.
My form is just a 2×4 I got at a construction site dump. The only problem with using a 2×4 is that they sometimes warp, and that can cause your bow to be misaligned.
If you decide to use a 2×4, let it sit around a while before you use it. Mine is pretty well seasoned and doesn’t warp. It warped a little in the beginning, but I used my belt sander to straighen it back out.
I put tape on the limbs to prevent the backing from sliding around while I put clamps on it. Then I used three 3″ c-clamps to clamp the handle to the form.

Once that was all set and everything was lined up, I put some wooden blocks under each end. That gave me a little over an inch of reflex.
I wanted some reflex because as I tiller the bow, it will take some set. I’m hoping when it’s tillered, the bow will be close to straight.
After the blocks, I put a whole bunch of squeeze clamps on there.

Then I put that in the hot box and let it cook for six hours. When it’s done, I unplug the hot box and leave it in there to cool off until the next day.
Roughing Out
Today is Saturday, July 14, 2007. I haven’t worked on this bow in a while, huh? It seems like something comes up every weekend.
This weekend it was Harry Potter and the Order of the Phoenix and Ratatouille. Thankfully, they didn’t take all weekend, so I had a little time to work on the bow.
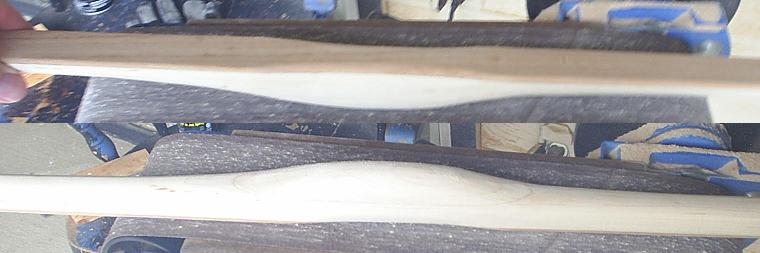
After taking the bow out of the oven and unwrapping it, I cut it out with the band saw. That is, I cut off the excess maple on either side of the pecan backing.
Then I used my belt sander to clean it up–get the glue lines looking good and the tool marks out of the sides. Here’s how it looked:

See how it’s got some reflex? That’ll probably go away, and hopefully I’ll end up with a straight bow in the end.
English longbows are supposed to have round bellies. I could get it round with a belt sander, but it’s easier to at least start with a rasp. I clamped the bow to my chair so I could hold the rasp with two hands.

I rasped the corners off all along the bow and rounded it a bit.

Then I rounded it the rest of the way with the belt sander. I used the flat part of the belt sander and sort of rolled it to get it round and uniform.

I know the roundness is hard to see with this picture, but it’s the best I could do.
Tillering
Some people floor tiller at this point. Floor tillering isn’t really necessary. You could accomplish the same thing by putting it on a tillering tree.
But if your roughing out is really rough, floor tillering isn’t a bad idea. I always floor tiller anyway just to see how stiff it is. I mean if it’s incredibly stiff, there’s no sense in putting it on a tillering tree.
You need to reduce it to where you can bend it a little. The more bows you make, the better you can tell how stiff a bow is when floor tillering. Mine is about where I want it to start tillering it on a trillering tree.
Since I’m going to put horn nocks on there later, I only want my nocks to be temporary. I want to make nocks I can remove later, so I make them sort of close to the end, and I don’t make them too deep.
First, I draw a line across the back 1/2″ from the end.

I use that line as a reference for filing my nocks. I file them at a 45 degree angle, as close as my eye can tell. I start them with a triangle file, then finish them with a rattail file.
If you start with a rattail file, it could slip and slide all over the place before it finally takes. First I do one side. Then I use that side as a guide while doing the other side.

And that’s as far as I got today.
Tillering With a Long String
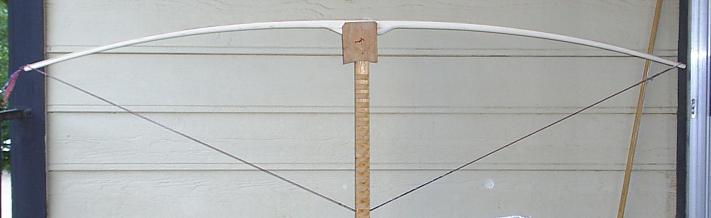
I decided to aim for somewhere between 35# and 40# at 27″ of draw. That seems to be about right considering who I’m making the bow for.
Jawges recommends using a long string until you get the bow bending 10″ before stringing it.
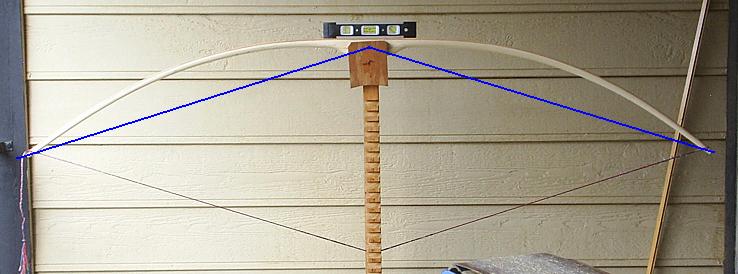
So I put a loosey goosey string on there and pull the string until it’s taut. My string became taut at 13″, so I want to get the string moving to 23″ before I string it the first time. And I want it to be at about 35# when I get to 23″.
After making sure it could bend a little by floor tillering, I stuck it on my tillering stick. (For those of you who shudder at the idea of using a tillering stick instead of a tillering tree with a pully system, well, I wish I could use a pully system, but living in an apartment, I have my limits.)
And I pulled it three inches just to see if there was any obvious difference in stiffness between the limbs. Here it is at 16″ (i.e. 3″ of draw).

The right limb looked a little stiff to me at the time. It was hard to tell, though, so I just excercised the limbs 30 times and pulled it to 18″.
I could tell from the feel that it wasn’t 35#, so I didn’t worry about it. You should never pull the bow past your target weight. There’s just no reason to. Here it is at 18″.

This time it was more obvious that the right limb is stiffer than the left, so I attempted to weaken it a little. I decided I’d use the belt sander.
Rounding the belly with the flat part of the belt sander went so well, I thought I might as well keep doing it that way. I just put it on the belt sander and rolled it from side to side, keeping it round as I removed wood.
I mostly worked from the fades to mid-limb. Here it is at 19″.

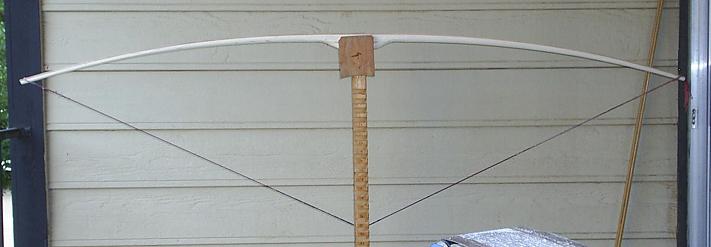
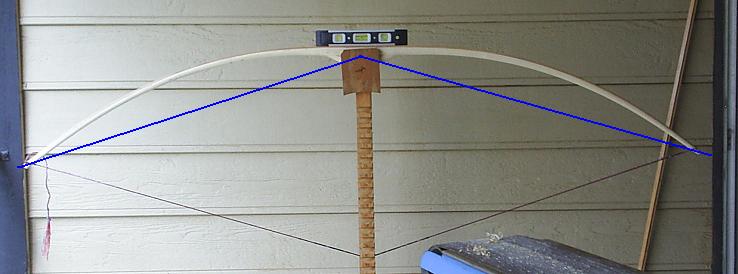
This time it looked about right, so I decided to pull the bow to 35# and see how far it went. It went to 21″, which is 8″ of limb travel. Just two more inches, and I could string it. Here it is, 35# at 21″.
The right limb still looked just a wee bit stiff, so I worked on it a little more, excercised the limbs, and had another look-see. Here it is again at 21″.
It looked even to me at this point, so all I had to do was reduce both limbs evenly so I could draw the bow farther and not go over my target weight of 35#.
I wanted the bow to bend a little more toward the fades, so I worked about midlimb to fade and left it alone from midlimb to tip.
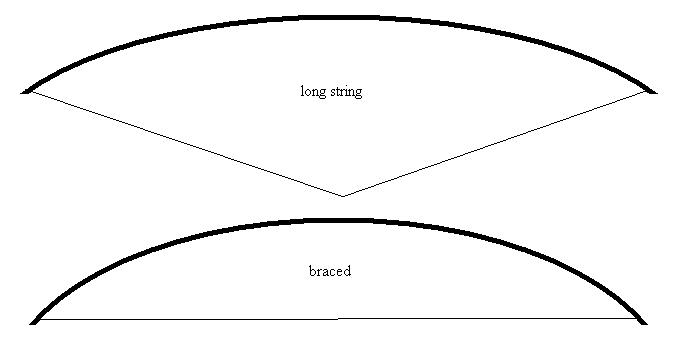
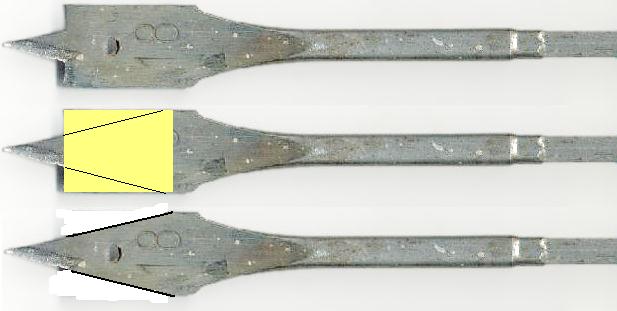
Lemme explain why I do that. When you use a long string, the force on the tips is more in a downward direction. But when you string the bow with a shorter string, the force is horizontal. That puts more pressure on the tips. The difference might look kind of like this:
If you’re not careful, the bow could be whip-ended or even cause a hinge.
Also, I like to keep the tips stiff because I’ll want to narrow them later. If they’re already bending too much, narrowing them is going to cause them to bend even more, causing the bow to be whip-ended or hinged.
This is especially horrible for a reflex deflex bow, because you’ll lose all your reflex due to set.
It’s much easier to see how the limbs are bending if you have a pully system, because you can stand back and actually watch them flex.
I worked from fades to mid-limb until I got it to 35# at 22″.

Oh, by the way, I drew an arrow on the handle pointing to the right limb. That way, I didn’t forget which end is which each time I took it off the tillering tree and put it back on.
Anyway, at this point, I decided to use a 5″ block of wood, slide it along the under side of the belly, and look at the gap. You can see hinges and flat spots easier that way.
The bow looked good to me, but I found a flat spot on the left limb about midway using the slide-the-block method. I marked that with a crayon and worked on it a little.
Eventually, after messing with the tiller and reducing the weight, I got it to 35# at 23″, which is what I was shooting for.

But now the string wasn’t taut at 13″ anymore. The bow must’ve taken a little set. Now it was taut just past 13″. I decided to really get 10″ of travel, I ought to pull the bow to 24″ before stringing it.
Lemme tell you what I put that level on there for. You see, I’ve noticed on a lot of bows I’ve tillered that even though it looks even before I string it, whenever I string it, one limb always turns out to be more stiff than the other.
I think I may have discovered why that is. It’s because my balcone is not level. Check this out:

Do you see how the gap between the floor and the board gets wider as you go from right to left? Well, the board is level, but the floor is tilted.
That causes my tillering stick to lean, and that’s probably why my bows come out uneven, which I don’t notice until I string them. Here’s an exaggerated look at what I think happens:

You see, I was using the boards on the wall to gauge whether the limbs were bending evenly or not. I figured if both tips came down to the same level, then the limbs must be bending evenly.
But with my tillering tree leaning, one limb had to bend more than the other for the tips to come down to the same level. I decide to fix the problem, I would put a level on the bow while I pulled the string.
That way, even though the string wouldn’t pull from the center, at least the bow would be level.
Looking back on it, I guess I could’ve put shims under the tillering stick to get it level.
So I reduced it a tad and put it on the tillering stick and pulled it to 24″. At 24″, it came to 37#.

So I strung it.

So much for my theory. My theory predicted a weaker right limb, but the right limb turned out too stiff. I decided to quit at this point because it was getting too dark.
Tillering with a Short String
July 29, 2007
Here we go again. I decided after string it that I would do the rest of the tillering with a scraper. I’ve never used a scraper before, but it sounded like the ideal tool for tillering because it would give you a lot more control than a rasp, a belt sander, or a drum sander.
I made a scraper out of an aluminum sign I found laying on the ground, and I even posted a build-along for it.
It didn’t work very well, though, so I broke down and bought a set of scrapers and a burnisher from ebay.
It was well worth it because this scraper works great! I love it! I should’ve gotten one of these a long time ago.
By the way, if you decide to get a burnishing tool from ebay, don’t type in “burnishing.” Instead, type in “burnisher.” I got my burnisher and my scrapers all together.
You need to know how to sharpen your scraper, so here is a link showing how. They are really wonderful tools.
Anyway, I scraped on that right limb some and then brace it a little higher.

The left limb was bending about 1/16″ more than the right. To measure there, I measure 9″ from the center of the bow down one limb. From that point, I measure the distance from the limb to the string.

I do that on both sides and try to get them close to even. A 1/8″ positive tiller (where the upper limb bends 1/8″ more than the bottom limb) is good, so I’m not worried about a 1/16″ difference.
The right limb is provisionally the top limb, but I only say so to keep me from getting confused about which end is which.
In the end, it doesn’t matter. I’ll choose whichever limb ends up bending a little more for the top limb when I’m done.
So…I pulled the bow about 10″ (which came to the 16″ mark) to see how it looked.

It looked good to me, so I pull it to 30# to see how far it would go. It went to 21″.

I learned this neat trick from the fine folks on the Leatherwall. If you use Paint to draw lines from the middle of the handle to the tips, it’s easier to tell if the tiller is off.
In this case, it’s obvious that the right limb is too weak. Probably what happened was that while I was scraping the top limb, it didn’t take enough set to really show the effects until I drew it to 21″.
That’s why you have to exercise the limbs each time you remove wood.
I also thought the limbs ought to bend more toward the fades, so I scraped near the fades on both sides, but I did a little extra scraping on the left side. Here it is again at 21″ after doing a bit of scraping.

The left limb still needs work. Oh, that reminds me. One cool thing about using a scraper is that you don’t have to unstring the bow to use it.
That makes tillering a lot less of a chore. Also, the scraper leaves a pretty smooth surface, and that reduces the amount of sanding you have to do later.
Here it is again at 21″.

The left limb still needs work, but I also thought the right limb was bending too much at midlimb. It seemed to hardly be moving at all near the fade.
So I worked on that a bit, too. Here it is again at 21″.

I did this about six more times, just working near the fades and some close to the tips, but staying away from midlimb. Finally, I got a 1/16″ positive tiller. Here it is at 21″.
Up until now, I’ve kept the tips a little stiff on purpose. I want to narrow the tips, which will weaken them a little. If I weakened them too much before narrowing them, I could’ve ended up with a whip-ended bow.
But I don’t want to wait until the end to narrow them, because it could affect the tiller.
My goal while narrowing the tips is to get the string aligned. There are basically two reasons why a string might be misaligned.
One reason is that the tips are misaligned. Another reason is because the limbs are twisting.
Fixing a misaligned string
I’m going to show you four different ways to fix a misaligned string (a string that doesn’t run through the middle of the handle).
One way is to narrow the tips by removing wood on only one side. Here’s a drawing of the belly of a bow with the string a little misaligned.

To fix it, I would remove the area in blue, which would narrow the tips and get the string close to the middle of the handle. Or you could just deepen the nocks on the blue side.
Another way is to narrow the handle in such a way that the string runs through the middle of it.

Some people leave the handle wide in the beginning for just that reason.
Another way is to cause the limbs to twist (or to untwist if they’re already twisted). The primary reason limbs twist is because of the grain in the wood.
But I’ve inadvertently glued in twisted limbs because the board I did my glue up on was twisted. Tips can also be misaligned because one side of the limb is more narrow than the other side.
Lemme explain that a little. This is a look at the back of an unstrung bow with a centerline drawn down the back of the bow from tip to tip.

Notice that there is more distance between the centerline and the edge of the limbs on one side (the top of the picture) than there is on the other (the bottom of the picture). That makes the thinner side weak.
Although the tips may be lined up when the bow is unstrung, they will not be lined up when you string the bow. When you string the bow, the tips will move in the direction of the arrows, bending toward the thinner (weaker) side, and the string will not line up through the center of the handle.
You can fix that problem simply by removing wood from the thicker side until the tips line back up and the string runs through the center of the handle. Be careful, though, because doing so will affect the tiller some.
You can use this same technique if your limbs are twisted–whether because of the grain or because you accidentally glued in some twist with a warped form.
Here is a look at the belly of a bow that is strung.

Either because of twisted limbs or because one side is thinner than the other when measured from the centerline to the edge, the string is misaligned when the bow is strung.
To fix the misalignment, you can remove wood from the edge as indicated in the picture, and the string will line back up.
I have actually experimented with this procedure quite a bit because I made several bows in a row with bad misalignments because I had a twisted form I used to glue the bows up on. So I know this technique works great.
There is one other technique mentioned in one of the Traditional Bowyer’s Bibles. I can’t remember which one.
Basically, they recommend simply shaping the handle in such a way that it “points” toward the string. Lemme see if I can explain that a little. Let’s say you’ve got a bow that is strung.
The handle is still square because you haven’t shaped it yet, and the string is misaligned. Viewing the bow from one tip, a cut-away would look something like this:
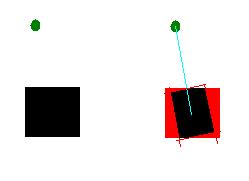
The black square is a cut away of the handle and the green dot above it is the string, which is obviously misaligned to the left.
To fix the problem, you just shape the handle in such a way that it points toward the string, which is illustrated by the picture on the right. You’d remove the area in red, and the string would magically be aligned through the middle of the handle.
Don’t feel like you have to use just one of these methods. You can use a combination of them if you want to.
Continuing With The Tillering
Anyway, I narrowed the tips and afterward ended up with a 1/16″ negative tiller. Keep in mind that it doesn’t matter at this point whether my tiller is negative or positive since I’m free to decide later which end will be the top.
I just want to make sure the tiller is within a 1/8″ difference. Here it is at 21″ after narrowing the tips.
Since the right limb was a bit stiff, I used the scraper near the fade and the tip. I ended up with a perfectly even tiller. Here it is at 21″.

By this time, I had weakened the limbs quite and bit and worried that I wouldn’t make my target weight. I inched the bow one inch at a time until I got to 27″, and it was 30#–way off. Here it is, 30# at 27″.

I ended up with 1.25″ of string follow right after unstringing it.
Shaping the Handle
I only keep the handle square so it will sit in my tilling stick properly and not roll around. But I wanted to have the handle just be kind of a bump on the belly. Having the bump allowed me to round out the handle area without weakening it. I rounded the back, too.
I used the belt sander and a rasp to shape the handle.
Horn Tips
I got a bunch of horn tips from John Beecroft. He has a booth at Canton on first Mondays trade days. He sent them to me in a box which I stuck in the closet for a while.
One day, I had a look at them, and there were little black bugs all over them, so I took them outside. Hopefully, they haven’t put a lot of holes in them.
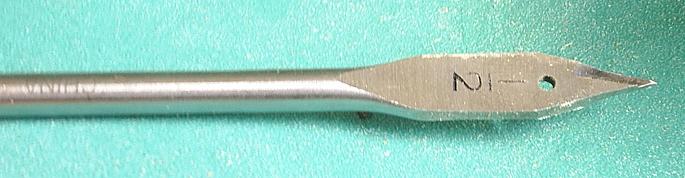
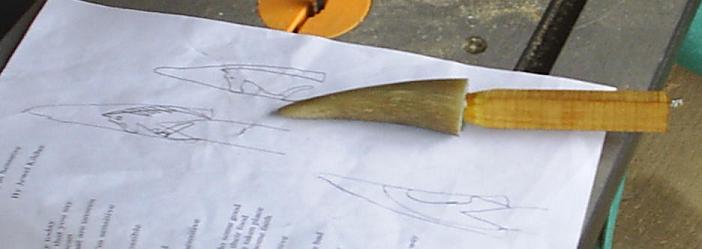
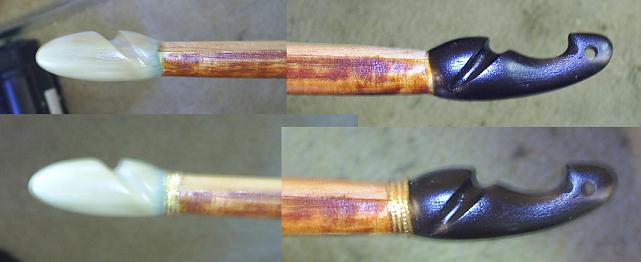
Here are a couple of the horn tips.
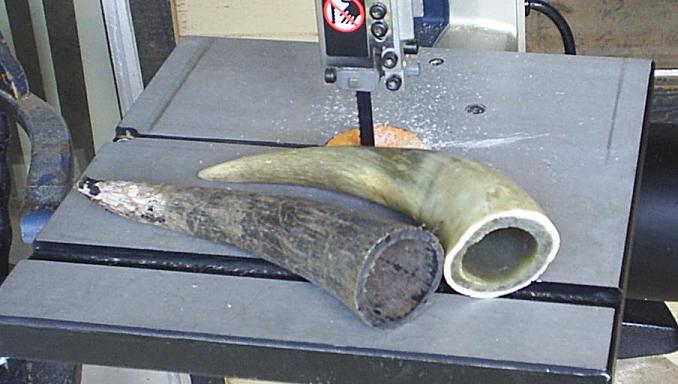
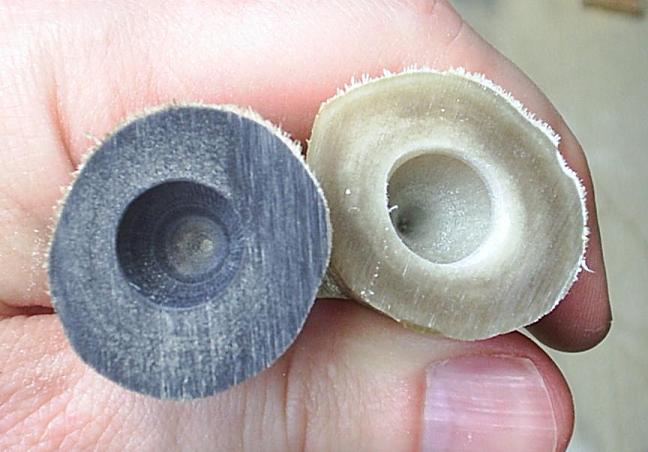
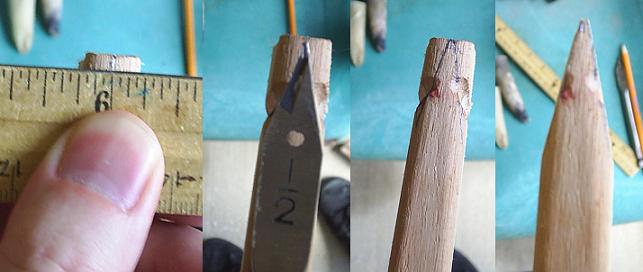
I wanted to use a black one and a white one just to be different. First, I cut off just enough of the horn so I’d still have a little hole.
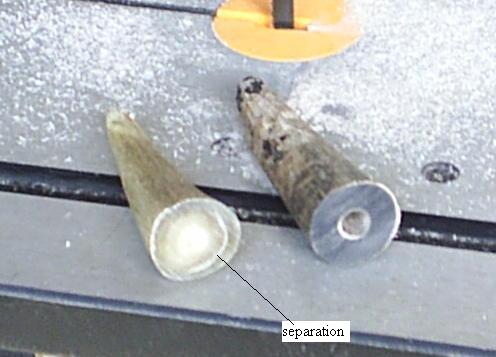
Horn doesn’t smell good when you cut it. The white horn had a wee bit of separation, which I’ve pointed out in the picture since the picture isn’t all that clear.
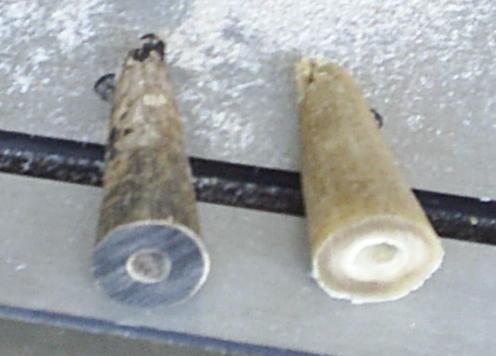
I wasn’t too comfortable with that, so I got another horn and cut it. Here’s the two good ones.
Now I wanted to drill a cone-shaped hole in the horns. In my last ELB build-along, I did it the hard way, but this time, I did it the easy way.
I went to Big Lots and got a 1/2″ spade bit for 79 cents. Then I went to my friend Mark’s house and borrowed his bench grinder.
I wrapped the bit in masking tape, drew lines to continue the points at the ends, and then used the bench grinder to grind the bit into a ‘V’ shape.
I did this last year, so I can’t show you my actual stuff. Instead, I downloaded this picture and drew on it to illustrate what I did.
Here is my actual V-shaped drill bit.
You shouldn’t grind it perfectly square. It needs to have a cutting edge, so you have to grind it at sort of an angle.
The tip part should already be ground at the right angle, so just use that as a guide when you grind it. Here’s an illustration to show what I’m talking about.

Here’s a look at mine.
It’ll get hot while you grind it, and that will soften the metal a little, so keep a cup of water by you and dip the bit in the water frequently while you’re grinding. For some crazy reason, I was intimidated by this procedure before I tried it.
I had never ground anything metal before. But it turned out to be very easy. I went back to Big Lots and got two more just so I’d have some extras to use or give away.
You HAVE to wear goggles while you’re doing this, by the way. Otherwise, you could get hot metal sparks in your eyes.
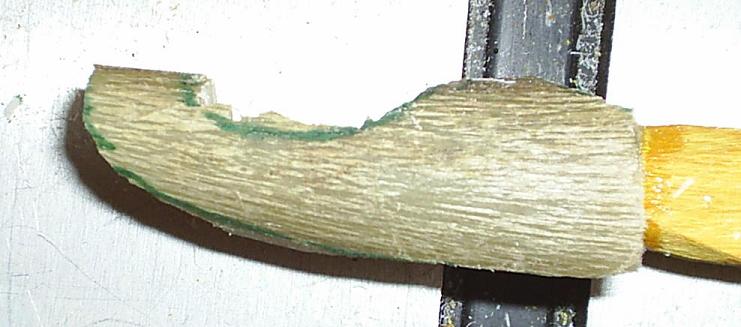
I chucked the bits in my drill, held the horn in my hand, stuck the tip of the bit in the hole that was already in the horn, and I drilled until the V was completely submerged in the horn.
Then I drill just a hair farther. Here’s a look at the holes I made.
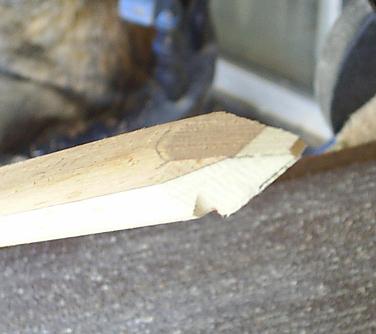
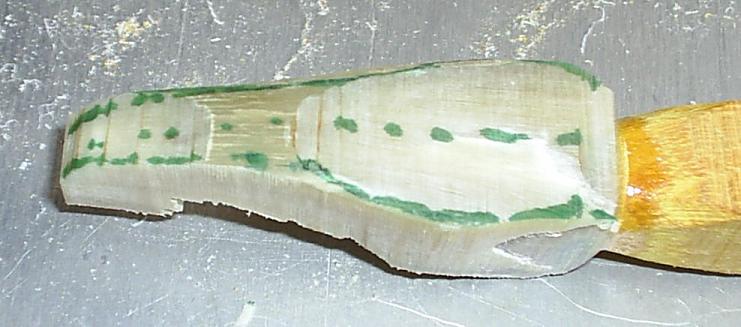
Now I had to shape the bow tips to fit in the V-shaped holes in the horns. First, I found the center on the tip and made a pencil mark.
Then I placed the spade bit on the tip with the tip lined up with the pencil mark.
Next I traced the bit with a pencil. Finally, I used the disk sander and belt sander to sand down to the line.
I did the same thing on the sides and ended up with this.
From here, I use my rasp and file to file the corners round. Some of the notches were still showing, so I decided to move the tip in 1/8 of an inch. That took care of the notches.
I wanted to make a perfect fit, and I couldn’t find any suggestions on the internet, so after racking my brains, I finally decided to try an experiment.
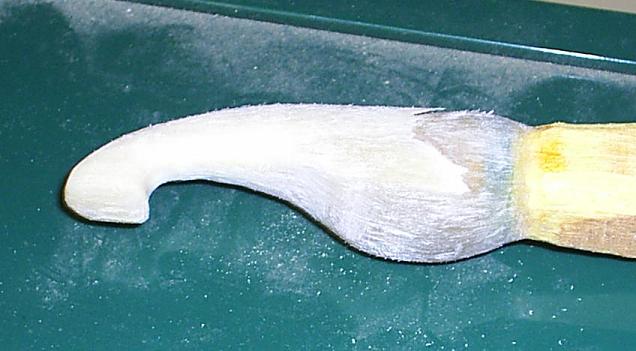
I used a green sharpie to colour the inside of the white horn. I put the horn over the tip and twisted it. Here’s what happened.
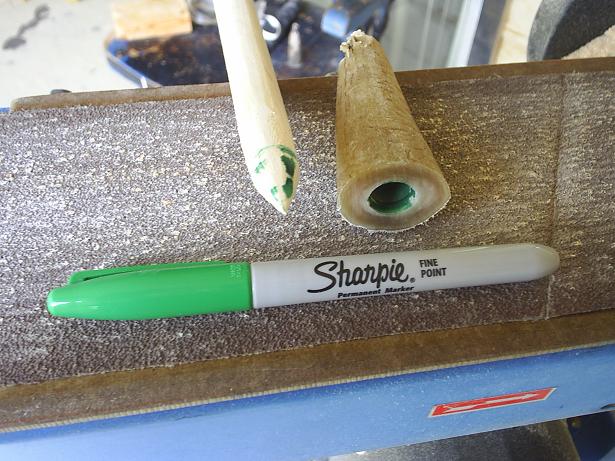
 The high spots on the bow tip got coloured green because they made contact with the inside of the hole. The uncoloured parts didn’t touch the inside of the hole.
So all I had to do was file away the green parts and try again. I did this a few times, and eventually I got a good fit. I could tell I had a good fit because most of the tip got coloured in green.
Before gluing it together, I made sure I had filed away all the green. I’m going to use the white tip on the other side, too, so I glued the black horn on this end.
I’ve heard about people having tip overlays and things pop off after using 5 minute epoxy, so I don’t use that.
I use another epoxy that also comes in a double-barrel syringe, but it takes more like an hour to cure. I’ve used it before for tip overlays and never had any problems, so that’s what I used this time.
Be sure to put glue on both sides and twist the horn when you put it on. That’ll get glue all over the surfaces.
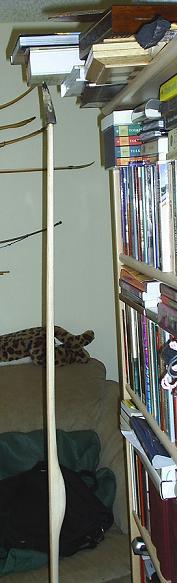
To add a little pressure, I used my bookshelf. I just hung a couple of books over the book shelf and set them on the bow to keep pressure on the tip.
Before gluing the other tip on, be sure to run the bit in it again to get that green ink out of there. It’ll just take a little.
The next step was to go to google and find as many pictures as I could of horn nocks to give me some ideas.
From looking at a bunch of English longbows, I’ve gotten the idea that the bottom one is always just sort of stubby and boring so you can rest it on the ground, and the cool decorative one goes on the top limb.
The problem is I can’t remember which end of my bow was going to be the top limb. I erased the arrow as I was shaping the handle.
I’ve got to shape the nocks a little before I can string it again to check the tiller. What a bummer!
Besides these, I also looked a chess piece–particularly for the knight. I thought it might be neat to carve a horse head.
I also decided to take that other horn tip–the one that had the separation problem–glue it to a stick of wood, and use it for practice. I’ve never carved horn nocks before, and I don’t want to mess them up.
Oh dear! It’s July 31. I need to pay my rent. brb
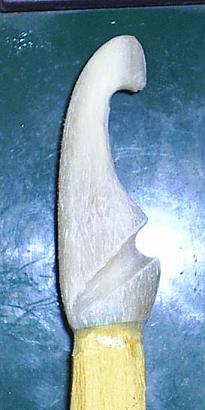
Okay, I’m back. After looking at a bunch of horn nocks and knights, I traced my horn onto some paper and drew different designs in it. Here’s my horn glued to the stick and some of my drawings.
See the two horses on the left? I decided not to do those. I figured I’d start with something more simple, like that hook on the bottom right. I drew the side profile on the horn with my green sharpie and then tried to cut it out with the bandsaw.
Then I drew a line down the middle and traced the front to back profile and cut that out with the band saw, too.
Things were kinda square at this point, so I used the belt sander to round it up a bit.

There’s only so much you can do with a big ole belt sander, especially with that hook, so I used my dremel tool with a sander to work on it some more

There’s only so much you can do with a big ole dremel tool sander doohicky, so I used a rattail file to work on that hook some more, and the area where the wood meats the horn.
Then I cut my nocks, starting
with the triangle file to
establish a cut, then with
the rattail file.
You’re supposed to be able to buff it to make it shiney, but I don’t have anything to buff it with. Maybe if I had one of those little buffer attachments with my dremel tool, I could use that. But I just sanded it and sprayed some Deft on it. Here’s the end product.
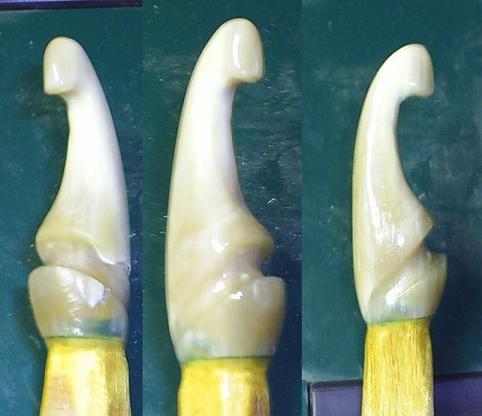
Horn is easier to work with than antler, I’ve discovered. Antler is like rock. This turned out to be easier than I thought it would be.
I don’t think it’s going to be as easy when I do it with the bow, though. You see with this horn glued to the stick of wood, it was easy to twist and turn in my hand as I worked with it.
It won’t be so easy when I’ve got a whole bow attached to the horn I’m working on. It makes me think maybe I should start shaping my nocks before gluing them on.
I guess there’s no point in going through the individual
steps of how I did my actual nocks since it wouldn’t be
much different than what I already showed you.
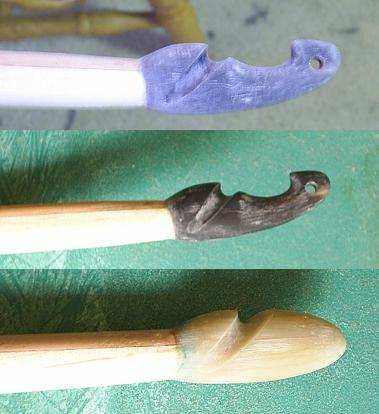
Here’s the nock’s before and after sanding, and the bottom one is the ugly bottom nock. Isn’t it weird how sanding it made it change color? Even the pecan backing changed color!
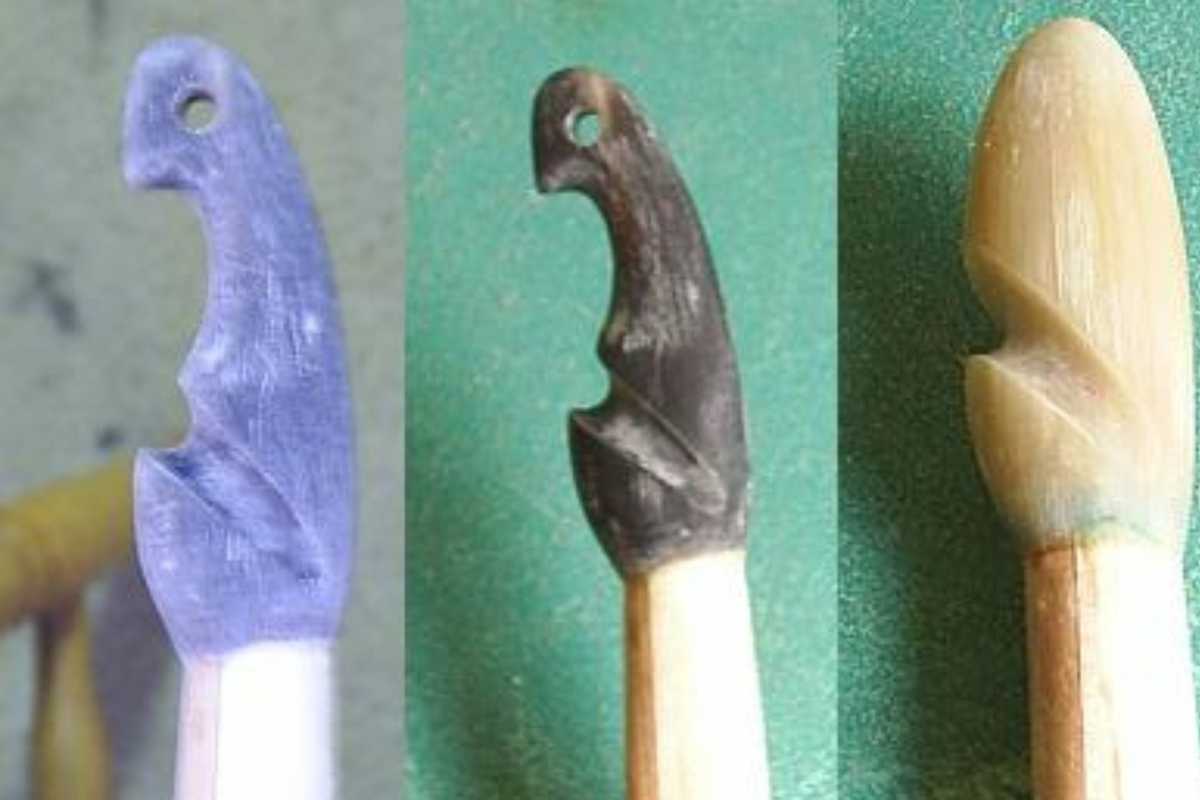
That hole I drilled in there is for a string keeper.
Since I forgot which end was up, I was worried the tiller would be messed up when I strung it, but I got lucky. It has less than a 1/8″ positive tiller. If I had been thinking,
I would’ve done these tips before I finished tillering. I’ll try to remember that next time.
I also used a piece of that horn to glue on a strike plate.
I used a dark brown leather dye I got at a shoe repair store to stain the maple part of the bow, but I don’t think that was such a good idea. It looked much better when it was just plain maple.
After staining it, I sprayed about five coats of Deft on it. I went to Walmart and got some metallic braid ribbon type stuff I found between the hobby section and the fabric section and wrapped it around the base of the nocks and secured it with super glue.
Here’s a before and after shoot.
Isn’t it weird how putting the ribbon on there made the nocks blurry?
I also used that ribbon on the handle, which is actually what I got it for. I looked at a whole lot of pictures of English longbow handles on the internet, and most of them had this decorative sort of lace wrapped around it.
I didn’t know what it was, so I asked the fine folks on the Leatherwall and searched the internet some more and came up with this. Here’s a picture
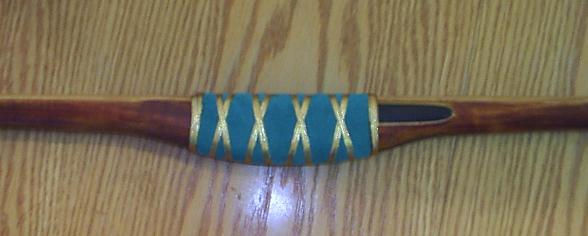
That green leather is just wrapped on there and attached with barge cement. I got that leather for dirt cheap at the Goodwill. It used to be part of a green leather skirt.
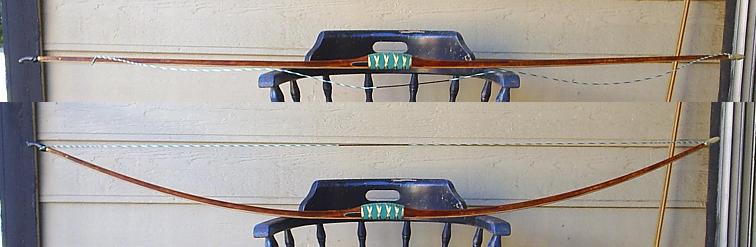
Here’s some final pictures of it.
Interesting how earlier I thought it needed to bend more toward the fades, and now I think it’s bending too much toward the fades and too little out toward the tips.
Oh well. That’s what I get for being out of practice for so long.
Thank you for joining me on this wild adventure. This was my second English longbow, and I have become quite enamored with them. I think I’ll make another one.
Disclaimer: Sam Harper owns the rights to this article’s images and written content. All requests for the use of Sam’s work must be submitted through him directly. This way, he can ensure that his work is used respectfully and by copyright law.


Conversation | 1 comment:
thank you Sam. it was interesting to read your story. nice looking bow , by the way