
I have two goals with this build along. First, I want to show how to make a cheap bow with the bare necessities. Second, I want to make the build along idiot proof. Wish me luck!
When I say, “bare necessities,” I suppose you may be thinking in terms of stone tools or something, but let’s not get too crazy. These are the tools I first got when I started making bows. It’s a little more tiresome than using power tools, but you can still make a bow.
Instead of giving a grocery list of tools and supplies you need right up front, I’m just going to introduce stuff as we go. The first thing I’m going to introduce is wood.
Choosing Your Wood
The reason I used red oak in my first bows is because (1) it’s pretty cheap, (2) you can find it just about anywhere, and (3) it makes a decent bow.
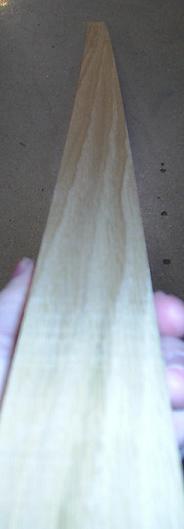
I went to Home Depot and found some red oak that was the perfect size. The little sticky lable on it says it’s a 1x2x6. In reality, it’s 3/4 inch thick, 1.5 inches wide, and 6 feet long.
You may find yourself sorting through 50 boards to find the perfect one, but it’s all worth it. There’s a few things you need to look for.
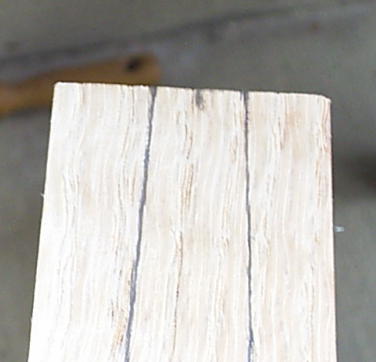
First, you need to make sure you have a piece with thin early growth and thick late growth.
The early growth is pourous and quite weak. If you have too much of that, the bow will be more likely the break. The late growth is more dense.
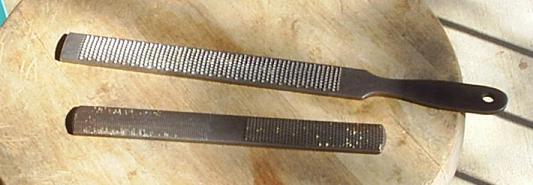
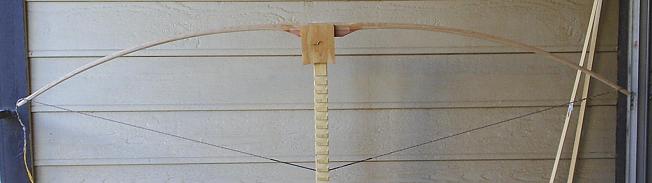
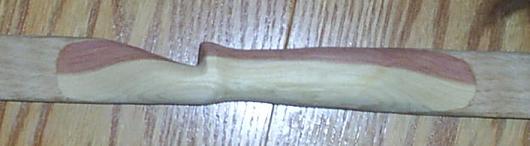
Looky here at the ends of these two pieces of red oak:
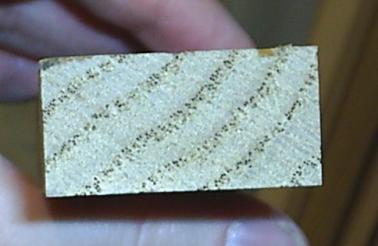
The one on the left is good. The one on the right is bad. Another way you can tell is that the one on the left will be heavier than the one on the right because it’s more dense. You want nice thick late growth rings, not a bunch of thin ones.
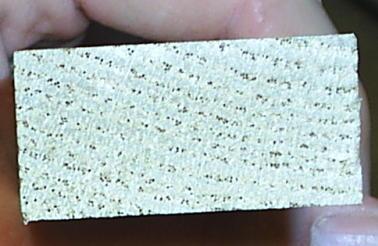
The next thing you should look for is a stick of wood with really straight grain. You have to look at the side of the board to see this.
The best way to tell the grain is straight is to look at the rings. Ideally, you’d like to find a piece of wood where the growth rings runs all the way down the side of the board from end to end without running off to the side or something.
You should look at all four sides, but most importantly at the 3/4″ sides. Of course it is highly unlikely that you will find the perfect board with perfect grain, but you want to get the best you can find.
If you happen to find one with absosmurfly perfect grain, then you don’t necessarily have to back the bow. The worse the grain is, the more you need to back it.
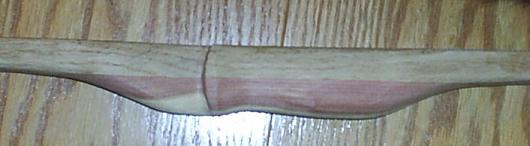
Here’s a look at the 1.5″ sides of two boards–one good, the other bad.
The one on the left is bloody awful. Boo! Hiss! The one on the right is not perfect, but it will do with a backing. In fact, I bought it.
Another little clue I’ve noticed is that the deeper red the red oak is, the better it is, and the lighter in colour, the worse.
The darker red wood is also more heavy than the lighter coloured wood, so I guess it’s more dense.
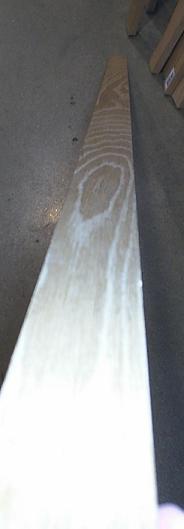
Lastly, try to find a board that isn’t warped. Of course if it’s warped from back to belly, that’s fine. That’ll give you a little reflex, which will result in less string follow when you’re done provided you make the concave part the back and the convex part the belly.
But try to avoid boards that are warped from side to side. That will make it difficult to get the tips lined up so that the string is centered on the handle. If the board is slightly warped from side to side, you can still use it.
I’ll explain how to deal with that later. But try to find a board that isn’t warped if you can.
Oh yeah, one last thing. No knots!
Sort through the whole stack, get the best one, and be on your way.
A Little Theory
If you were to take a board with uniform dimension throughout its length and bend by putting pressure on both tips and in the middle, the board would bend the most in the middle and hardly at all toward the tips.
Since most of the bend would be concentrated in a small area in the middle, it would be most likely to break in the middle. If you want to bend the piece of wood by the same amount without the wood breaking, you’d have to find a way to distribute the load so that each part of the wood does the same amount of work. That reduces the stress on any one section.
Obviously, the thinner the wood, the easier it bends. If a perfectly parallel piece of wood bends the most in the middle, then to get the wood to bend evenly all along its length, you’d have to have it thickest in the middle and tapered toward the tips.
That’s where “roughing it out” comes in. When your bow is finished, it will be tapered from the handle to the tips.
It can be tapered only on the belly; it can be tapered only on the sides; or it can be tapered on both the sides and the belly.
Since we know already what the basic shape of the bow will be, we can cut out a lot of work by roughing it out. That is, we can taper it to begin with before we even start tillering it.
The question is, what dimensions should we use? Well, every piece of wood is different, and every bow is different.
The best way to determine what your initial dimensions should be is to practice and see what works best.
But if it is your first bow, it never hurts to have a set of preconcieved dimensions that somebody else has figured out. Keep in mind, though, that these are just guidlines. You don’t have to do it like this.
Roughing Out The Dimensions
For this build along, I’m going to use a piece of red oak that is 72″ long, 1.5″ wide, and 3/4″ thick.
The first thing you should do is find the exact dead center of the bow. That means you have to find the intersection of the center of the length and the center of the width.
Since it’s 72″ long, you know the center is going to be at 36″. But just in case you ever use anything different, there’s an easy way to find the center without measuring the length and dividing by two.
Put the yard stick flush against one end, and mark the wood at the other. Then do the same thing on the other end. Now you will have two marks that are closer together. Hopefully, they are within 12 inches of each other.
Now just put a ruler on them and center the two lines on either side of the ruler. Put a mark at the 6″ spot. That’s the center of the length.
The center of the width is found by centering the ruler on the width and marking the wood at the 6 inch mark. Now you should have a + sign at the dead center of the bow.

I put a “C” on there since this build along is idiot proof.
It’s very important when making a bow that the tips line up perfectly through the handle. It could be that your board is just a little bit warped from side to side.
If so, then you can’t just center the tips on either end. Doing so will result in tips that are misaligned, the string will be misaligned, the bow will twist, and it will have a better chance of breaking.
There’s a better way to get the tips lined up perfectly. Just run a string along the length of the bow and hang weights off either end.

I’m using squeeze clamps for weights. Now tweek each end, trying to get the string as close to the middle of the ends as possible while making sure it runs straight through the dead center of the bow.
Now make a mark on each end right under the string. You can use these marks for reference points when you draw your tips.
Now here’s the dimensions I’m going to use for this build along.
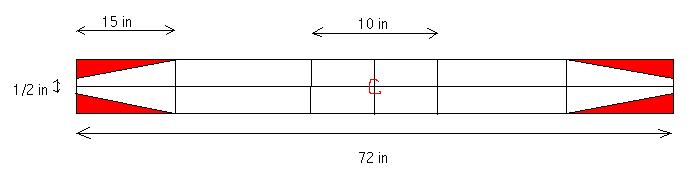
The area in red will be removed. I’ll explain how later. After you remove the red, sort of smooth over that transition so there isn’t that sharp turn. Know what I mean? Just sort of round it out.
Remember that these are just guidelines. For example, you don’t have to taper from the 15″ mark. I’ve done it anywhere from 12″ to all the way back at the handle.
Speaking of handles, that’s what the 10 inches in the middle are for. I’m going to glue on a 10″ riser.
Some people may go a little wider at the tips. That allows you to tweek the tips later in case you need to bring the string closer to the center of the handle.
You could do that by shaving wood off one side, making the tip more narrow. Do whatever works for you.
Warped Wood Woes
What do you do, though, in a situation where your wood is really warped from side to side? Well, one thing you could do is steam and clamp it back into shape.
But here’s another method. Just lay the string with the weights along the wood like before, and make sure the string runs through the dead center of the bow. Then make marks at the tips under the string.
Then draw a straight line from the tip to the center of the bow on both ends. Now you should have a perfectly straight line from tip to tip that runs through the center of the bow.
At various intervals, measure the distance between the center line and the edge of the board. Then put a mark on the other side of the center line that is equal in distance. Do this on both limbs so that the intervals are the same and the widths are the same.

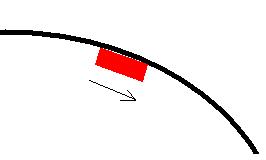
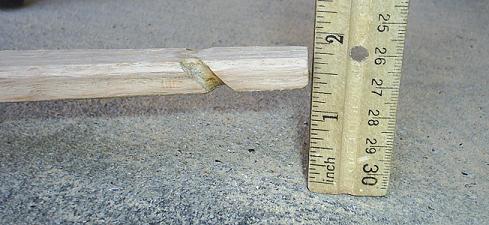
If your board is anymore warped than what I have in this picture, then you have to either (1) make the bow shorter, or (2) use steam or some other method to straighten the board out.
Remove the red part.
Wood Removal
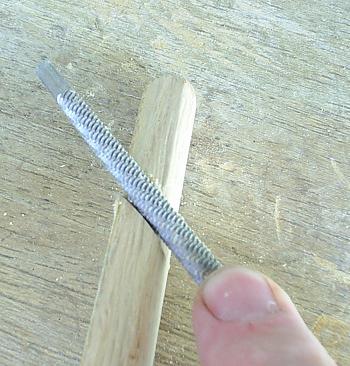
Now I get to introduce the first tool (besides a pencil and a yard stick which I smuggled in earlier without you noticing).
This first tool is called a Stanley surform rasp, and you can get it at Lowes, Home Depot, or wherever.
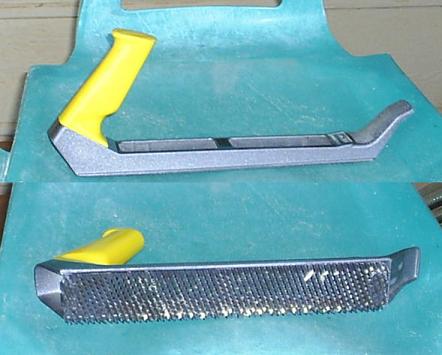
It’s got a removable blade, and they’re easy to change out. When I first started making bows, I used this tool for just about everything. I used it both to rough out the bow, and I used it for all my tillering–even fine tillering. It was very handy.
When you use this surform, you should only use it in one direction. If you stroke the wood in one direction, and then drag it back in the other direction, it will dull the cutting edges, and you’ll have to replace it sooner.
So just stroke the wood in the cutting direction, lift it, and start again. It will last longer that way.
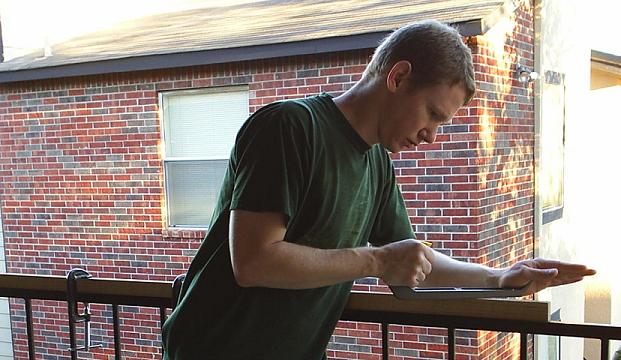
If you live in an apartment like me, then you probably don’t have a work bench, a vice grip, or even anywhere to put one.
You still have to figure out a way to hold the bow while you work on it, though. Since you don’t have a vice grip, you have to make due with what you’ve got. That’s simple enough.
This is called the Sit-on-it method.
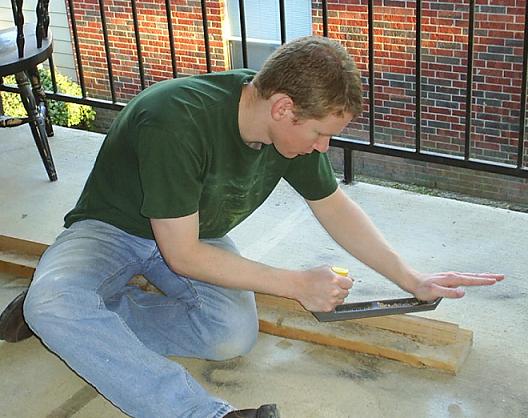
You see? I’m just sitting on it. I put a pine board (which I got for free out of a dumpster at a construction site) under it for two reasons.
First, it lifts it off the ground a little, which makes it easier to work on. Second, it keeps me from dragging my knuckles on the concrete of my balcone. Notice how my left hand is open.
That’s also to prevent my knuckles from dragging on the concrete. I’ve done it so many times that I started wearing a glove on that hand to help even more.
I don’t have the glove on in this pictures because I’m not really using the rasp. I’m just posing for the picture. If you don’t have a balcone, you can even do this on your kitchen floor. It makes a lot of little shavings, but they’re quite easy to sweep up.
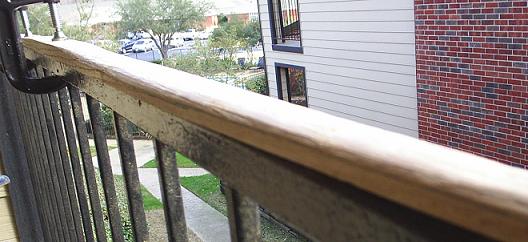
If you’ve got a rail on your balcone, and you’ve got a couple of C-clamps, then I highly recommend the Clamp-it-to-the-rail method.
This is far easier and much less tiring. Notice that I’ve got TWO clamps on there.

Two is better than one, and keeps the bow from turning while you shave wood off the corners. I put them on upside down so the stem doesn’t get in my way.
After making about five bows with your Stanley surform rasp, you might start thinking about getting a bandsaw. It makes the work much easier.
The Stanley surform is tiresome, but it gets less so the more bows you make. The first bow took me three hours to rough out. By the fifth bow, I could do it in about 45 minutes.
Anyway, cut on down the to the line and then turn the page.
Continuing with the roughing out
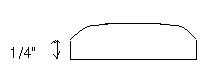
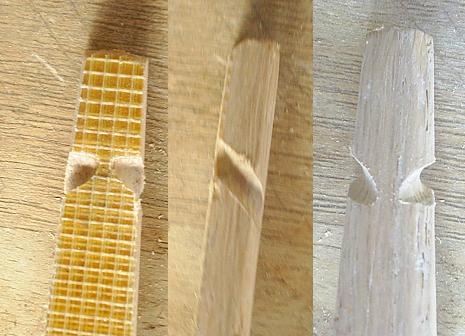
Now that you’ve got the side’s roughed out, you’ve got to get the belly roughed out, too. This is a little tricky to explain, but here’s a diagram:

The red part should be removed. Now let me explain that line I have drawn 1/4″ from the back along the side. You see, it’s easier to remove wood from corners and rounded surfaces than it is from wide flat surfaces with the surform. So what I do after I remove the red part is sort of round the corners. I use that line along the side as a guide when I shave off the corners. That’s how far I go down. Here’s what a cross section of a limb would look like:
And here’s what the wood looks like:
This creates a sort of rounded belly. It makes it much easier to remove wood from the belly as you tiller. If you ever get a band saw and a belt sander, it isn’t necessary to do this. Of course it isn’t necessary to do it with the surform either; it just makes life easier.
I still want to leave the handle area square, so I sort of just gradually round those corners as I move away from the handle. I don’t know if I’m explaining that well or not. After I glue on the handle riser, then I use a rasp to bring that roundness from the limb into the riser. I’ll show you what I mean later.
Gluing on the riser
The next thing is to glue on the riser. I used to do this before I did the roughing out, but the riser gets in the way a little when you’re trying to rough out the belly.
The riser is optional. You could leave the riser off and make a bow that bends through the handle. Having a riser allows you to make the handle more narrow and comfortable. It also allows you to cut an arrow rest. The last thing you ever want to do is cut an arrow rest in a bow that bends in the handle. It’ll break for sure.
Anyway, I use a piece of wood 10 inches long and about as thick as the board, which is 3/4″ thick. If you want to put a little more contour in your handle, you might want to use a thicker piece of wood. You can also use a few layers of thin wood and glue those on.
That’ll add a little pizazz to your riser. In this case, I’m using a piece of cedar so the handle will be half sap wood and half heart wood. I think that’ll look cool. You can use just about any kind of wood you want–another piece of red oak, a piece of poplar (which you can also get at Home Depot or Lowes) or whatever.
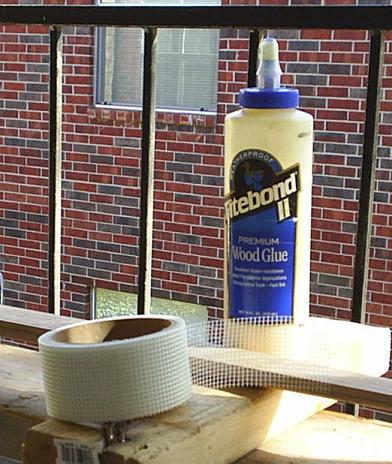
I use Titebond II wood glue to glue the riser on. Be sure to put the glue on both surfaces. Putting it on both surfaces ensures there will be no dry spots. And remember that too much is better than not enough.
Spread it on with your finger so that it covers the whole surfaces to be glued. Don’t worry. Titebond II washes off easily with water as long as it hasn’t dried. Once you have it clamped on, glue should ooze out everywhere, and you can just wipe it off with a paper towel.
I use three C-clamps. Two is enough. This is a little tricky to do with just one person, because as you’re trying to tighten the clamps, the riser will start sliding around. It’s much easier if you have two people–one to hold everything together and one to tighten the clamps.
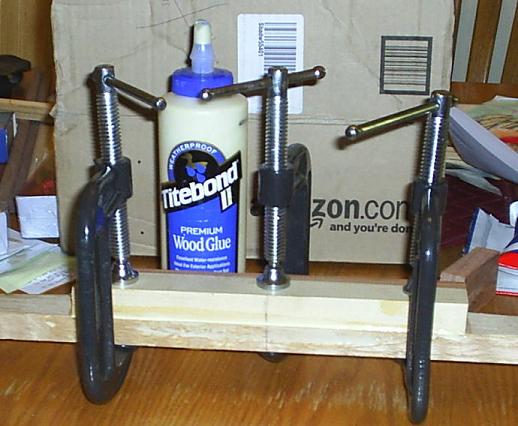
Notice the pencil mark in the middle. I put that in the middle of the riser and the middle of the bow. Then I just line them up while I clamp the riser together. Clamp firmly, but don’t clamp so hard you squeeze all the glue out of the joint.
Let that dry until tomorrow.
Roughing Out the Handle
Then you can rough out the handle. Here are the dimensions I use.

You see how that 1/4″ line along the bow sort of curves up toward the handle? That’s what I meant earlier when I was talking about gradually rounding the corners as I move away from the handle which I left square.
You can remove that red part in one of two ways. You can either use a rasp or you can use a saw. A saw is much easier.
Just be careful not to saw into the limb of the bow. You can saw most of the corner off and then use the rasp and file to go the rest of the way, blending it into the limb.
Lemme introduce a new tool.
Looky there at the one on the bottom. That there is a Nicholson 4-way rasp file. It has four surfaces.
On one side, it is flat with a rasp on one end and a file on the other. On the other side, it is rounded with a rasp on one end and a file on the other. It’s a very useful tool and I highly recommend it.
Now look at the one on top. The only reason I have that one is so I can use both hands and remove a lot more wood in a shorter amount of time.
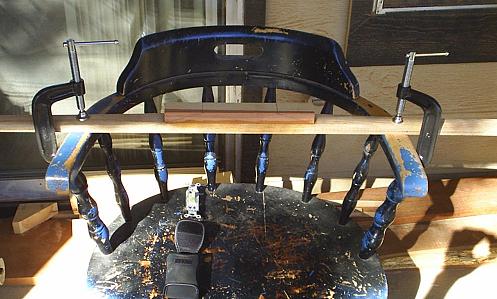
To use both hands, you need to clamp the bow somewhere. A vice grip would be ideal, but I don’t have one of those. Instead, I clamp it to a chair.
If you don’t have a chair or C-clamps, you can just hold it in your lap and rasp. It’ll take longer, but you can still do it. Just be careful not to rasp your hand. That hurts.
Remember when you use a rasp to only stroke the wood in one direction. Don’t drag the rasp backwards or it will become dull.
Whether you use a saw or rasps to remove the area in red, the next thing to do is use the rasps to sort of make the fades dish-shaped so that it blends into the limb gradually. (You’d be amazed at how much easier that is to do with a belt sander!)
Then rasp away all the corners in the handle area so you can grip it without it being too uncomfortable. I leave the belly of the handle flat so it will sit on my tiller tree without rolling.
I wait till after I finish tillering before I finish working on the handle. That way I can make any adjustments I need to make if the string isn’t perfectly lined up through the center of the handle. More about that later.
I used to wait until after I tiller before cutting an arrow rest. That way if one limb bends a little more than the other, you can use that limb for the top. That’s what I’ll do with this bow.
There’s a reason you’d want the top limb to bend slightly more than the bottom. It’s because the arrow rest is going to be a little above center, so the string will be drawn a little above center.
Having the top limb be slightly weaker evens out the tiller when you draw.
Applying a Backing
I said earlier that in the unlikely event that you should find a board with perfectly straight grain (where the rings on the sides do not run off to the side but continue in a straight line for the whole length) that you don’t necessarily have to back your bow.
But if you’re making a bow for the first time, I think you should back it anyway. It’s better to back it and not need to than to need to and not back it. You don’t want to break your first bow.
The purpose of a backing is to create one continuous smooth surface on the back of the bow. You see, the back of the bow will be under tension.
If you have run-offs in the grain, a splinter could easily lift there. Once a splinter begins to lift, it creates a weak spot, and the bow will surely break.
The backing prevents any splinters from lifting.
There are plenty of other backings you could use (e.g. silk, linen, etc.) that you can get for pretty cheap, but I’m going to use sheetrock tape (otherwise known as drywall tape) and wood glue.
There are some advantages and disadvantages to using sheetrock tape.
Advantages
1. It’s dirt cheap. You can back several bows with one roll.
2. It’s readily available. You can get it at just about any hardware store like Lowes, Home Depot, or whatever. (It doesn’t matter what colour you get, by the way.)
3. It’s very easy to apply.
Disadvantages
1. It’s made of fiberglass. If you use a file or a belt sander to trim the edges, you can get fiberglass splinters that will cause the itchies.
2. It uses a lot of glue.
3. It’s kind of ugly.
Okay, the first thing you should do is lay your bow down with the back facing up (See? This tutorial is idiot proof!).
Try to lay it down on a level surface, because the glue will drift to one side if you don’t. I lay it down on a pine board I got out of a construction site dump. This way, I don’t mind if any glue drips on it.
I put smaller pieces of pine under the ends since the handle in the middle would cause it to “see saw” otherwise.
Then you need to measure out three pieces of sheetrock tape just a little longer than the bow. It’s sticky on one side, so I just stick a piece on the back of the bow, cut it off, unstick it and set it aside. Then I do the next piece, and then the third.
Next, squeeze a healthy stream of glue all along the back.

Don’t be stingy with the glue. Once you have that stream of glue, spread it across the width of the bow with your finger. Make sure you cover the whole surface. Then take one strip of the sheetrock tape, start at one end of the bow and begin laying it down on the back.
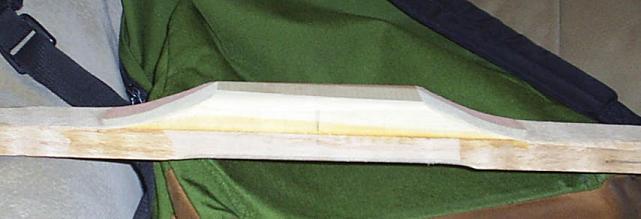
Once you get it on, start at the handle and, using your finger, smooth it down to the tips. The glue should saturate the mesh and look something like this:
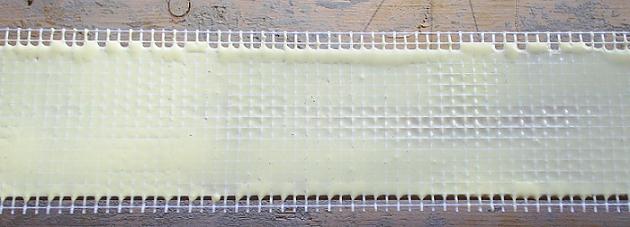
If you don’t have enough glue, add a little more until you do. Then next time you’ll have a better idea of how much you should put on there in the first place. Be sure there are no places where the sheetrock tape buckles or warps or anything.
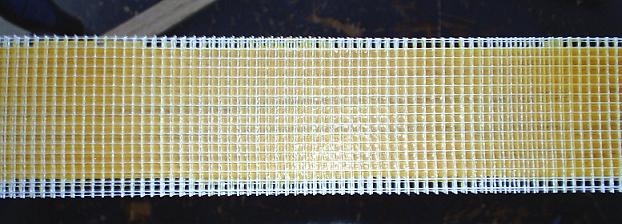
Let that sit for about 10 or 20 minutes–enough to create a slight film–and then add your second layer. Use a stream of glue, spread it, apply the backing, and smooth it down.
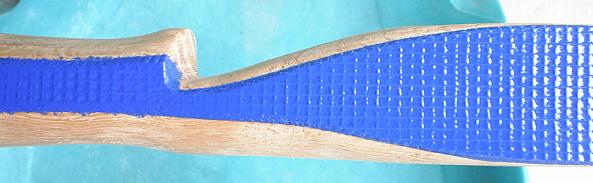
Let that sit for another 10 or 20 minutes, and then apply the third layer. Once you’ve got it all on, let it dry at least 24 hours. Here’s what it looks like when it’s dry.
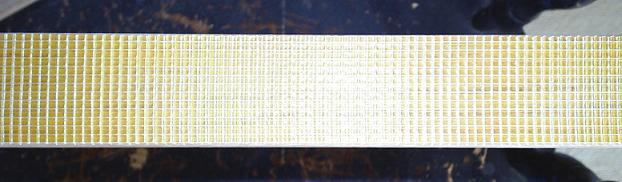
Now ya gotta trim the edges. You can do that with the surform, an exacto knife, or a box cutter, but it’s much easier with that handy dandy four-way file/rasp I showed you earlier.
You might want to wear gloves, though. That’ll keep your hands from itching from all the fiberglass. Don’t be afraid to take a little wood off with the tape.
You don’t want to have a sharp corner anyway. Having the edge radiused will help prevent splinters from lifting. Once you get it all trimmed and stuff, sand the corners. Here’s a final look-see.
Cutting the Nocks
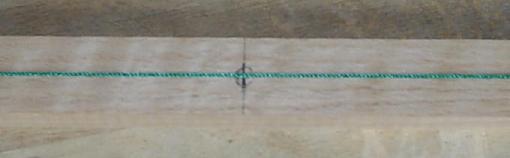
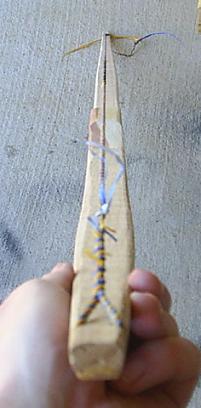
Next thing ya gotta do is cut nocks for a string. Draw a line one inch from the tip.
Since the overall length of the bow is 72″, and you cut your nocks an inch in on both ends, the bow will be 70″ nock to nock.
You want to cut the nocks at about 45 degrees so when the bow is strung, the string doesn’t have to bend around any sharp corners. Using the line on the back of the bow as a guide, I begin my cut with a triangle file.

Using the triangle file allows me to start a groove without it slipping and sliding all over the place. You can have that problem if you start with a rattail file.
Once I have a groove cut with the triangle file, I cut the rest of the nock with a rattail file.
Make it round toward the back and the belly so the string doesn’t have to bend around any sharp edges.
When you cut the other side, look at the line on the back and where you cut the groove to the belly, and use those as a guide so that your nocks are even. Work your file around to the belly so that it matches the other side.
Don’t cut it too deep, because you may need to make adjustments later on. Just cut it deep enough.
Tillering preparations
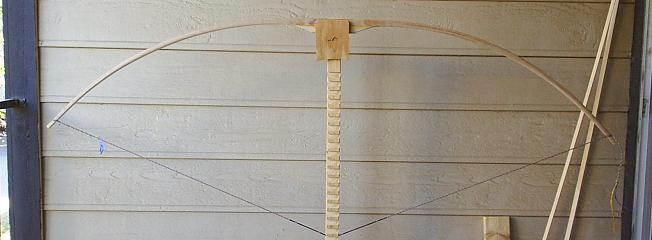
There are two more tools you need to tiller your bow. The first is a tillering tree (or stick or whatever you want to call it).
It’s just an upright doohicky with a notch at the top to set the bow in and notches all down its length to put the string in.
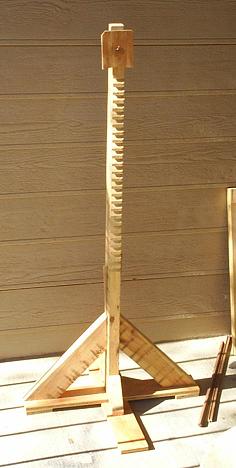
This device allows you to draw the bow to various lengths, stand back, and examine the bend in the limbs to see what needs to be worked on.
I made this out of some pine I got out of a construction site dump. Cutting all those notches is be very tiresome if you’re using a hand saw. There are a couple of alternatives.
Alternative 1: Instead of cutting notches, drill holes with a 3/8″ drill bit and stick 3/8″ dowel pegs in there. Do it at an angle so they point down making a hook. That way, the string doesn’t slip off.
Alternative 2: Use nails. My old tillering tree used three nails in place of each notch. One nail wasn’t strong enough, so I used three. If you use three nails, don’t put them in a perfect horizontal line.
If you do, the middle nail will carry no load, and all the load will be on the outter two nails. Instead, hammer them in a sort of “V” shape so all three nails carry some load.
Hammer them in until just enough sticks out that you can put a string on there. And do it so they form sort of a hook pointing down. Know what I mean?
Now lemme show you the top where the bow goes.
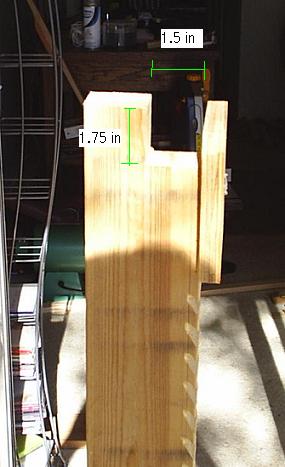
I’ve got that notch cut 1.5″ wide because that’s about how wide most of my bows are before I do the final shaping on the handle.
I nailed that other pieces of wood on there to make sure the bow doesn’t accidentally slip out.
Now lemme explain why I made the notch 1.75″ deep. You see, there’s a standard for measuring draw length. Draw length is measured from 1.75″ forward of the deepest part of the handle.
That’s called the AMO length. By making the notch 1.75″ deep, I can set the handle down in the notch, and the top of the board will be 1.75″ above that. The notches I cut for the string are all measured from the top of the board.
So, for example, the 6″ notch is not 6″ from the bottom of the top notch. Rather, it’s 6″ from the top of the board. Does that make sense?
Speaking of notches, those notches along the board start at 6″ and go to 31″. So far, I haven’t made any bows with a longer draw length than that.
They are all cut 1″ from each other, and they are all labled.
I must warn you that some people think this sort of tillering tree is a bit dangerous. While pulling the string down to a notch, the bow could break and hit you on the head.
There is a better way. What a lot of people do is attach something to a wall or an upright sturdy beam or something to sit the bow in.
Then they attach a pully somewhere below that. That way, instead of being up close to the bow and pulling on the string, you can stand away from the bow and use the pully to pull on the string.
Here’s a video showing how to set up a tillering tree with a pulley system.
There are some great advantages to the pully system. First, it’s more safe because you aren’t so close to the bow when it’s being pulled.
Second, it allows you to see the limbs bending as you pull them. You can do that with my tillering tree, but you don’t have the same vantage point.
The pully system is far superior. The problem is that I live in an apartment, and I don’t think they’ll let me nail stuff to the wall on my balcone.
There is another way to watch the limbs bend, though. If you having a big mirror, you can stand in front of it while pulling on the bow and watch the limbs bend.
Or, if you have sliding glass windows on your balcone, you can stand in front of it and watch your reflection as you pull on the bow.
I have tillered bows completely using this method without ever using any tillering tree at all. That’s how I did my English longbow. It’s not the best method in the world, but it’ll work.
The next thing you need is a tillering string. I use a long Flemish string with a Flemish loop on one end and a timber hitch on the other.
The tillering string has to be long enough so you can put it on a bow and have it be slack.

The timber hitch allows you to adjust the length of the string. That way when you get ready, you can shorten the string and brace the bow.
Bad Tillering
Before we start tillering, lemme tell you what tillering is all about. Tillering is what turns a stick of wood into a bow. It’s really the crux of the whole bow-building enterprise.
The whole point of it is to get the limbs to both bend evenly, to get the shape you want, to get the the bow to the weight you want at the draw length you want, and to do it all without breaking it.
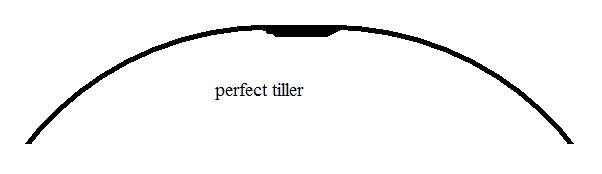
“Bending evenly” means two things. First, it means both limbs bend by the same amount. One isn’t stiffer than the other.
(Actually, a lot of people [myself included] like to have the top limb bending slightly more than the bottom limb).
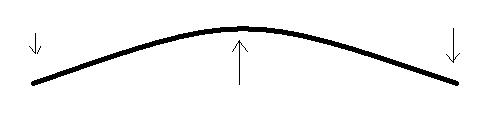
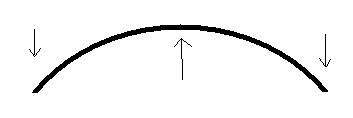
Second, it means the flex is distributed evenly along the limbs. A perfect tiller will look something like this:
Let’s contrast that with a few examples of imperfect tillers. Some of them have names, but I don’t know about this next one. I’m posting this one because for a long time, I had a bad habit of tillering bows this way.

The problem is that most of the flex is happening near the fades, and the rest of the bow isn’t doing much work.
This causes excessive set, puts too much strain on too small a part of the limb, and reduces the life of the bow. Of course if you’re doing a reflex/deflex bow, this kind of tiller ain’t so bad.
Definition Detour
Since I mentioned “set,” lemme take a detour here and explain the difference between “set” and “string follow.”
First of all, all bows have set. “Set” is when the belly wood gets compressed, and the limb bends more toward the belly than it did before.
Now let’s say you take a bow with 5″ of reflex, and after tillering it, it has 3″ of reflex left. That means it has 2″ of set because it has been deformed by 2″.
But such a bow has no string follow. String follow is the amount of deflex in the bow. If you start off with a perfectly straight bow, and you end up with 2″ of set, it will also have 2″ of string follow.
But if the bow starts off with 1″ of reflex and takes a 2″ set, it will have 1″ of string follow. If you start off with 2″ of reflex and take 2″ of set, the bow will be perfectly straight with no string follow.
And since this tutorial is idiot proof, lemme explain the difference between reflex and deflex. Reflex is when the limb (or part of the limb) bends backwards away from the belly. The belly is the side the string goes on, by the way. Deflex is when the limb (or part of the limb) bends toward the belly.
Back to Bad Tillering
With that out of the way, let’s look at some other bad tillers. This next one is called “whip-ended” because it’s whip-ended.
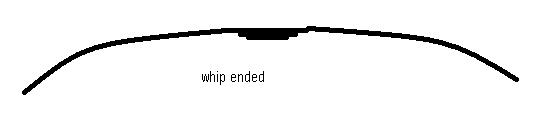
This one has the opposite problem from the whatchamacallit tiller. Instead of bending too much near the handle, it bends too much near the tips.
Some people like this sort of thing, though. It does reduce hand shock. Other than that, though, it has the same shortcomings as the whatchamacallit tiller.
This next one is just an example of a hinged limb.
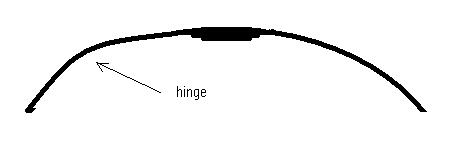
Hinges are bad. It concentrates the strain on that one area of the limb, and it could easily cause your bow to break.
Tillering with the Long String
For this bow, I have chosen to go for 45# at 28″. 50# is about the maximum I would be comfortable with for red oak. I have heard of other people going a lot higher, but they are probably better at making bows than I am.
The lower the weight you go, the less chance there is of breaking the bow, so do give some thought to aiming for 40# if this is your first bow.
If that’s too light for you, you can always give the bow away or just hang on to it for sentimental reasons. I can almost promise you this won’t be the last bow you make.
If you don’t have a bow scale, then you can stick a bathroom scale under the tillering tree. When you pull down on the string, it will register on the scale.
You just need to substract the weight of the tillering tree to get the right reading.
If you don’t have any scale at all, you’re just going to have to go by feel. I went by feel for my first 10 bows or so. You can sometimes find cheap bow scales on ebay. That’s where I got mine.
Unless your CPU is a neuralnet processor, and you have machine-like rough tillering abilities, your bow is not going to be perfect when you first start bending on it. So let’s start off by pulling it just a couple of inches and see what happens.
What do you know! The left limb is bending more than the right. We need to even that out. I do that by removing wood from the right limb, making it weaker so that it matches the left limb.
Now lemme tell you something really important. We’re going to be moving gradually here. The farther you pull a bow, the easier flaws show up.
So if you ever pull the bow to any length and notice a flaw, don’t pull it any farther until you have fixed the flaw. Pulling it farther will just cause the bow to take excessive set.
Take a hinge for example. Obviously, if you keep pulling on a hinge, that little area will take a lot of set. So remove that hinge before going any farther.
So far, I don’t see any hinges or flat spots, so I just need to reduce the right limb some. Whenever I’m just reducing weight from a limb, I do it by holding the surform backwards, starting at the fade, and pulling the surform all the way to the tips.

I also count the strokes. Five at a time is about right. As you get some practice, you’ll get a feel for how many you should do.
If both limbs are even, and I just want to reduce the weight of the bow, counting comes in really handy. I would count how many strokes I did on one limb and then do the same number on the other limb.
That way I’m taking off about the same amount of wood, minus my human error from not having a neuralnet processor.
There’s something else I gotta tell you. Obviously, the harder you pull on a bow, the more the belly wood will be compressed and the more set it will take.
Since we’re shooting for a 45 pound bow, we don’t want to ever pull the bow more than 45 pounds. There’s just no reason to compress the belly more than necessary.
Until I get the bow braced, though, I’m even more conservative than that. I want to tiller with the long string until I get the limbs moving 10″.
As the string dangles there, I pull it taught and notice that the limbs just start to bend when the string is at 10″. That means I want to brace the bow when I get the string to 20″.
And to be conservative, I’m going to shoot for 30# at 20″.
Don’t you worry. That will leave us plenty of strength to get to 45# at 28″ with a full brace. I’m just doing this to reduce strain on the bow and prevent it from breaking.
Here it is 30# at 17″.

Oh, I forgot to tell you something. Your eyes can play tricks on you sometimes. You’ll look at the bow and think one limb is bending more than the other or something, but when you flip it around, the problem goes away.
So it’s a good idea to sometimes put the bow on the tillering tree the other way and look at it. That way you can study it from different angles. That’s what I’ve done here.
Now you have to keep track of which side is which. I just use a crayon and draw an arrow on the handle pointing toward the provisional top limb. That way I don’t get mixed up.
Anyway, I’ve marked on the picture what needs to be done. For hinges, stay away! Don’t touch that area. The only way to take out a hinge is to remove the stiffer wood around it so that it starts bending, which takes the load off the hinge.
You can see how the wood on either side of the hinge is stiffer. Remove wood from the stiff areas to get them to bend more, and stay away from the hinges.
When I look at the bow on the tillering tree, I use a crayon and mark the areas I intend to remove wood from. It helps.
That’s another thing I should tell you about. You’d be amazed at how much more you see when you take a picture. When I took this picture, it all looked just fine to me.
It wasn’t until I looked at the picture on my computer that I noticed the flaws. The flaws aren’t really all that severe, but they sure do show up in the pictures.
So if you have a digital camera, you might keep that in mind. Of course it would take you a lifetime to make a bow if you took a picture and looked at it on your computer every single time you removed wood.
So just take pictures at various milestones.
Whenever you remove wood from the bow, you should excercise the limbs. You see, the surface of the belly undergoes the majority of the compression. When you take wood off the belly, it removes the compressed wood and exposes some wood that isn’t compressed as much.
But it will be. So to show the true effects of the wood removal, you have to get that wood compressed so that it matches the rest of the compressed wood around it. You do that by excercising the limbs. Whenever I remove wood, I excercise the limbs 30 times.
That is, I hold the string and go from relaxed to wherever I happen to be (in this case 17″), and then repeat. I do it 30 times. You should, too. Excercising the limbs also gets the wood used to bending and reduces the chance of breaking it later on. Bows are like shoes. You have to break them in, but not break them.
Since we’re shooting for 30# at 20″, we don’t want to draw the bow more than 30#. Right now, I’ve reached 30# at 17″, so I need to remove wood before I pull it any farther. Unstiffening that left limb and removing the hinge from the right limb will reduce the weight a little.
I’m going to keep it at 17″ until everything looks even. By then, it will be a little less than 30#. At that point, I’ll pull it to 18″ and see how it looks and check the weight. I keep doing this until I get to 30# at 20″.
Here it is 30# at 19″:

The hinge seems to be gone, but the left limb is still a little too stiff.
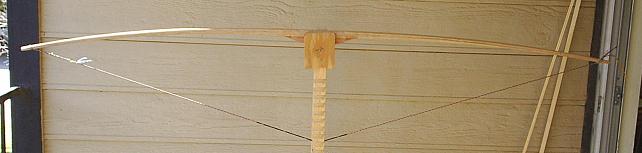
Finally, here it is 30# at 20″.
It looks pretty good to me, so I’m going to brace it. Now I don’t go for the full brace height at first. I shorten the tillering string using my handy dandy timber hitch, and I brace it just a few inches.

I apologize for the lack of constrast. I guess I need a different colour for the background to make these pictures turn out better.
Usually you can see flaws as soon as you brace it that you couldn’t see before. The most obvious flaw I usually see that I didn’t see before is that one limb is a lot more stiff than the other. In this case, I got lucky.
They seem pretty even to me.
When you brace the bow for the first time, you really should use a stringer. Remember this is a sensative time in the bow’s life.
Bows are like children. They are far more impressionable when they are young, and whatever you do to them in those formative years will stick with them their whole lives.
So you want to be careful, and using a stringer is the best way to go. I made a stringer out of some braided nylon chord and some thick leather.
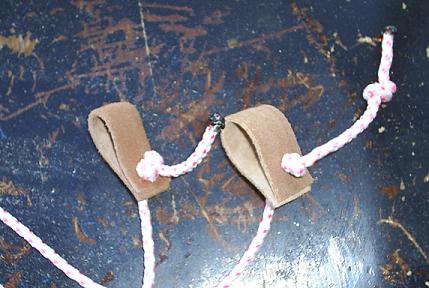
Maybe I’ll post something on my web page some day about how to make stringers and how to string bows. For now, use google and learn how to use a stringer if you don’t already know.
Tillering with a Low Brace
I just got in from tillering the bow. It is completely tillered now. I took pictures as I went along and wrote down the draw weight and length as I went along so I wouldn’t forget which description goes with which pictures.
But there is something I forgot. At various stages, I would notice flat spots or some other little thing I wanted to adjust, and now I can’t remember it all. I’m going to have to make some guesses, so bear with me.
Yesterday (yes, page 8 turned out to be tomorrow after all), we braced the bow kind of low. Maybe it was 3″.
Now what I wanted to do is draw the bow out some more and eventually brace it higher. Since I braced the bow after 10″ of limb travel, I was curious to know what 10″ of limb travel would give me now that the bow is braced.
Since the string comes to 3″, I pulled it to 13″ and got 20#.
And then since I braced it when it was 30#, I wanted to see how far I had to draw it to get to 30#. I ended up drawing it to 17″.
I don’t remember when it was, but at some point, I noticed a couple of flat spots on the right limb. Now lemme explain how I found them.
You see, these flat spots were imperceptible to the naked eye. Instead, I took a short little block of wood about 4″ long and slid it along the belly of the bow.
Do you see that little gap between the black curve and the red block? Well, just slide the block down the limb. If the gap gets bigger then smaller again, that means you found a hinge.
If it gets smaller then bigger again, that means you found a flat spot. It’s a nifty little trick.
Another nifty idea (Dare I say ‘niftier’?) is the tillering gizmo invented by Eric Krewson. It’s basically just a block of wood with a pencil through it that marks flat spots when you slide it along the limb, so you’ll know where to remove wood.
Simple and effective. It only works on straight bows, though. It doesn’t work on reflex deflex bows or bows with a lot of character.
Anyway, remember that whenever you find any kind of flaw, you don’t want to draw the bow any farther until you’ve corrected the flaw.
From this point on, I go one inch at a time. I wanted to creep up to 40# or around 20″, whatever I felt like, and then brace the bow fully.
Once I have all perceptible flaws fixed, I take the bow another inch and measure the draw weight. Remember to excercise the limbs every time you remove any wood. At 20″, the bow came to 35#.
I don’t remember when it was, but at some point, I wanted to start getting the limbs bending closer to the fades. Oh, that reminds me. After I braced the bow, I vowed to leave the tips alone for about 5 or 6 inches.
Leaving the tips stiff will allow me to narrow them later if I feel like it. Also, having stiff tips is supposed to help performance.
There’s debate about that, though. Still, I feel more comfortable with the tips being a bit stiff. If anything, it would have to at least reduce stacking.
Anyway, I finally reached 40# at 22″
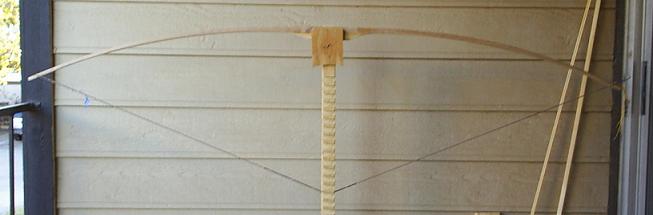
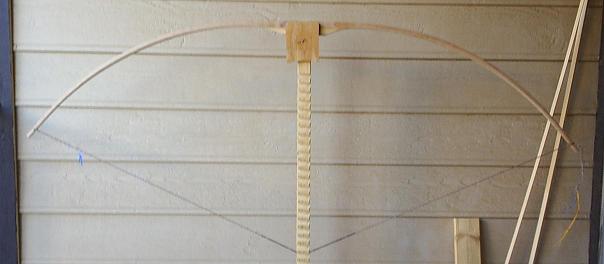
Now’s a good time to bring it up to a full brace. First, check out the string alignment.
Now bad, eh? Here it is with a full brace.

“Full brace,” usually means the distance between the handle and the string is the same as when you put your fist on the handle with your thumb sticking up.
But in my case, the brace is just slightly lower than that. Some of us prefer a lower brace. It’s supposed to improve cast, but it sometimes increases wrist slap and archer’s paradox.
Tillering with a full brace
Anyway, I continued pulling on the bow and inching toward my draw weight and draw length and making adjustments as I went.
You should go really slow at this point. Remember we’re shooting for 45# at 28″. Since 45# is my final target weight, though, I’m actually going to try to get there at 27″.
You see, I figure with all the sanding I’m going to do on the bow, and the fact that it will likely weaken some more as I shoot it, it will lose a little weight.
If I get 45# at 27″, I’m sure it will eventually be 45# at 28″ once it’s been shot in.
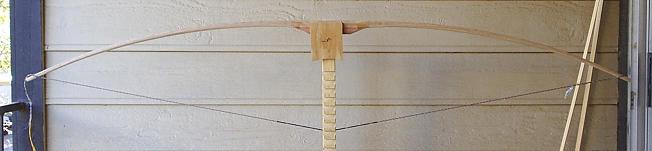
Here, I’ve reached 45# at 25″.
It’s tempting at this point to think, “Well, why not just have a 50# bow instead of a 45# bow? Then I could pull it to 28” and call it quits.
To tell you the truth, I was really tempted to do that. I decided I needed to work on my committment issues, though, and since I committed to 45# at 28″, I stuck with it.
Before getting it to 27″, I wanted to check the tiller. Now’s a good time to introduce a new term. You already know the idea.
Now you just need to know the word that codifies the idea. The word is “positive tiller.” Oh, I know. That’s not really a word; it’s a phrase.
I’ll give you that one. But that’s neither here nor there. What’s important is what it means. A positive tiller is when the top limb bends more than the bottom limb.
There are two popular ways of shooting bows in the Anglo-American world. There’s split finger and there’s three-under. Split finger is the usual way when you’ve got your index finger above the arrow, and your middle and ring fingers below the arrow.
When you shoot an arrow, the arrow is actually going to rest above the center of the bow. When you draw the string with split fingers, you’re pulling above the center of the string.
That puts more stress on the bottom limb than on the top. To compensate for that, some people like to have a positive tiller.
When shooting three fingers under, all three fingers are under the arrow. In that case, the fingers are drawing the string closer to the middle.
So when people tiller a bow for three fingers under, they try to get both limbs bending perfectly even. There is no positive tiller.
I, and most people, shoot with split fingers. So I try to shoot for the limbs being pretty close to even, but when I get to the end, I measure to see if one limb is bending slightly more than the other.
If one limb bends more than the other, I make that the top limb. I measure from the end of the fade to the string on both sides.

If the top limb is has a gap 1/4″ bigger than the bottom limb, then you have 1/4″ of positive tiller. That is a typical positive tiller for split finger shooting.
In this case, though, the limbs came out pretty close. One limb has a gap 1/8″ bigger than the other limb, which is fine with me. The limb with the bigger gap will be the top limb.
At this point, we’re just reducing weight. I seem to have gotten all the flat spots and hinges out. I don’t want to get anymore in while I reduce the weight.
So remember to take long steady strokes from the fade to within 5 or 6″ of the tips. Count the strokes, repeat the same number on the other side, and don’t take off too much wood at a time.
Go slow. Do about five strokes, then check it again.
Here it is finally at 46# at 27″.
46# is close enough for me. After all, I have serious doubts about the accuracy of my bow scale anyway. What’s one pound gonna hurt?
I measured the string follow immediately after unstringing it. I layed the bow on its back and measured how high the tip came up.
1.5″ is unusual for me. Usually, I get 2 or 3 inches. 1.5″ is really pretty good. I think the reason it came out so well is because I was far more careful tillering this bow than I usually am.
Since I’m doing a build-along in front of lots of other people, I didn’t want to goof it up, so I was extra careful. It paid off, huh?
Now of course, even though I hit my target weight at 27″, I still want to make sure I can pull it to 28″ without it breaking.
In fact, in a situation like this, I will usually go ahead and pull it to 29″. That way, if anybody with a 28″ draw ever brings it to 28″ and then hick-ups, it won’t cause a problem.
It gives me a feeling of security knowing the bow is safe to pull an inch farther than I intend for it to be pulled.
Shaping the Handle
To shape the handle, you just need a rasp and a file. I also use a rattail file a little on my arrow rest.
You have a lot of freedom with how you shape your handle, so I’m just going to tell you what I did and why I did it.
First of all, I decided to cut an arrow rest 1.25 inches above center. You can do this with a little hand saw, a jig saw, or whatever. I cut mine for a left-handed shooter, because the only other time I’ve made a left-handed bow, it was an accident.
Left-handed people are always complaining about people putting the arrow rest on the wrong side, and I’m sure I can find somebody who will want this bow.
I haven’t always done this, but I like to round my fades a little. I used to leave them square as they went into the limb. Now I round them purely for aesthetic reasons. I think it looks better than squared fades.
Since cedar isn’t the strongest wood in the world, I didn’t cut the arrow rest all the way to the middle. I did cut it where the wood is at its thickest, though.
You don’t want to cut it into your fades. I start near the fades and gradually get deeper as I move to the thicker wood on the handle.
There are a couple of advantages to cutting an arrow rest. First, it gives you a consistent place to rest the arrow, which makes it easier to shoot.
Second, it means the arrow doesn’t have to bend so far around the bow, and that allows you to use a wider range of arrow spines and still have good flight.
But you don’t have to cut an arrow rest if you don’t want to (or can’t because you don’t have a saw). If you don’t want to cut an arrow rest, I would highly recommend giving the “floppy rest” a try.

It’s easy to make and just uses a little piece of leather. They work great. You might want to narrow your handle some before using it, though.
Here’s another look at my arrow rest.
See how I’ve got the arrow rest radiused? That is, curved? That helps arrow flight in two ways. First, when the feather hits the rest, it isn’t stopped all of a sudden.
Rather, it’s gradually collapsed as it gets smoothed down. Look at the front view again above. I’ve got the arrow shelf sort of rounded on the verticle and horizontal so that the feather has an easier time going through.
Second, a radiused shelf reduces drag on the arrow, because there is less contact between the arrow rest and the arrow than there would be if the shelf were flat. Now of course you can’t cut an arrow shelf like that with a saw.
You have to cut it square and then use your rasp and file to get the shape you want. Here’s how I do it, though:
There’s also a reason I have the handle contoured. Contouring is not necessary, but it does two things.
First, it makes the bow more comfortable to hold and shoot.
Second, it helps with consistency. Your hand will always grab the bow in exactly the same spot since the handle is contoured. Consistency will improve your shooting.
Speaking of comfort, don’t forget to round the back of the handle, too.

Having it round all the way around makes it a lot more comfortable to hold. But like I said earlier, you have a lot of freedom with the shape of your handle. Do whatever you want.
Shooting the Bow
The next step is shooting the bow. Of course a lot of us can’t resist the urge to shoot them before we even finish tillering.
Whether you do that or not, you really ought to shoot it at this point. I shoot it before I finish the nocks.
That way, I don’t get wax and colour in the nocks with the string before I put the finish on it.
If this if your first bow, you’re in for a thrill. Shooting a bow for the first time that you made yourself is wildly exciting!
The question is how you’re going to do it if you live in an apartment. I got a cheap styrofoam target from Wal Mart, and I sometimes shoot it in the apartment.
I can stand in my living room, shoot down the hall into my bedroom, and hit the target on the opposite wall. I only have two holes in my wall. 🙂 Be careful.
Sometimes, I take my target outside in an open space and shoot. So far, nobody seems to mind. You have to watch out for pedestrians, though.
It’s much easier to have a friend with a big backyard who doesn’t mind you shooting. Or, if you live out in the sticks, lucky you!
Later…
Shooting the bow was a bit awkward since I’m right handed. I gave up trying to shoot it left handed and just shot it off my hand right handed. It flings arrows just fine, but it’s got some hand shock.
Narrower tips and a heavier riser would’ve helped that a little. It also smacked my wrist pretty hard. I may raise the brace a little to help with that, but there’s always an arm guard.
Shaping the Nocks
Nocks are another area of freedom. You can get ideas by just searching the internet and looking at pictures of what other people have done. Here’s mine.

There’s only one design consideration. See how I sort of smoothed out the notch on the tip? That’s to allow the string more freedom to move as I draw the bow.
If you want, you can glue on tip overlays. Tip overlays will allow you to narrow the tips a little more which will speed up the bow imperceptively and reduce hand shock a little.
Sanding
The next step is sanding. Don’t sand the backing. I start with 100 grit sand paper. I use enough of it to get all the tool marks out. Once I’m satisfied that all the tool marks are out, the rest of the sanding goes more quickly.
I used 220, then 320, then 400, then 600. After 600, it was pretty smooth. You can get that really fine sand paper at auto parts stores. You can get 1000 grit if you want.
Some people like to wipe the whole bow down with a wet cloth. That causes the grain to rise, and when it dries, it feels all hairy. But then when you sand it back down, it gets really smooth.
To sand the nocks, I wrap the sand paper around the rattail file and pretend to file nocks with it.
Once it’s all sanded, I wipe it down with a t-shirt to get all the dust off of it. Red oak is kind of pourous, so if you want, you can wipe it down with acetone, and that will get some of the dust out of the pours.
Getting Rid of the Ugliness
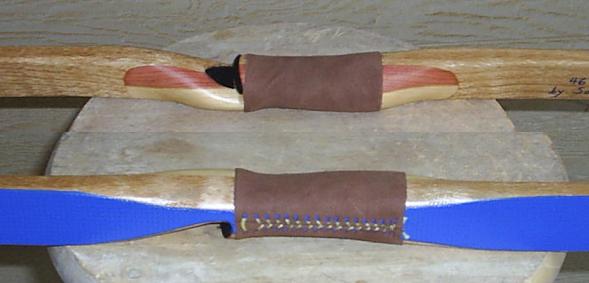
I think the drywall tape backing is hideously ugly, so to fix that problem, I spray painted it blue. Why blue? Well, you see, I made one of these red oak board bows for my friend, Thomas.
We were out shooting it one day with his sisters, and his younger sister, Amanda, asked me to make her a bow. She said she wanted the back of it to be blue. Such was my desire to please the young lady that I immediately went out and bought a can of blue spray paint to use on her bow.
Her bow, however, did not exhaust the blue paint inside. Not wanting it to go to waste, I’ve been spray painting drywall tape backings blue ever since.
I just want the back to be blue, so I used masking tape to tape the bow up.

This stuff dries in 12 minutes or less! It says “handle after one hour.” Here’s a look after removing the masking tape.

And here’s a close-up.
Applying a finish
If you want, you can stain the bow. A darker stain really makes the grain in the red oak come alive. After that, you can apply the finish of your choice.
I’m going to use about five coats of Deft. Deft is cheap, dries on anything, and dries pretty fast (about 20 minutes).
It comes in a spray can, and you can get it practically anywhere–Walmart, Home Depot, Lowes, etc. I put on three coats, then I use a Sharpie pen to write my name, length, weight, etc., then put on the final two coats.
I put the writing between coats so it will be easy if anybody ever wants to sand it off.
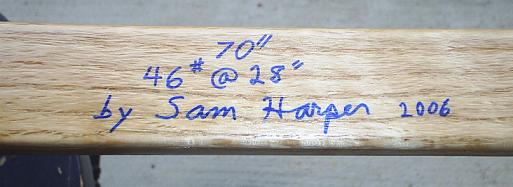
I put the new string on and measured the draw weight right before I wrote this and actually got 47# at 28″. But I figure once it’s been shot a little more, it’ll come down to 46#, so my conscience doesn’t bother me too much.
Finishing up with the finishing up
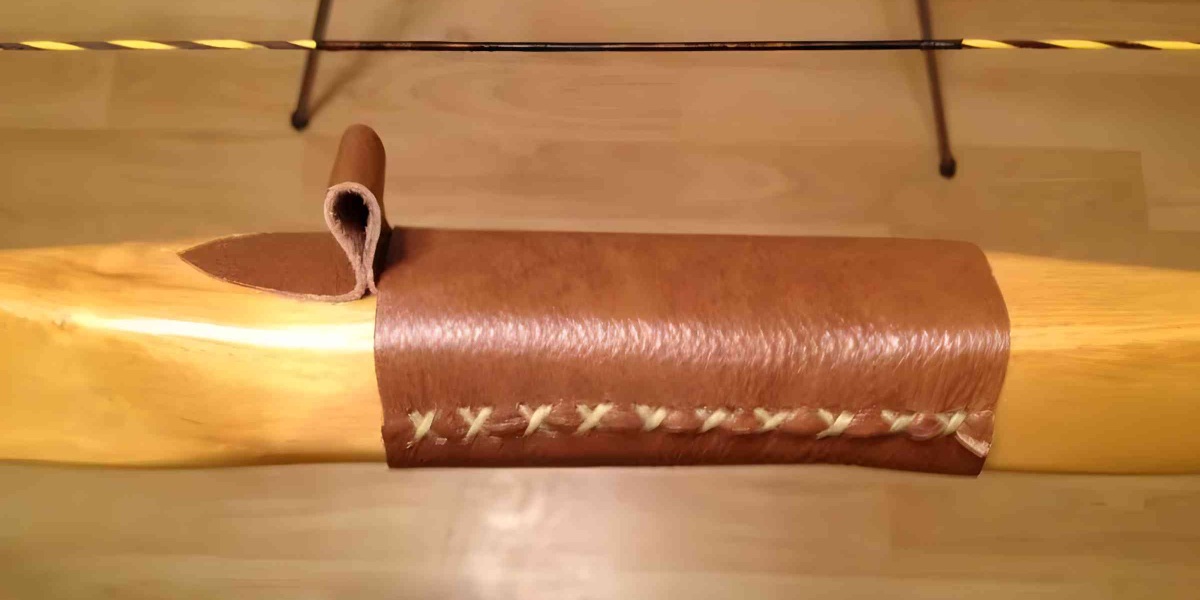
After putting my final two coats of Deft, I put a leather grip on it which I laced with artificial sinew I got from Hobby Lobby.
I got the leather off a leather jacket I bought for $2 or something at a yard sale. I used self-adhesive velcro for the arrow rest and strike plate.
Velcro is great stuff. I was tempted to try the self-adhesive felt one time, but it doesn’t stay on. I got industrial strength Velcro, and now I’m sold on it.
Just use the soft part. You can also use leather or calf hide or whatever and apply it with Titebond II or Barge cement.
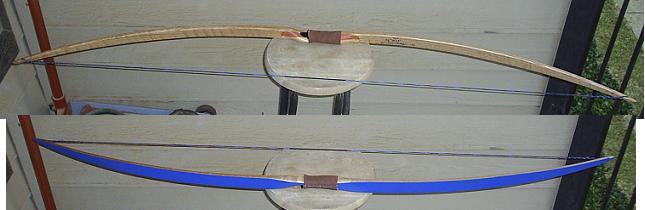
And here’s the final product.
That’s it. A word of warning: Making bows is highly addictive. On the other hand, it’s also highly rewarding.


Conversation | 4 comments:
Thank Sam for me if you can still contact him. I can tell he put a lot of TLC into his tutorials. It would be a shame for effort like that to go unrecognized. What a mensch.
Oh man!!! Sam Harper’s build along. I just pulled my old red oak board now I pulled from my dad’s garage yesterday night 10/8/2023. Something I built along time ago according to this build along. Wow!! Great times. Almost 20 something years ago!!!? Wow!!! I can’t believe I found Sam’s work again.
Awesome! Yeah, his tutorials are epic!
About the best buildalong Ive seen, thanks