
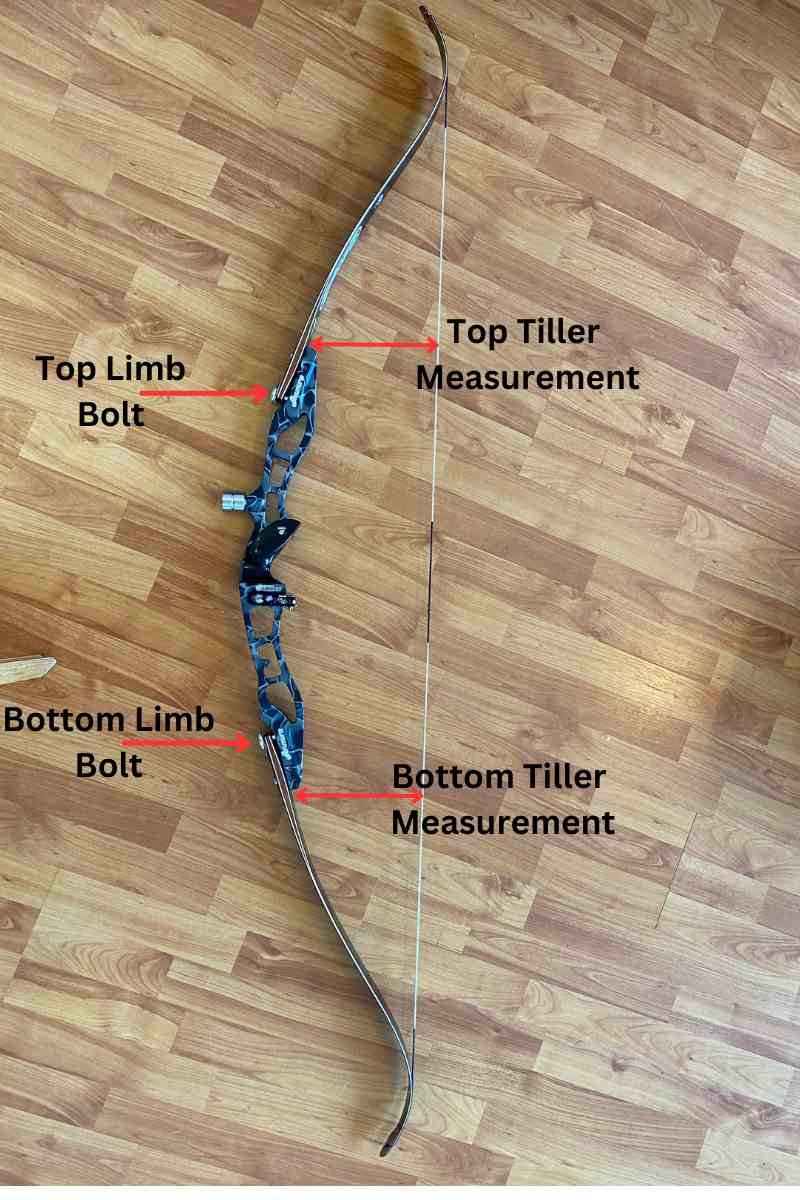
The term “tiller” refers to the horizontal distance between the bow’s string and the limb of the bow. Usually, both the upper and lower limbs are measured when referring to the tiller.
The top limb of a traditional bow should typically have a tiller that is 1/8 to 3/16 inches more than the tiller of the bottom limb.
Beginner archers won’t be that bothered by the tiller, but experienced archers need to work out the tiller.
As an archery enthusiast, I’ve always been fascinated by the intricate details that go into mastering this ancient art.
One aspect that often goes unnoticed yet plays a crucial role in determining the performance and accuracy of your bow is the tiller.
When shooting a traditional bow, most archers draw the bottom limb farther back than the top limb, creating a more severe angle on the bottom at full draw. This gives the top limb a head start on closing upon release. For the limbs to synchronize at the shot, the bottom limb must be slightly stronger to catch up to the top. Equalizing the limb speed brings the bow string into alignment with both limbs at the same time for a proper shot.
It’s high time we delve deep into understanding its importance, its effects on shooting, and how to properly measure and adjust it to optimize your bow’s potential.
In this article, I’ll share my knowledge about tiller measurement techniques, adjustments needed for improved performance, and tips for maintaining a proper tiller over time. So grab your quiver, and let’s get started!
read.. how to measure a bow
Bow Tiller Explained
Now that you’ve grasped what tiller is all about let’s understand how it affects your archery game!
Tiller adjustment, or tiller tuning, plays a significant role in the function of the tiller as it determines how well your bow performs. The string at rest and the tiller head are crucial components to consider when adjusting the tiller.
An ideal tiller height ensures that both bow limbs work together effectively, while adjustable tillers allow for modifications to suit individual preferences. Keep in mind that improper tiller can lead to poor performance and accuracy.
Tiller difference is another essential aspect to consider. This refers to the difference between the top and bottom limb measurements from the string at rest.
Ideally, there should be a slight positive difference (meaning the top limb measurement is slightly larger than the bottom), but this can vary based on personal preference and shooting style.
Be cautious with poor tiller settings, as they may cause inconsistencies in your shots or damage your bow over time.
Remember, taking time to fine-tune your bow through proper adjustments will improve accuracy and overall better archery experience!
Measuring Techniques
Ready to perfect your archery skills? Let’s dive into some measuring techniques that’ll have you hitting the bullseye in no time!
To tiller a bow, measuring and adjusting it correctly is essential. One common method for measuring the tiller is to use a ruler or tape measure, ensuring accuracy in obtaining limb-to-string distance.
First, check if your bow has adjustable tiller bolts; they’ll help you fine-tune your tiller height easily.
Take note of your tiller height by measuring where the limb meets the riser to the string at rest. A decent tiller height typically ranges between 1/8′ and 1/4,’ but this can vary depending on individual preferences and shooting style.
To achieve the perfect tiller, experiment with different measurements until you find an ideal configuration that works best for you.
read.. draw length measurement
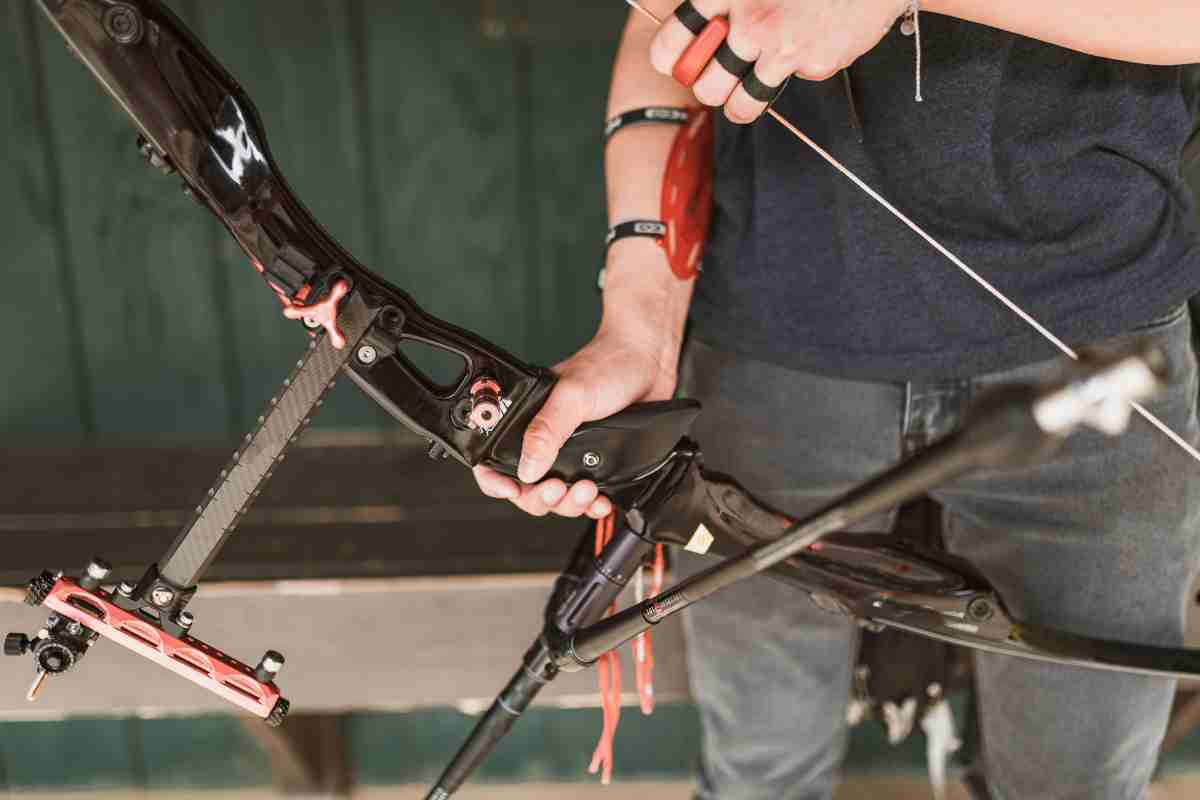
Start by slightly loosening one of the limb bolts and adjusting it up or down as needed, then tighten it back up once you’ve found a comfortable setting.
Repeat this process with both limbs until they’re evenly balanced in relation to each other – that’ll help ensure consistency and accuracy when shooting arrows.
Don’t forget: always make sure your bows’ limb bolts are securely tightened before taking any shots!
With some practice and patience, you’ll be well on your way toward mastering these measuring techniques and achieving that perfect tiller tune compound bow setup!
Adjusting the Tiller
Adjusting the tiller is crucial for proper bow performance and can help eliminate issues such as an uneven draw or inconsistent accuracy.
To start adjusting the tiller on your bow, you must first measure the current tiller using one of several measurement techniques.
For example, floor tillering involves measuring from the string to the axle points at both top and bottom limbs while holding the bow horizontally with one limb resting on a flat surface.
To adjust the tiller, you’ll want to focus on three main components:
- Limb bolts: These are used for adjusting limb weight and affect tiller measurements. Loosening or tightening these bolts can change your axle-to-axle distance and impact your tiller.
- Limb weight adjustment bolt: This is separate from limb bolts; it primarily changes draw weight without affecting brace height or axle-to-axle distance. It also influences how people tiller tunes compound bows.
- Measurement of string: While not directly related to adjusting the tiller itself, knowing where to measure from plays a significant role in achieving accurate results during adjustments.
“Weight adjustments can easily be made by turning the weight adjustment bolt or limb bolt (tiller bolt on recurve bows) clockwise to increase weight or counter clockwise to decrease weight. You should always turn the top and bottom adjustment bolts in equal amounts. Be sure to unstring recurve bows before making adjustments.“
Source: https://hoyttarget.com/
Once you have identified these components, make small adjustments by either tightening or loosening your limb bolts depending on whether you need more positive (shortening) or negative tiller (lengthening) inch-positive tillers.
Remember that patience is key here—making large changes could lead to unwanted results.
Keep track of each adjustment(!) and compare them against your starting measurements until you reach a comfortable balance for optimal shooting performance!
Effects on Performance
You’re honing in on precision, and understanding the effects of tiller adjustments on your archery performance is essential to easily hitting that bullseye.
When you tiller a bow, you are essentially fine-tuning the balance between the top and bottom limbs of the bow, which directly affects how well it shoots.
The process typically involves using tools like a tillering tree or floor tillering and making adjustments based on visual inspection and trial-and-error shooting.
| Tillering Tool | Description | Purpose |
|---|---|---|
| Tillering Tree | A device that holds your bow horizontally for easy adjustment | To check limb alignment and adjust string tension |
| Floor Tillering | Placing the bottom limb tip against a solid surface while holding the grip and flexing the upper limb | To check initial bend distribution along limbs |
| One-time-use Tiller Stick | A temporary tool used to make quick adjustments | To help achieve proper tiller measurement during initial setup |
- Tillering Tree: A tillering tree is designed to hold a bow horizontally, allowing easy access to adjust and measure the bow’s tiller. It helps archers check the limbs’ alignment and adjust the string tension for optimal performance.
- Floor Tillering: Floor tillering is a method where the archer places the bottom limb tip of the bow against a solid surface, such as the floor, while holding the grip and flexing the upper limb. By observing the initial bend distribution along the limbs, the archer can assess the tiller and make adjustments if needed.
- One-time-use Tiller Stick: A one-time-use tiller stick is a temporary tool used during the initial setup of a bow. It assists in achieving the proper tiller measurement. The stick is typically placed against the bow, providing a reference point to measure the tiller height accurately. Once the tiller is set correctly, the stick is removed, and the bow is ready for shooting.
Poor tillering can lead to uneven stress distribution across your bow’s limbs, causing one side to work harder than the other.
This imbalance can result in less accurate shots or damage your equipment over time.
When adjusting your bow’s tiller, consider factors such as limb string groove alignment (to ensure both limbs are bending evenly) and pivoting points on the tillering tree (to minimize stress).
Another aspect to consider is grip angle: if it doesn’t match your hand shape or shooting style perfectly, it may affect overall accuracy regardless of how well-adjusted other parts of your bow might be.
So next time you aim for that perfect shot, remember that taking care of these details will greatly improve your archery experience and protect your investment in high-quality equipment.
Maintaining Proper Tiller
Maintaining the right balance between your bow’s limbs can significantly impact your shooting accuracy, and interestingly, studies have found that experienced archers exhibit a 99% consistency in their tiller adjustments.
To maintain proper tiller, it’s essential to remember that the degree angle of the string should be equal on both sides of the bow when at rest.
Discussions about tiller often involve aspects such as positioning on the string and finger pressure during release.
For instance, if you shoot with a split-finger shooting style (one finger above and two fingers below the arrow), you may require a slightly positive tiller (the upper limb having a greater distance from the string than the lower limb) to compensate for uneven pressure.
Advanced archers tend to develop unique preferences for maintaining proper tiller, but some general guidelines can help you get your head around tillering.
One tip is to set up your bow with an even or neutral tiller (equal distance from both limbs to the string).
Then experiment by incrementally adjusting either limb while monitoring how these changes affect your shot consistency and arrow flight.
Another aspect to consider is whether you naturally apply more finger pressure on one side of the arrow while drawing back – this could result in needing adjustment towards either the left or right of the string center, depending on personal tendencies.
It’s important not only to focus on measurements but also pay attention to how comfortable and efficient each setting feels since comfort ultimately contributes towards better shooting performance.
Before you go..
Mastering the art of tillering is an essential skill for any archer. I can truly optimize my bow’s performance by understanding its importance and learning proper measuring techniques.
Knowing how to adjust the tiller effectively is also crucial. By doing so, I’ll see improvements in accuracy and experience a smoother shooting process.
Keeping a well-adjusted tiller ensures I remain on target and consistently hit the mark with each arrow released (hopefully…)
measure the current tiller of your bow.
Frequently Asked Questions
Barebow Tiller
Bow Tillering Tree
Do I Need To Tiller My Compound Bow?
What Does Tillering Mean?
Why Is A Neutral Tiller Preferable?
Loads of archers prefer a neutral tiller because it can improve arrow flight. You can also opt for a positive tiller, though you might want to experiment to see what works best for you.
Do I Need To Worry About The Tiller?
No, the tiller is not something that you need to worry about. Particularly if you are a beginner tiller, you will not need to pay too much attention to the tiller.
On the other hand, if you believe that the tiller has been impacting your performance, then you should definitely look into getting it adjusted. Doing this is particularly important if you are an experienced archer.