
Greetings and felicitations. Today, March 14, 2006, we are going to make a bamboo-backed ipe bow. Isn’t that exciting? But why ipe, you ask? Well, there are a few things you ought to know about ipe.
About Ipe
First, you need to know how to pronounce it. Ipe is pronounced, “EE-pay.” Can you say EE-pay? I knew you could.
Second, you need to know what ipe is. Ipe is a Brazilian walnut. Okay, you didn’t really need to know that.
Third, you need to know some properties of ipe. There’s good properties and there’s bad. We’re mostly interested in the good properties, but we ought to be aware of the bad.
The bad thing about ipe is that a lot of people have an adverse reaction to it. Mostly, it causes some people to itch. Thankfully it doesn’t bother me a bit. You ought to do some reading on it sometime. There’s plenty of information on the internet.
read.. how to make a knife (by Sam Harper)
The good thing about ipe is that (1) the grain is almost always straight, (2) it rarely has any knots, (3) it’s very stiff, (4) it’s very dense, and (5) it’s quite resistant to decay.
Numbers 1 and 2 are desirable for any kind of bow wood, but what makes ipe unique is 3 and 4. 3 is especially unique about ipe. Ipe is so stiff that the dimensions will be quite unlike most wood bows you make.
The limbs will be much thinner. The cool thing about that is that even though the wood is very dense and heavy, the limbs actually end up being lighter than usual.
And since they are also thinner, the bow ends up being faster than usual. Ipe backed with bamboo makes a deadly combination.
Number 5 is a clue to sources for ipe. You need not only search the hardwood stores. You can also search for decking. Ipe is used in decking because it’s so resistant to decay.
I’ve even read that you can use it without putting a finish on it, and it’ll last through all types of weather. I don’t know how true that is.
read.. the best beginner compound bows reviewed
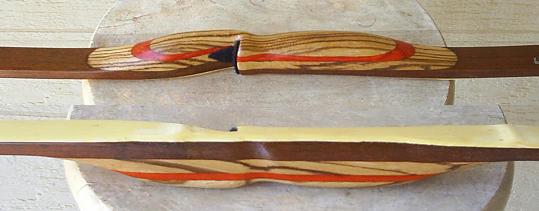
You also need to know how to pick out a good piece of ipe. Besides straight grain, which is a given with any bow wood, you want the ipe to be nice and dark.
I’ve made more bamboo-backed ipe bows than any other kind of bow (it being my favourite), and I have discovered that the darker it is the better.
The lighter-coloured ipe sometimes frets (i.e. gets compression fractures) on the belly if you don’t tiller it just right.
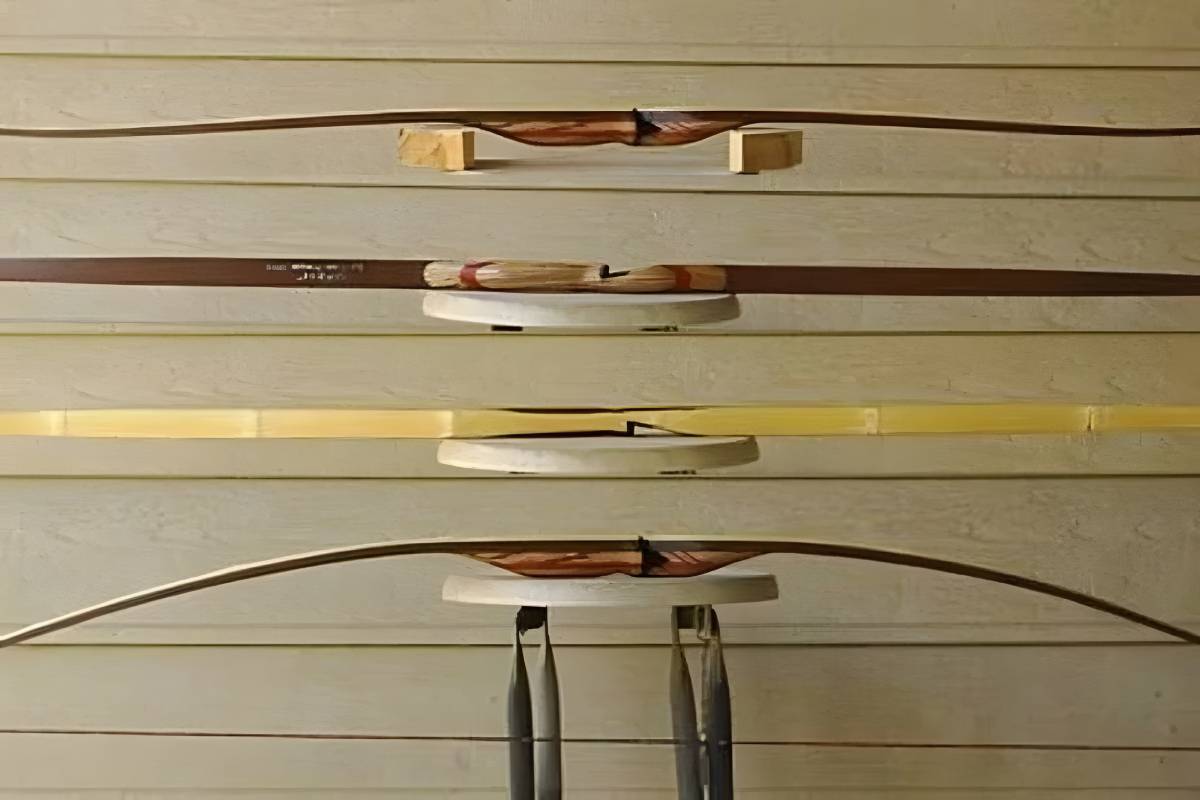
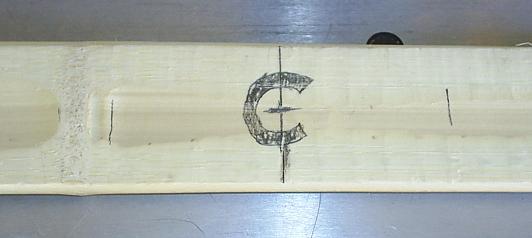
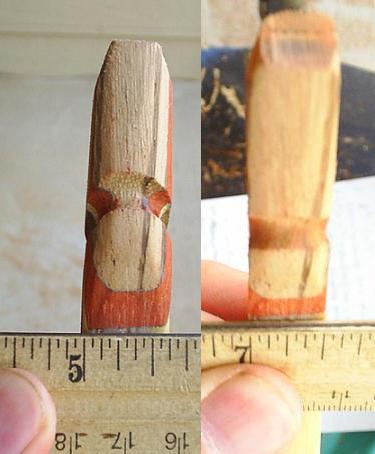
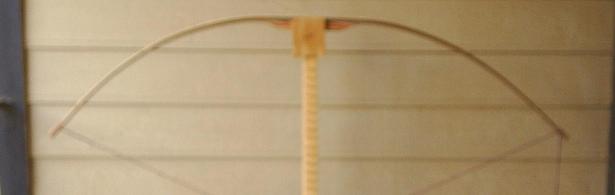
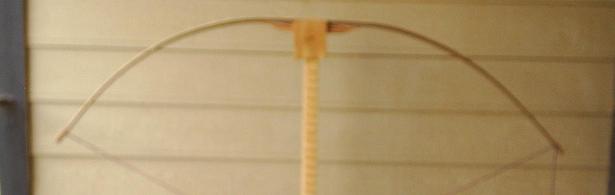
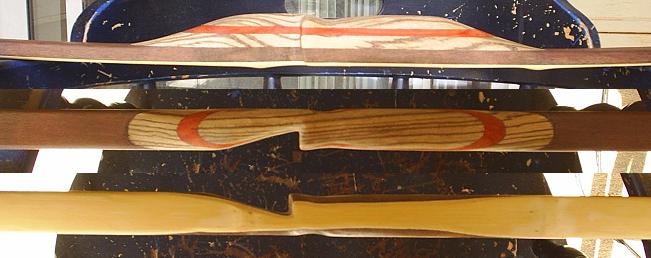
I’ve never had any problems with the darker coloured stuff. Here’s an example of what I’m talking about:

Ipe that looks like the bow on the top might give you problems. You want to find ipe that looks like the bow on the bottom. Except that it won’t be a bow when you find it.
Oh, there’s one more thing you ought to know about ipe. Ipe is one of those oily woods where hardly any finish will dry on it.
I use Deft lacquer, because it works beautifully. It’ll dry within 20 minutes. You can put a couple of coats of Deft on it, and then any finish you want on top of that.
Or you can just finish the whole thing in Deft. But I’m getting ahead of myself.
About Bamboo
Like ipe, bamboo also has both good and evil. The evil of bamboo is that the splinters are horrendous. They’re tiny, hard to see, and annoying.
Also, bamboo is bad on the skin and murder on the lungs. Please please please use a respirator when working with bamboo. It’s not quite as bad as fiberglass, but it’s pretty nasty.
It does smell like hay, though, so if you’re into that, then that’s a good thing. The other good thing about bamboo is that the grain is always straight.
Also, bamboo is unusually strong in tensil strength. It’s so strong, in fact, that some people discourage using it with some woods, because it tends to overpower those woods. Bamboo works great with things like ipe, though, since ipe is so strong.
So Why make a Bamboo-Backed ipe Bow?
Good heavens! Isn’t that clear enough by now?
Preventing a Catastrophe
There’s something I wanted to add to this build along but I wasn’t sure where to put it. It’s important, so I’m just going to stick it right here.
We can’t very well have a first page without pictures anyway, can we?
I’m going to be gluing a riser on the belly of the bow. A lot of people have had problems with this because it can cause the handle to pop off.
You see, there’s a transition between the flexing limb and the stiff handle, and that transition is the fade.
If you have the limb moving all the way up to the fade, and then you have the entire fade consisting of the riser wood, then the riser wood is going to have to absorb some of that flex. It will put a lot of stress on the glue joint.
If the limb wants to bend, the riser wants to stay stiff, and there’s stress on the glue joint, the riser could pop off.

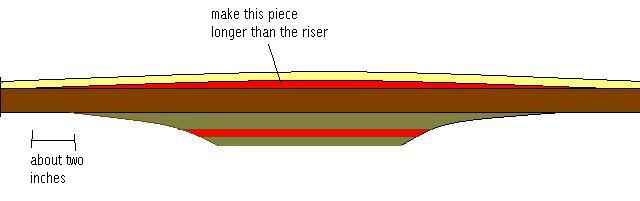
There are three ways to avoid that. One way is to glue a thin tapered piece of wood between the bamboo and the belly wood. It must be longer than the riser. That will cause the transition period to happen in the limb and take the stress off the glue joint on the riser wood.
A second way is to make a tri-lam bow where you have a bamboo backing, some type of core (maybe ipe), and then a belly lam (of bamboo, ipe, or whatever).
If you run the belly lam up the fades, there will be no glue joint to be under pressure since most of the compression forces happen on the surface of the belly along the continuous lam.

The third way, which is the way I usually do it, is to have the fade run into the belly wood. That way, the transition just about stops before it gets to the glue joint.

Let’s see, where to begin? Ah yes. Concerning bamboo. (Can you hear the fiddle in the background from Lord of the Rings when Bilbo is writing about Hobbits?)
You might like to know where I get my bamboo. I used to get mine at Master Gardens, but after getting a couple of bad shipments, I started getting mine at Frank’s.
It comes in 8 foot lengths, about 2 inches wide, and pretty thick. That means it needs some preparation.
read.. best compound bow under $500
Preparing the Bamboo
For this build along, I’m going to make the bow 66″ nock to nock. If I cut the nocks in an inch from each end, that means I’ll need the total length to be 68″. So let’s cut the bamboo down to 68″ long.
Before doing that, we want to center the nodes on each tip. That is, we want the distance between each tip and the first node to be the same. If we have an eight foot piece of bamboo, that’ll give us lots of flexibility.
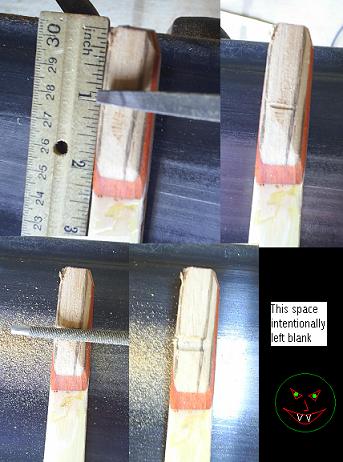
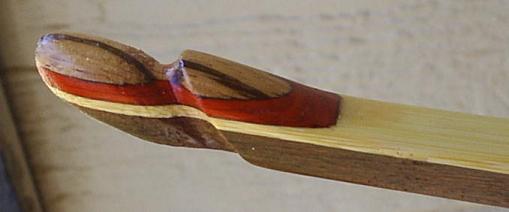
The nodes on bamboo are not equidistant. They are farther apart near the ground and closer together near the sky. Looky here at this picture:
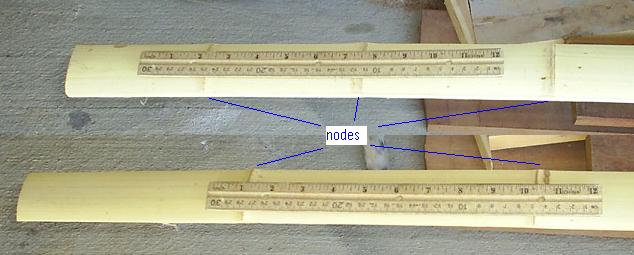
These are opposite ends of the same piece of bamboo. See how much closer together the nodes are on the top than they are on the bottom? Well, ideally, we want the nodes to be as far apart as possible.
The closer the nodes are to each other the more likely you are to get a hinge in your bow, or have other problems tillering. So when we measure out our 68 inches, we want to do it closer to the end where the nodes are farther apart.
To get the 68″, take a piece of scrap wood or something that’s more than 68″. Use a tape measure to measure out 68″ on it.
Make pencil marks 68″ apart. Then take that piece of wood or whatever and lay it down on the bamboo. In my case, I’m using a scrap piece of bamboo flooring. Once you lay it down on the bamboo, you can center it.
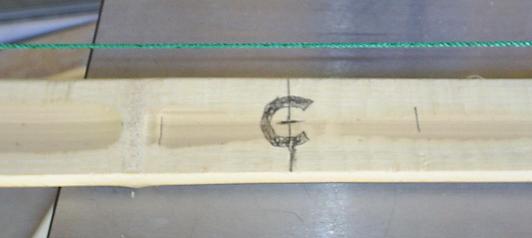
Get it to where the nodes are the same distance from each pencil mark. In this picture, I’ve got the nodes on each end about 5 inches from the pencil marks.
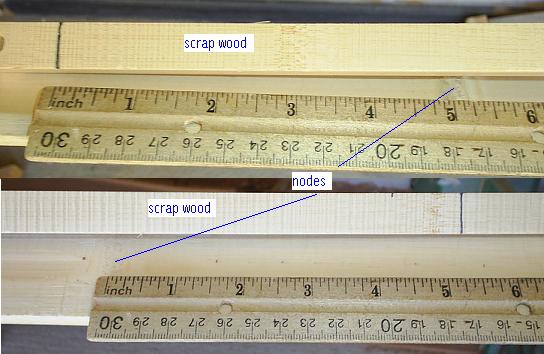
I’m sorry that picture isn’t more clear. The top part shows the left end of the bamboo, and the bottom part shows the right end.
See how the pencil mark is 5 inches to the left on the top and 5 inches to the right on the bottom? Once I’ve got it centered, then I make pencil marks on the bamboo so I’ll know where to cut. Then I cut off those ends with my band saw.
Then I want to find the dead center of the bamboo–the intersection of the center of the width and the center of the length.
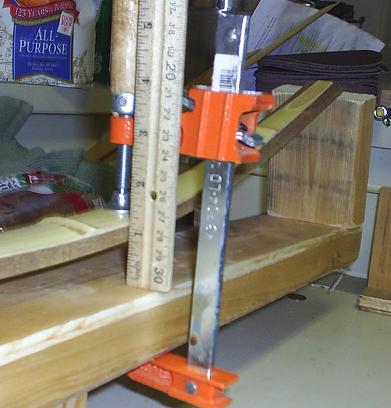
To get the center of the length, I put a yard stick flush with one end of the bamboo and make a pencil mark at the other end of the yard stick.
Then I put the yard stick flush with the other end of the bamboo and do the same thing. Now I’ve got two pencil marks close to the center.
I take a ruler and find the midpoint between those two pencil marks. That’s the center of the length.
To get the center of the width, I just put a ruler across the width and find the center. Then I’ve got a + sign at the dead center of the bamboo, and I put a nice fat ‘C’ on there to remind me to SEE where the center is.
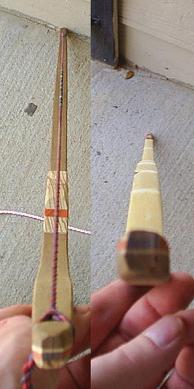
Next, we want to make sure the bow isn’t warped from side to side. We want the tips to be lined up perfectly. To do that, let’s run a string along the bamboo and hang weights from each end.
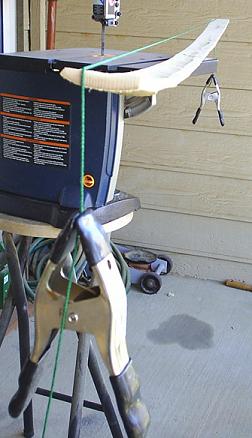
Since the bamboo is warped, it’s kind of hard to tell when the string is really over the center, isn’t it?
It all depends on how you look at it. That problem is easy enough to fix. Just stand there at the midpoint, stretch out your arms, and push down on each side.
As you push down, the string will eventually touch the center point, and then you’ll know whether it’s running through the center or not.
If not, then adjust the string on each end until it goes through the center. Once it does, make a pencil mark on each tip under the string.
read.. best archery set for youth reviewed
Since I make a lot of bows, I have found it much easier to use a template rather than measure out my dimensions on each bow individually.
I made my template out of a piece of poster board. I drew the lines exactly how I wanted them, got it perfectly straight, then cut it out with a box cutter.
Then I used the belt sander to sand down to the line. Here’s the dimensions of my template:

Don’t wig out about the fact that it’s 3/8″ at the tip. You have to consider the fact that your pencil mark is going to be a little wider than 3/8″, and then it’s going to be even wider when you cut it out with the band saw since you’ll cut outside of the lines.
Besides, you can always put the end of the template an inch or so past the end of your bamboo so that you have a wider tip.
Whatever works for you. I use this same template for my fiberglass bows. If for whatever reason I want to make it wider or more narrow, I simply adjust the angle of my pencil or where I put the tip.
Here’s the template on the bamboo.

My goodness! Look how warped that bamboo is! Good thing I did that string thing, eh? You can hold the template on with squeeze clamps if you want, but I was just careful and did it with my hands while I traced around it.
Put the template on the other end and repeat. Then cut it out with a band saw. Cut outside the lines, and then use the belt sander to sand the rest of the way to the lines.

Now isn’t that better? If you don’t have a band saw, there is another way. You can clamp the bamboo to the edge of your railing where one edge sticks up, and then use your Stanley Surform. That’s how I did my first one.
Now you need to flatten the bamboo. I did my first one with a Stanley Surform, and although it was a lot of work, it worked just fine. But now I use a band saw and a belt sander, and I’m a happier person because of it.
I used to use a rip fence to do this part, but I’ve found it much easier to do it free hand. There are two reasons I don’t use a rip fence anymore.
First, most pieces of bamboo are kind of warped. Unless you’ve got really strong thumbs and can consistently keep that bamboo pressed against the rip fence, it’s going to wander and make it hard to cut straight.

Second, if your bamboo is warped from side to side like mine is, you’ll end up with a piece that’s thicker on one side than the other. If you try to use a rip fence, you might run into this problem:

Do you see the problem here? You’ll lose some of the width of the bamboo. As it turns out, I’ve got this very problem with my piece of bamboo.

I used to use a rip fence because I wasn’t very handy with a band saw, and the rip fence was a crutch. But now I find it easier to free hand it. I can fix the above problem by just holding the bamboo at an angle and watching carefully as I cut it.
When your flattening the bamboo with the band saw, be careful not to follow the edge with the nodes. In other words, don’t cut a dip where the nodes are.
Just keep cutting in a straight line, leaving the node area thicker. You can follow the grain when cutting past a node so you don’t get lost.
The closer to the rind you cut the bamboo, the less work you’ll have to do with the belt sander. But however close you get with the band saw should be determined by how good you are with it.
If you’re not very good, you ought to leave yourself plenty of margin for error and just flatten it the rest of the way with the belt sander.
I use a 40 grit belt on my belt sander for just about everything, including flattening bamboo.
Since ipe is so stiff, the final bow will end up being pretty thin. Since the bow will be pretty thin, you’ll want to make sure the bamboo is pretty thin.
Think about it. Suppose you glue up a bamboo backed ipe bow with lots of reflex. Suppose the bamboo backing is 1/4″ thick, and that the final thickness of the bow is 1/4″ thick. Well, if that happens, then you won’t have any ipe left. I
t’ll all just be bamboo. But if it’s all just bamboo, how is it going to hold any reflex? It can’t! The reflex is held by the shear forces at the glue joint.
You need that glue joint to be closer to the back of the bow. If the bow is going to be really thin, then you need the bamboo to be thin so that you’ll have plenty of ipe left on the belly.
I make sure my bamboo is no thicker than 1/8″.

Some people just sand until they get a knife edge, which causes a natural taper toward the tips.
I don’t recommend that method, because not all bamboo comes from the same diameter, which means some will have a higher crown than others.
If you use “knife edge” as a rule, then some of your backing will be thicker than others. But it’s all a matter of personal preference.
My preference is to measure between the nodes and make sure nothing is more than 1/8″. It’s usually thinner toward the tips.
Do most of your sanding with the flat part of the belt sander. That’ll keep you from having dips and stuff from the band saw.
But if you have thick spots, you can work them down a bit with the elbow of the sander, then go back to the flat part.
Check both edges of the bamboo from time to time to make sure one edge isn’t thicker than the other edge. If it is, just apply more pressure to the thicker edge until it’s even again.
Once you’ve got the bamboo all nice and flattened, sand the back of the tips on both ends. Sand until you get the rind off and you get a flat surface.

The purpose is so you can glue tip overlays on.
Once you’ve got one piece of bamboo read to go, you can use it as a template to trace out the pattern on all your other pieces of bamboo.
Just use squeeze clamps to clamp them belly to belly. That way, you can easily center it on the nodes, get the tips aligned, and trace it out in one shot without having to use a scrap piece of wood for centering, a string and weights for aligning, or a template for tracing.
And now we shall prepare the ipe. I gotta be honest with you about something, though. I already prepared the ipe a long time ago.
I prepared a bunch of them at the same time so alls I’d have to do is glue them up whenever I felt like it. But I’m going to show you how I do it.
Preparing the Ipe
Before I prepare the ipe, I first prepare myself, and I prepare myself by getting some ipe. I used to get mine at the Hardwood Barn in east Texas, but they seem to have ceased to exist. Since ipe has become a popular decking material, it’s become easy to find.
Just search for ipe decking in your area. Sometimes you can find it cheap on craigslist when people dismantle their decks. It usually comes in these big ole boards ten feet long, five and a half inches wide, and one inch thick.
I can get a whole bunch of ipe bows out of one board. The first thing I do is cut it down to six feet, and I do that at the Hardwood Barn so I can fit it in my truck. Once I get it home (or to my friend’s house), I cut it up like so:

First I rip it in half. Then I rip those two halves in half. Then I turn each of those halves on its side and rip them in half. That gives me a bunch of boards that are about 1.25 inches wide, and a little less than half an inch thick when you account for the kerf made by the band saw.
I do the same thing to the four foot piece from when I cut it at the Hardwood Barn. I use those pieces, too, but first I have to splice them together.
Altogether, then, I can get twelve ipe bows out of that one board. It’s pretty cheap, too.
Now let’s take one of those boards, and I’ll show you how I prepare it for glue-up. Looking at the side of it, I taper the belly like so:

Don’t be intimidated by that 7/16″. That’s just 1/16″ shy of 8/16″ which is 1/2″. After you cut out the belly with the band saw, use the flat part of the belt sander to get out the tool marks. It’s important that the tapered part is flat and even all the way down.
You see, we’re going to glue in some curves, and we want them to bend evenly. If you have hills and valleys from not cutting straight with the band saw, that will cause it to bend unevenly, and it’ll make tillering more difficult later on.
You should also sand the back of the ipe so it will be nice and rough, creating a good gluing surface.
That 14″ flat section is for the riser and should also be sanded to create a good gluing surface. I’m actually going to glue on a 12 inch riser, but I leave it 14″ on the ipe so I’ll have room to work on the fades.
Also notice that I’ve cut the board down to 69″. That’s not important. Just so long as it’s at least 68″, everything will be fine.
Preparing the Riser and Tip Overlays
A guy asked me to make a bamboo backed ipe bow recently with zebra wood and padauk on the riser. It turned out to be such a pretty combination I’ve decided to do the same thing with this build along.
Here’s a picture of the wood I’m using for the riser and the matching tip overlays.

You can use whatever wood or combinations of wood you want, and you can make each layer as thick or thin as you want.
Nevermind the individual thicknesses of mine. The total thickness is one inch. The length is one foot. The tip overlays are two inches long, wide enough to cover the tips, and 1/4″ thick with the two woods together.
Don’t get too worked up about these dimensions. I wouldn’t have known what they were myself if I didn’t go to the trouble of measuring them just so I could tell you. Usually, I just eyeball it.
The only thing I actually measure is the length of the riser and the length of the tip overlays. You have a lot of flexibility with thicknesses.
When you cut these pieces out, be sure to sand them with the flat part of the belt sander. Making them nice and flat will give you a good glue joint. Using a 40 grit sanding belt also gives a good rough surface for gluing.
A Couple of Observations
You may have noticed a couple of things. First, the ipe is 1.25″ wide, yet the handle wood is 1.5″ wide. What’s up with that?
Well, ya see, that gives me a little margin of error in case the handle wood slips around a bit while I’m gluing everything up. Without a lovely assistant, I have to apply pressure while keeping everything lined up at the same time.
You may have also noticed that while the ipe is 1.25″ wide, the bamboo is almost 1.5″ wide. What’s up with that?
Well, ya see, I just do that for convenience. I use the same template for fiberglass bows and bamboo bows, so they all come out to the same thickness. Whenever I make something as narrow as an ipe bow, it’s a simple matter to cut away the excess bamboo after glue-up.
I’ll be cutting away the excess ipe toward the tips anyway, so I just cut away the excess ipe, bamboo, and handle wood at the same time.
But we’re getting ahead of ourselves. I just didn’t want to leave you there scratching your head and saying, “Boy, I say boy, that just don’t add up!”
The next thing we have to do is glue the bow together. For some reason, everybody calls this a “glue-up.”
Why it’s a glue-up rather than down, or rather than a glue-together is a mystery to me. I suppose “up” is just shorter to spell and quicker to say.
I’ll stick with it for the sake of convention. I’m not a teenager anymore, so I don’t feel the need to be a rebel.
Doing a Dry Run
Let’s not worry about why it’s called a “run.” What’s important is that it’s called “dry” because we’re not going to use glue yet.
Not use glue you say? That’s right. Before we use glue, we want to make sure we know how everything is going to work out.
We don’t want to discover that part of the form is going to fall apart, we haven’t got enough reflex, or we don’t have enough clamps or something. The dry run helps you to forsee unforseen calamities. It also helps build confidence.
The first thing you should do is find the midpoint of the length on all the pieces (except the tip overlays)–the bamboo, the ipe, and the handle pieces.
Make a pencil mark on the edges of all these pieces. That will help you get everything lined up.

Now get your form ready. I just use a 2×4 I got out of a construction site dump. It has to be straight with no warping and no twist, and it has to be six feet long.
I set the 2×4 on a couple of stands which lifts the 2×4 up and allows me to get clamps under it.
You’ll also need something to put on the ends of the boards to prop the bow tips up, giving the bow its reflex. Almost anything will do as long as they are the same height.

Notice how my doohickies sort of lean? There’s a reason I do that. You see, a couple of times I’ve had the end pieces want to fly out from under the bow tip while under pressure.

These leaning doohickies don’t have that problem.

I got them cut to the same angle by tilting the table on my band saw and using the miter gauge to saw them. Then I got them both to the same height by grinding one with the belt sander until it matched the other.
When I do the dry run on a bow I’ve glued up a dozen times, I don’t do the whole shabang. That is, I don’t put every single clamp on there that I’m going to use.
I just put the critical ones on there–a couple to hold the handle and the ones for the deflex.

I measure 12 or 13 inches from the tips and put a pencil mark on the bamboo. That’s where I put the deflex clamps. But that’s a matter of personal preference.
There’s about a gazillion ways to do one of these glue ups. Most I’ve seen have separate pieces for the deflex and the handle.
The method I use is about as simple as it gets. I just put the handle of the bow straight down on the 2×4 and use the two orange clamps to give it whatever amount of deflex I feel like giving it.
For bamboo-backed bamboo bows, I don’t give it any deflex at all, because it’ll have plenty of deflex once it’s tillered. I just crank the deflex clamps down until it’s about even with the handle.
But in the case of ipe or Osage, I give it a little deflex. Since my handle is an inch thick, I make the gap between the deflex part of the limb and the 2×4 about 3/4″.
This is all a matter of personal preference, though. The truth is, just about every bow I do is a little different.
The procedure I use is to first clamp the bow at the handle. Then put the leaning doohickies under the tips. Then put the deflex clamps on. That seems to be the easiest way.
The leaning doohickes are about 4.5″ high, but that, too, is a matter of personal preference. After all, you could just make a perfectly straight bow if you wanted to.
Gluing the Bow Together
To glue the bow together, I put a 2×6 in front of the form to use as a table. Then I put a piece of saran wrap long enough to extend past the table. I want it to be long enough to wrap the bow up in.
I lay the bamboo and the ipe on the saran wrap with the surfaces facing up that I’m going to apply glue to.

Then I mix the glue up. Unless you plan to make fiberglass bows, I recommend using Urac-185. It’s about half the price of Smooth On.
I’m using Smooth On because I also like to make fiberglass bows, and you can’t use Urac for that. Smooth On comes in two parts–the glue and the hardener.
DON’T EAT THE HARDENER!!! I know it looks like caramel, but it’s not. I use about equal parts of each, but I don’t really measure it that accurately.
I take plastic spoons and get a big heaping spoonful of each, plus just a little extra. That is plenty for one bow. If you run out of glue before you have everything together, don’t panic.
Smooth On gives you plenty of working time, so you can just mix up a little more. Here’s my stuff.

On the left, you’ll see a blue-handled seam roller I got at Lowes. That really makes the glue-up easier. In the middle you’ll see a plastic yellow bowl with hardener on the left and glue on the right.
The stick of wood laying across the bowl is what I use to mix it. You gotta mix it really well, too. I use that same stick of wood to scoop glue onto the bow parts. Then I use the seam roller to spead it. It works really well.
Be sure to put glue on both surfaces that are glued together. That ensures there are no dry spots. Here’s the procedure I use:
First, I glue the bamboo and ipe together. Then I glue the three handle pieces together. Then I glue the handle to the ipe. Then I glue the tip overlays on.
Whenever I glue two pieces together, I squeeze as hard as I can with my hand. That reduces the amount of sliding around later on when you try to put the clamps on.
After everything is together, I wrap the saran wrap around the bow.

I don’t know if you can see it, but I’ve got a couple of pieces of masking tape wrapped around the limbs. That’s to prevent the bamboo from sliding around on the ipe.
It helps. Do you remember when I told you about how the bamboo is wider in the middle than the ipe, but that the tips of the bamboo are more narrow than the ipe?
Well, somewhere on the limbs, there’ll be a point where they are both the same width. I put my fingers on that spot and get the bamboo and ipe all situated; then I put the masking tape around that spot.
Now it’s time to apply the clamps. This is really easy if you have a lovely assistant. One of you can hold the pieces together, keeping them lined up while the other applies the clamps.
But if you’re alone, there’s still some techniques you can use. A friend of mine drills a tiny hole through the pieces and puts a nail in it.
I don’t do that, though. What I do is put one clamp in the middle and only tighten it enough to keep it from falling off, which is not much at all.
Then I adjust the alignment if needed. Then I put one on the end of the handle, and another at the other end of the handle. Again, I only tighten them enough to keep the clamps from falling off.
After that, I tighten each one slightly, then repeat, and keep repeating until they’re pretty tight. If you do this gradually, the handle won’t slide around, and when it does, you can make the necessary adjustments as you go.
Once I have the two clamps on the ends of the handle kind of tight, I move the middle one to the side and put a fourth clamp on there.
You should put a piece of cardboard, rubber, cork, wood, or whatever between the clamps and the bamboo because if you don’t, the clamps will put dents in the bamboo.
Once the handle is clamped down, the rest is easy. Put the leaning doohickies under the tips, put the deflex clamps on (make sure you have the same amount of deflex in both limbs), then put the rest of the clamps on.
Don’t forget the clamps for the tip overlays, and be careful not to let them slide around.

When you put the rest of the clamps on, don’t put them all on one side. If you’ve got too much weight on one side, that could cause the limbs to twist.
That’s especially true if you use all C-clamps, because they’re heavy. Alternate sides instead. I’m using a bunch of squeeze clamps because
(1) they’re a lot cheaper than c-clamps, (2) they don’t weight nearly as much as c-clamps, (3) they’re much easier and quicker to apply, and (4) they keep constant pressure on the bamboo. Lemme explain 4 a bit.
You see Smooth On is a bit thick at room temperature, but it thins out when you heat it up. If you were to put a c-clamp on there and then stick it in the hot box, the glue would become thinner and more would leak out.
When it leaks out of the joint, that takes the pressure off the c-clamp, and the c-clamp will become loose.
You don’t have that problem with squeeze clamps, because no matter how much glue squeezes out, they will continue to keep the same pressure. Also, (5) squeeze clamps don’t leave dents in the bamboo, and (6) squeeze clamps don’t have a problem staying on the crowned surface of the bamboo like c-clamps do.
Don’t get in a rush. Smooth On gives you plenty of working time. After I have everything together, I put it in my hotbox for six hours.
You can use the c-clamps for handles to carry it around. After six hours, I unplug the hotbox, but I don’t take the bow out.
It needs to cool, so I leave it in there until the next day. The bow will hold its shape better if you let it cool before taking it off the form.
This morning I took the bow out of the oven and unwrapped it. It felt just like Christmas. The next step is to rough it out, clean it up, and get it ready to tiller.
Roughing, Cleaning, and Preparing for Tiller
Here’s a before and after shot from the time I took it out of the oven until I had it all cleaned up.

Cleaning it up involves cutting it out with the band saw and then using the belt sander to sand the sides until there’s no more tool marks or glue.
Don’t worry so much about the handle since you’re going to wait until the end to give it its final shape anyway.
I also radius all four corners on the limbs. Having rounded corners reduces the chances of lifting a splinter or anything like that.
Whenever I do a bamboo bow, there’s always one node on the back of the handle that is not centered. I always make the end with the node the top limb, so I cut the arrow rest accordingly.

Usually, when I cut an arrow rest, I don’t measure a certain distance from the center. I just hold the bow in my hand like I’m going to shoot it and mark with a pencil where I want the rest.
But since I’m doing a build along, I decided to measure and put the arrow rest 1.25″ above center.
I cut the fades 3 inches from the ends of the handle with the band saw and then rounded them out and got them closer to the limb with the elbow of the belt sander.

See how I still have some glue on the belly of the bow just after the fades? That’s because I like to leave that area alone for now. It allows me to work on the fades later without causing a hinge.
To radius my arrow shelf, I use my disk sander. It comes with a plastic cover over it that gets in the way. I cut part of the cover off with a dremel tool so I can get the bow on there.

Having a radiused shelf reduces drag on the arrow by limiting contact. Notice how there’s no sanding belt on the belt sander. That’s to protect me while I radius the shelf.
Next, I cut the nocks. First, I round out the tip overlays and grind the tip fades with the belt sander. Then I start cutting the nock one inch from the end. I actually measure this, because you can’t make a string for a bow if you don’t know exactly how long it is.
I start the cut with a triangle file because if I use a rattail file without first having a little groove, it will slip and slide all over the place, and I can’t cut accurately. So first I make a groove with the triangle file.
Then I start cutting with the rattail file.
Everybody has their own way of getting even nocks. I used to do all kinds of intricate measurements, but I came up with an easier way that seems to work pretty well.
After I cut that initial groove in the tip overlay, I round it over and cut at an angle on one side. Once I get it cut, I round it toward the belly, too.
Then when I flip it over, I can see both the groove on the back and the groove on the belly from the other side at the same time.

Isn’t that cool? Now it’s easy to cut the new groove to match the one on the other side because I can see it while I’m filing. Here’s the result:

I don’t cut these grooves too deep because I may need to adjust them later to get the tips aligned. I just cut them deep enough to hold a string.
The only thing left to do before I start tillering is to prepare the back. I used to put masking tape on the bamboo before glue up to keep the glue off the back, but that turned out to be unnecessary.
It made it hard to cut the bow out because I couldn’t see a clear line between the bamboo and the wood.
Besides, the glue that gets on the bamboo isn’t much of a problem. If there are big chucks, it’s easy to pry them off with a pocket knife.
Everything else can be sanded or scraped off with the rind.
I used to leave the rind on and just sand it smooth. One time, I lifted a splinter that was only rind deep, and I’ve been sanding the rind off ever since.
I think most people scrape the rind off, but I use this handy dandy pneumatic drum sander.

It’s got a 1 HP motor and an inflatable sanding drum. I love that thing. It’s a good tool to tiller fiberglass bows with, too. Since it’s inflatable, you can easily sand the rounded surface on the back of the bamboo.
I first sand between the nodes leaving a little bit of rind around the nodes. Then I make a few quick passes over nodes so as to get the sharp edge off but not sand them down too much.
Once I’ve got the rind off, I want to get the back of the bow as smooth as an android’s butt. I do that with 100, 150, 250, 400, and 1000 grit sand paper.
After the 1000 grit, it’s pretty smooth. Having a smooth surface like that reduces any chance of lifting a splinter. I couldn’t find 1000 grit at Home Depot or anything like that, so I got it at an auto parts store.
Things have gone awry. I was outside tillering today and taking pictures and notes as I went. But when I came back in to transfer the pictures to the computer, some of the pictures were out of focus.
But worse than that, the tiller looks a lot worse in the pictures than it looked to my naked eye. Sorry about that. We’ll just have to make due.
Tillering the Bow
Since this is a reflex deflex bow, you can’t tiller it like you tiller a straight bow. You can’t just go for a perfect arc, and you can’t use the little trick where you slide a block of wood along the belly and identify hinges and flat spots by the changing size of the gap.
There are other tricks to tillering a reflex deflex bow, though.
Rather than go into those, I just want to explain the thought behind it.
What you want to do when tillering any bow is to get each part of the limbs bending the same amount as every other part. Think about that for a minute. You’ve got a deflex part and a reflexed part of the bow, right?.
If every part of the limb is bending by the same amount, then the deflexed part is going to look like it’s bending the most, and the reflexed part is going to look kind of straight.
The degree depends on how much reflex and deflex you have. If you have just a little reflex, those tips will bend inward. But if you’ve got a whole lot of reflex, then they might be doing good just to straighten out.
I’m not an expert at tillering reflex deflex bows, so I suggest just looking at a lot of other r/d bows. I think to see what a perfectly tillered r/d bow looks like, you could look at a r/d fiberglass bow with tapered laminations.
Since all the laminations are ground to uniform perfection and tapered, it should produce the ideal tiller.
In the meantime, I’ll do the best I can.
The first thing I do is pull it about three inches. It just starts to flex when I get the string to 17″, so to pull it three inches, I pull it to 20″.

This is just to get a feel for how stiff it is and to see if the limbs are bending evenly. A lot of people floor tiller, but this serves the same purpose. Now don’t get the wrong idea.
I’m not suggesting that you pull it three inches no matter what. If your bow is so stiff you can’t pull it three inches without pulling harder than 40# or something, then don’t pull it 3″.
Tug on it and see if it’ll bend a little, but if it won’t bend without considerable force, then you need to reduce the limbs some more. Like I said, this is the equivalent of floor tillering, and the purpose of it is just to test the stiffness and get the limbs moving.
It seems to be bending alright, so I excercise the limbs 30 times to loosen them up a bit and then pull it to 30# and see how far it goes. It went to 21″ which is just 4″ of limb movement.

I’ve got the top limb on the left and the bottom limb on the right, just soes you know. The right (bottom) limb seems to be bending more, so before I draw it any farther, I want to try to even them up.
I do that by removing wood evenly along the top limb. I just do a little at a time, excercise the limbs, then check. It’s important to excercise the limbs every time you remove wood. That allows the wood to get used to the loss and show the effects.
I excercise the limbs 30 times each time I remove wood. By the way, I’m using my pneumatic drum sander to tiller the bow.
After a few tries, I finally got them close to even. Here it is again at 21″.

That looks a little better, doesn’t it? Now I’m going to pull it to 35# and see how far it goes. I’m moving in 5# increments until I get to 45#.
I want to reach 45# at 10″ of limb travel before stringing it. 10″ of limb travel would be 27″. At 35#, it went to 22″.

Now it seemed to me that the left limb is stiffer in the outter section than the right. After working on that, I think I got it looking a little better. Here it is again at 22″.

Now I draw it to 40# and it comes to 24″.

It looked good to me so I kept going. I eventually reached 47# at 27″. I know I said 45#, but 47# is close enough, isn’t it?

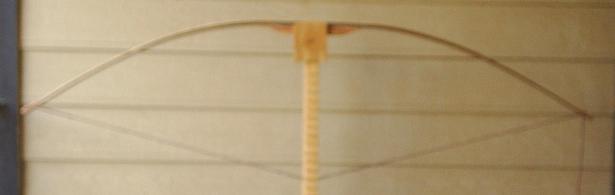
Now I string it just a little lower than full brace.

I can never quite tell if the limbs are bending evenly until I brace it. Then it becomes obvious. In this case, the top limb is too stiff. I want the top limb to bend slightly more than the bottom limb, giving me a slightly positive tiller. After working on it some, I got a 1/8″ positive tiller.

A lot of people wait until they’re done tillering before choosing which will be the top limb, and they don’t cut an arrow rest until then. But I have found it easy enough to get the tiller I want, so I don’t do that anymore.
Now I draw it to 18″ just to look at the tiller. This is well below the current draw weight.

I intentionally left the outter limbs stiff, because I knew I was going to narrow them later, and that would affect tiller some. That time has come. At this point, the tips are 5/8″ wide. I want to narrow them to 1/2″.
Before I narrow the tips, I want to check the alignment. It may be that I need to take wood off one side and not the other in order to correct the alignment.
The alignment looks good to me, so to keep it that way, I need to remove the same amount of wood from both sides on either end. As long as I cut my nocks to an even depth on both sides, that’s easy.
I just grind the sides on the belt sander and check the depth of the nocks on both sides. I grind from about 14″ or so to the tip, so I narrow the last 14″.
I get the tips at the beginning of the overlays to just a smidgeon more than 1/2″. Here’s a before and after picture:
Notice how the depth of the nocks is equal on both sides. That should keep everything lined up.
Before continuing, of course, I redo the nocks and re-radius the corners of the bamboo and the ipe. Here’s another look at 18″ with the tips narrowed.
You see, I had my camera set on close-up for the tip picture, but I forgot to reset it for the next three pictures. That’s why they’re blurry. Sorry about that. You can still see the shape, though, right?
I don’t have a specific draw weight I’m shooting for, so I’m just going to keep tugging until I get it to 28″, and I’ll be happy with whatever it comes out at. The next thing I do is draw it to 45# like I had it before stringing it. That brings it to 25″.
At the time, it looked pretty good to me, but now seeing this picture, it doesn’t look quite as good. The right limb needs to bend more at mid limb.
But not seeing that at the time, and thinking everything was hunky dory, I continued. I eventually got it to 48# at 28″.
It’s not gastly or anything, but it could be better. Finally, here’s a look at the profile right after unstringing it.

For the rest of the day yesterday, I debated with myself on whether I should go ahead and try to straighten out that tiller. I decided against it, because the tiller is really not bad, and my drive toward perfectionism would only result in a weaker bow that doesn’t perform any better.
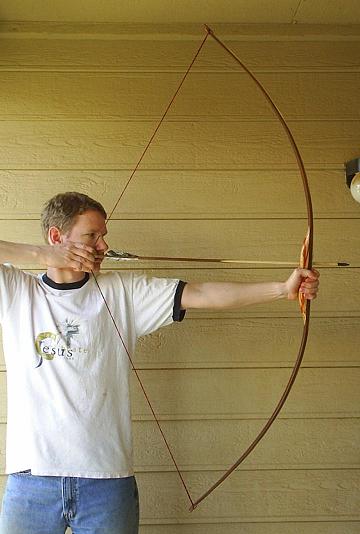
I also thought about putting the bow back on the tillering stick and taking better pictures, but that didn’t feel honest. I’ll take a full draw picture at the end of this build along so you’ll be able to see a clear picture of the final tiller anyway.
Shaping the Handle and Tips
I posted three videos on YouTube showing how I shape the tips and handle.
I use the belt sander to get most of the shape on my handle, and I use rasps and files to tweak it. I don’t use the belt sander to round the fades, though.
I use a rasp and a file to do that. After shaping it I go out and shoot it. The things I look for when shooting it are noise and vibration.
I like to notice as little as possible of both. I also want to make sure it’s not going to break before investing anymore time in it. After shooting it, I sand it. Here’s the result:
When I do the tips, I cut them a little shorter, but I leave them long enough to still be able to use a stringer. Cutting them shorter reduces mass which also reduces hand shock and increases speed ever so imperceptibly. Here’s how I did my tips:

I saved the tips for last so I can sand/file away the red dye and wax from my string that gets in there. I want it to be nice and clean before I put a finish on it.
Putting the Finish On
Before I put a finish on, I wipe the bow down with an old t-shirt to get as much dust off of it as possible. Sometimes, though, dust settles down into the pours, and I can’t get it all out.
So I sometimes wipe the bow down with acetone. I should warn you, though, that whenever you wipe acetone on padauk, it causes red stuff to smear into the other wood, and then it’s impossible to get it off.
So I’m very careful. First, I wipe down the limbs. Then I put a dab of acetone on my shirt-wrapped fingertip and trace it carefully along the padauk accent.
Remember that ipe is oily. I’ve tried tru-oil, polyurethane, and sparurethane, and none of it will dry on ipe no matter how much time you give it.
A friend of mine suggested Deft. It’s cheap, comes in a white spray can with a blue and brown wavy stripe, and it’s available just about anywhere, including WalMart. After the first coat, I found it to be completely dry within 20 minutes.
I’ve been using Deft ever since. It’s so easy to use! If you still prefer other finishes, you can use a couple of coats of Deft lacquer to seal the ipe, and then put your favourite finish over that. As for me, I’m just going to do the whole thing in Deft.
When I spray a bow, I hold it by the handle horizontally in front of me. I give a few bursts to one tip to be sure I get in the grooves.
Then I make two passes on each of four sides of the limb–the back, belly, and two sides. Then I flip the bow over and do the other limb. Then I put the bottom tip down on a piece of cardboard and hold the top limb with my finger tip while spraying the handle.
Then I just lean the bow over so the tip rests against the wall. That way, the only thing the bow touches while spraying and drying are the very tips. There are other ways, but that’s how I do it.
While the Deft is drying, I make a new string for the bow. Brown and red seems to go well with the ipe and the padauk so that’s what I’ll use.
I put three coats of Deft on there and then string it up and check the final draw weight. Then I write on it with a metallic silver Sharpie. Coloured Sharpies don’t seem to show up on the ipe, but this silver Sharpie does.
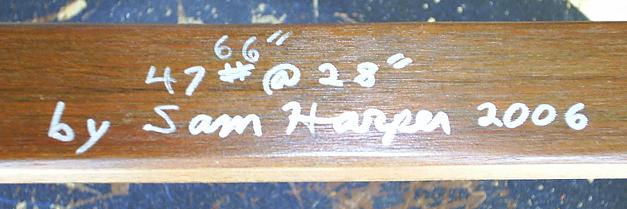
The reason I don’t write directly on the wood is so you could easily sand the writing off if you ever wanted to. I don’t write on top of the final coat either because I don’t want the writing to smear. By putting it between coats, it’s protected.
Before spraying anymore Deft on there, I wipe the nocks with my t-shirt to get any wax or dye from the string out. Then I put on a few more coats.
Anywhere from five to seven coats altogether is what I use. I like to use the satin finish, too, because I don’t like a lot of shine.
Fingerprints show up too easily on glossy surfaces. I like the way satin finishes look and feel. There are hunting considerations, too.
The last thing I do to the bow is put velcro on the arrow rest and strike plate. I use industrial strength velcro. It’s self-adhesive and easy to apply.
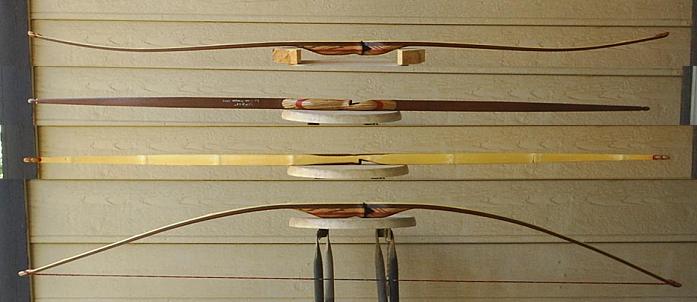
Showing the Goods
Now that the bow is all finished, here are some final picture
We hope you have enjoyed this excursion into making a bamboo-backed ipe bow. Join us next time when maybe we’ll do a fiberglass longbow build along or a belt sander lam grinder build along or a footed arrow build along or something like that.
Disclaimer: Sam Harper owns the rights to this article’s images and written content. All requests for the use of Sam’s work must be submitted through him directly. This way, he can ensure that his work is used respectfully and by copyright law.


Conversation | 4 comments:
I know that I need my ipe to be straight grain, I have had a hard time seeing the if the grain was straight or not. Do you have any advice on this subject? Or do you know where I can purchase a good quality ipe stave for my next bow? Thanks for any suggestions about my concerns.
Hello to my fellow bow builders, If you’re looking for some of great ipe that is some of the best that I’ve ever found Sam Harper has the best advice on making ipe and bamboo bows. The darker the color of ipe the better it is for the bow.
How does it perform?
Thanks for sharing your experience and knowledge with us. I really appreciate your support on this issue.