Special Thanks to Sam Harper for allowing us to republish his tutorials and build along instructions. His expertise and knowledge in the bow-making field have greatly benefited many readers, and we are grateful for his generous permission.
My hot box cost me about $20 to make. Here’s how I did it.
First, I went to Lowes and got two sheets of foam board insulation. It’s 1 inch thick, and 4 ft x 8 ft, and it cost about $8 each.
I had them cut it to my specifications for me so I could fit it in my truck to bring it home. You can cut them yourself with a box cutter if you can manage to get them home. Here’s how I had them cut up:

I taped together the sides, ends, and bottom with metal tape, which I also got at Lowes. Then I taped the lid on one side so I could open and close it. I had to trim the edges of the pieces to get them all to fit together.
The “light” piece needs to be shorter that the dimensions above so you can fit it on the lid and still have the lid close all the way.
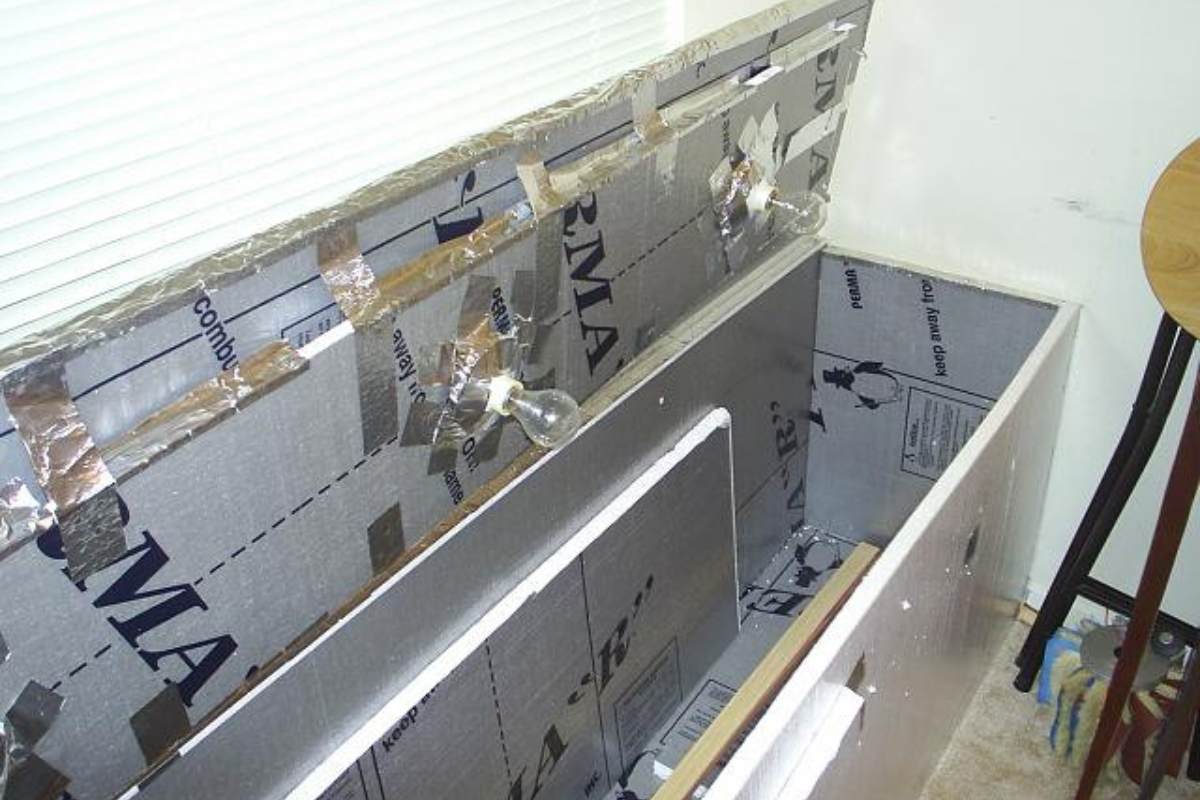
The first time I turned on the box, some of the tape came loose, so I had to tape it another way. I ran the tape from the “light” piece all the way outside the box, and that fixed my problem. See the picture below to see what I’m talking about.
Recommended Posts:
- Best Beginner Compound Bows
- Best Archery Sets for Youth Archers Reviewed
- Top Recommended Compound Bows under $500
- Best Compound Bows for Women
- Bear Divergent EKO Review
- The Best Archery Gloves
- Best Bow Hunting Backpack
I got three cheap plastic light fixtures from Lowes. I poked three holes in the “light” piece with a pencil to run my wires through.
I wired the light fixtures in parallel and used metal tape to tape them to the “light” piece. I think I used 10 gauge wire,but I don’t remember. I used a power cord from an old jam box, cut off one end, and spliced the wires together so I could plug the lights in. Here’s an illustration:

With three 100 W bulbs, I can get about 160 F. You could very the heat by using different watt bulbs, putting a blanket over it, unscrewing bulbs, or cracking the lid open.
I usually just crack the lid open so the temperature isn’t so high when I glue on tip overlays and back-of-the-handle overlays.
That way, I don’t have to worry about the bow delaminating when I stick it in the oven the second time.
I use a meat thermometer and just stick it in the side of the oven between two lights. I don’t put it right up close to any of the lights, because I don’t want to get a false high reading.
Here are some pictures of the actual box:


A friend of mine made his heat box out of foam board insulation, but he had some variations.
First, he made his box smaller than mine, so he can get the same temperatures I can with only two bulbs.
Second he didn’t mount the bulbs in the lid. Instead, he uses those light fixtures with a parabolic dish and squeeze clamps and just clamps them to the form when he puts a bow in the oven.
Here’s a build along for a fancier schmancier one in case you want to spend more money and do more work.
Disclaimer: Sam Harper owns the rights to this article’s images and written content.
