
It has been difficult writing this build along because there’s a lot of information I want to include, but I’m having trouble deciding how to organize it.
This is my third re-write. I guess the simplest way to do this is to show you one simple way to build a spine tester.
Then explain how to use it and read it (page 1). Then explain how to account for the difference between static spine and dynamic spine. Then show you some other ideas for spine testers. Does that sound good?
First, let’s give credit where credit is due. The spine tester I’m about to show you was inspired by a fellow whose handle on The Leatherwall is “Sailor.”
He came up with the idea of making a homemade spine tester with a caliper. Mine works exactly like his does; it’s just built a little differently.
Almost all of the spine testers basically work like this: an arrow sits on two rests spaced 26 inches apart, and a 2-pound weight is applied to the middle. Then there’s some mechanism to measure how much the arrow bends, and that is correlated to some spine.
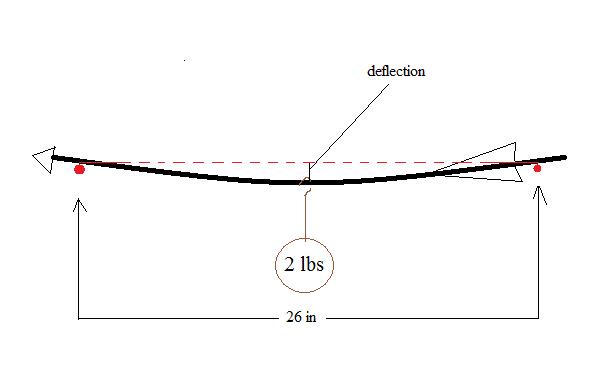
There are various ways to make two rests 26 inches apart, various ways to apply weight, and various ways to measure the deflection, so you can use your imagination and come up with your own design. But here’s how I did it.
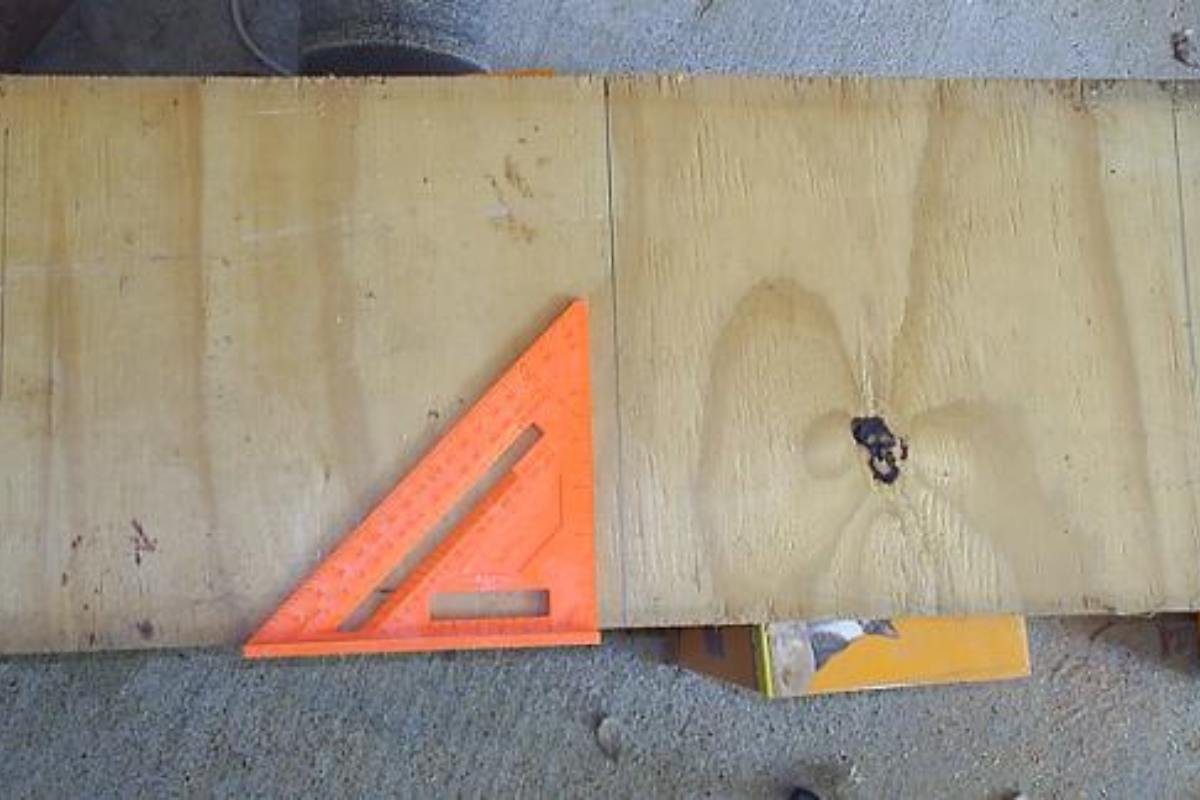
I started off with a piece of plywood 3/4″ thick.

I can’t remember where I got it, but I can promise you I didn’t pay a dime for it. People are giving away free scrapwood on craigslist all the time, and you can find this stuff in piles of rubbish at construction sites or in their garbage.
The only requirement is that it be at least 28 inches long and maybe 10 inches wide. Mine was bigger than it needed to be, so I cut it down to 30 inches and left the width.
Then I made three pencil markes along one edge spaced 13″ apart. So…0″, 13″, and 26″. I used a square with my aluminum yard stick and drew verticle lines with those points.
That’s my big toe in the bottom left.
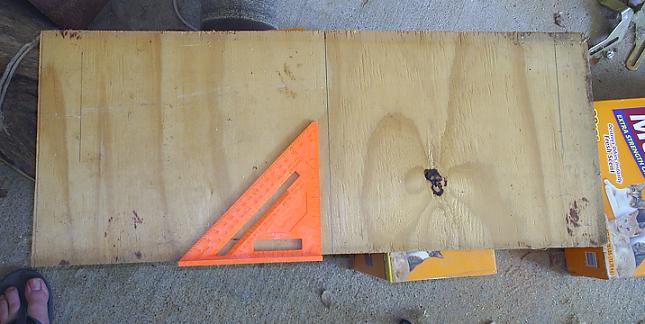
I wanted to make sure that when I put the arrow on the tester and hung a weight from it that the weight would have room to hang, so I set my weight (which I’ll show you later) on the plywood and measured a few inches up to make room for arrow deflection, and made marks on the 0″ and 26″ lines for my rests.
That resulted in my rests being about 6 inches up from the bottom of the plywood.
I decided to use 3/8″ dowels for my rests, though I could’ve just hammered in some nails. I used a 3/8″ frostner bit to drill a hole so I could have a flat bottom and make a good glue joint, but I guess an ordinary bit would’ve worked as long as I didn’t drill all the way through.
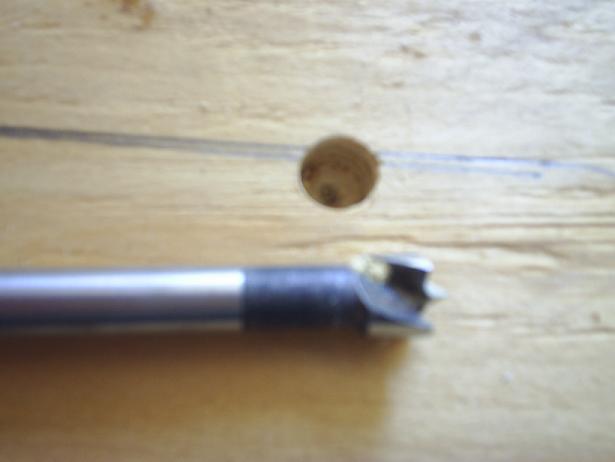
Sorry it’s blurry. I’m a terrible photographer.
I used Titebond III to glue in the dowels, making sure they came straight out of the plywood at 90 degree angles and didn’t lean to any side (because then they wouldn’t be exactly 26″ apart).
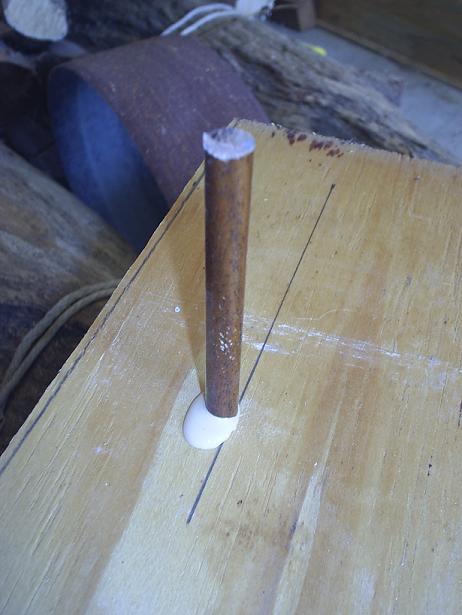
That’s a walnut dowel I made myself, by the way. 🙂 It didn’t cost me anything because my brother-in-law gave me a bunch of walnut flooring.
There was a little play between the dowel and the hole, but with all that glue in there, it was easy to adjust the dowel to where it was 90 degrees from the plywood in all directions.
Once I got that straightened out, I set it where the cats couldn’t get to it and let it dry.
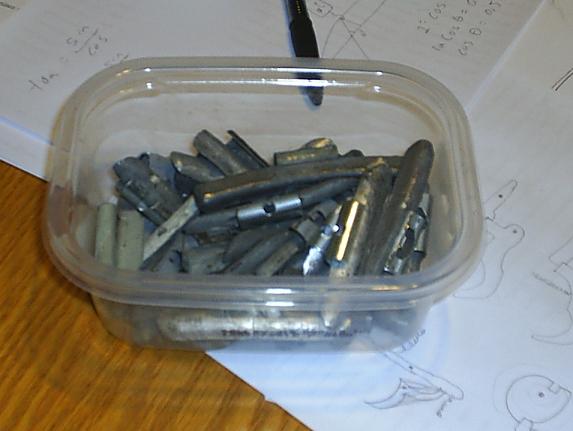
Meanwhile, I went to Discount Tires and said, “Do you have any of old wheel balancing weights that you’re just going to throw away?”
The guy I talked to told me they recycle them, but he let me have some anyway. I showed him my tuperware and explained that I just needed “about this much” which was actually more than I needed. He was happy to let me have some.
I don’t know if you’ve noticed it yet or not, but so far this spine tester has cost me next to nothing.
I guess you could say I spent a little money on gas to go get this stuff, I paid for the glue, and I paid for my Veritas Dowel Maker I used to make my dowel, and I paid for my pencil and yard stick.
Next, I made some macaroni and cheese.

Notice the bamboo spatula. I made that with some of my scrap bamboo from my bamboo backed bows. Resourceful of me, eh?
Then, I cut open a can of tuna (in water) and poured the contents into the macaroni and cheese.
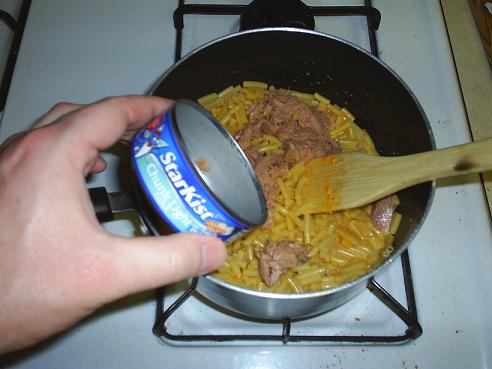
Then, I ate the macaroni and cheese and rinsed out the tuna can.
I took the tuna can with the weights and a small hook screw to the grocery store, proceeded to the fruit section, and placed the tuna can in one of those scales.

Sorry about the glare. Again, bad photography on my part. Notice that it reads 1/16 lbs (or 1 oz). So I droped in the hook screw and added weights until it was 2 lbs and 1 oz.

***You ought to keep in mind that if you do this, you’ll be putting lead weights on the same scale that people put their food in, and lead is poisonous.
Think of the children! If you’re going to do this, at least be careful to put the weights in the tuna can, and not directly on the scale. Of course there are alternatives to using a grocery store scale.***
It’s important that the weight be exactly 2 lbs, and since I’m going to cut the tuna can away, I needed the weights plus the tuna can to weigh 2 lbs more than the tuna can by itself.
It’s best to put the heavy weights in first until you’re close, then put the smaller weights in last until you reach your target weight. By putting the smaller weights in last, you can tweek the weight and get it exactly right.
Once I got the weight right, I put the tuna can, hook screw, and weights in a zip lock bag, left the extra weights in the tuperware, and took it all home.
Once I got home, I put the tuna can on the stove, put the weights in it (left the hook screw out!!!), put it on the stove, and turned the fire on low.
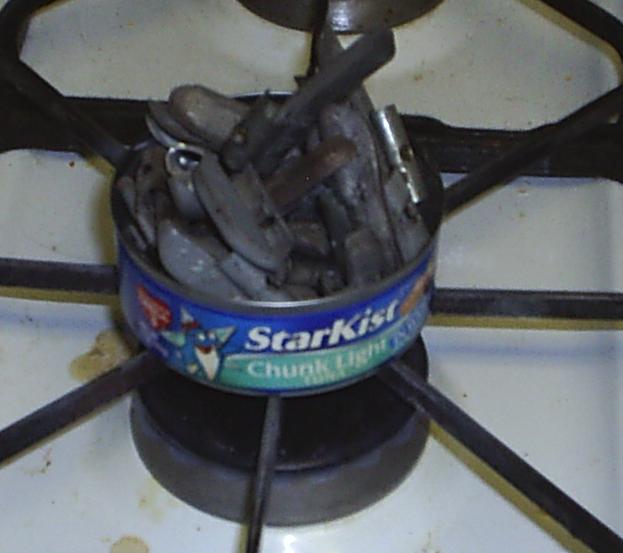
Lead is poisonous, so I opened windows and turned on the fan above the stove. If you’re concerned, you might want to do this outside on the grill or something.
I once tried this with a candle, but the candle just didn’t generate enough heat to melt the lead.
Having the stove fire on low was taking a long time, so I turned the fire up. It took about 15 minutes for the lead to completely melt. I kept a bamboo screwer handy to make sure the lead didn’t fall over the side as it melted.
All the metal that was attached to the weights floated to the top, preventing me from getting a smooth surface. Anyway, I let that cool off for a couple of hours, then used some snips and needle nosed pliers to get the can off.
There’s my hook screw at the top of the picture. Don’t accidentally leave that in there when you melt the lead!
You don’t even have to use a cooking spray because the tuna can has a non-stick surface already. 🙂 It’s easy to get off.
Next, I spray painted the weight just so I wouldn’t have to handle that lead all the time. It’s poisonous, after all.
The last time I made one of these weights, I used fishing weights (which are more expensive than getting them for free at Discount Tires).
The fishing weights didn’t have metal things attached to them, so when I melted them, my weight came out a lot more smooth. Here’s the front and back and both of my weights.

The old one is prettier because I used blue, red, and black. The new one has more personality because of the texture on one side. They both weigh exactly 2 lbs, and they’ll both accomplish the same thing.
I tapped in a small finishing nail to make a pilot hole for the hook screw. Then I screwed in the hook screw.

Notice how I have the hook oriented to where the plane of the hook is 90 degrees from the plane of the weight. That’ll help later on.
Okay, let’s get back to the spine tester. I cut the top of the board about three inches from the arrow rests.
I guess I could’ve done that before putting the dowels in, but I didn’t.
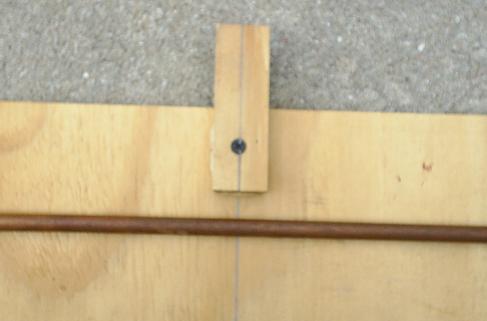
Next, I layed an arrow across the rests, then glued and screwed a 3 inch piece of plywood on the 13 inch verticle line, just above the arrow, so that the top of it protrudes above the baord.
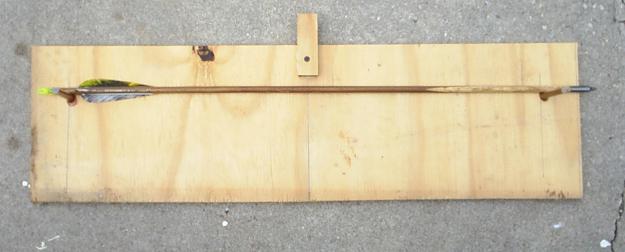
And I drew a verticle line on it that lines up with the 13 inch line.
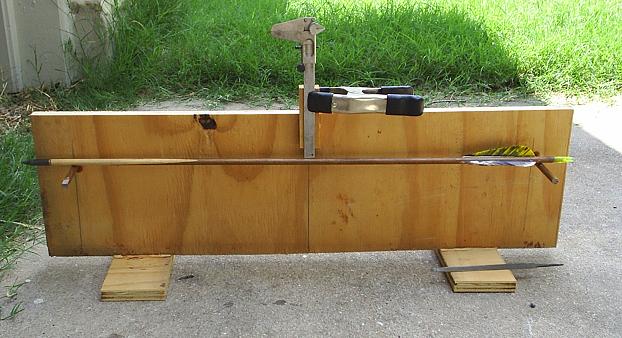
At this point, you can decide whether you want to attach it to the wall or make feet for it so that it’s free-standing. You could attach it to a wall by nailing it, screwing it, or putting brackets on the back of it and hanging it like a picture.
I went with feet because I already made a spine tester on my wall the other day.

I just glued and screwed these pieces of plywood to the bottom. The advantage of a wall hanger is that it’s always out of the way, and you’re unlikely to lose it. The advantage of a free-stander is that it’s mobile, and you can loan it to your friends.
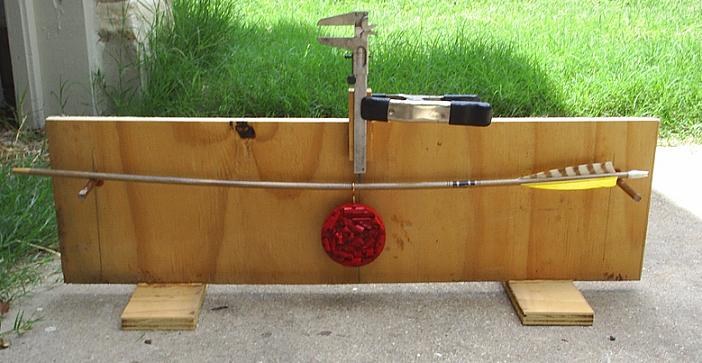
The spine tester is essentially done. All you have to do now is put an arrow on it and clamp a calper to where the bottom of the caliper barely touches the arrow shaft.
If you used nails instead of dowels, your arrow might want to roll around, making it hard to get the caliper to sit right on top. It’ll do that with dowels, too, just not as much. You want the caliper to sit right on top of the arrow, and not off to one side or the other.
This is easier if your 3 inch piece of wood you clamped the caliper to is thick. Using 1/4″ plywood will make it difficult because the arrow will be sitting right against the wall.
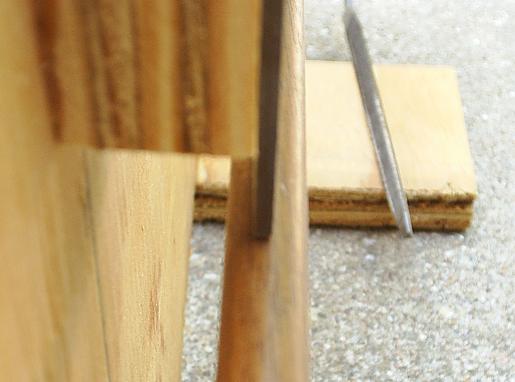
How will you hang the weight from it? I used a 3/4″ piece of plywood. To make sure the arrow doesn’t roll around while I’m getting the caliper zeroed in or hanging the weight from it, I cut a tiny groove on both dowels with a triangle file, then widened it a little with the rattail file.
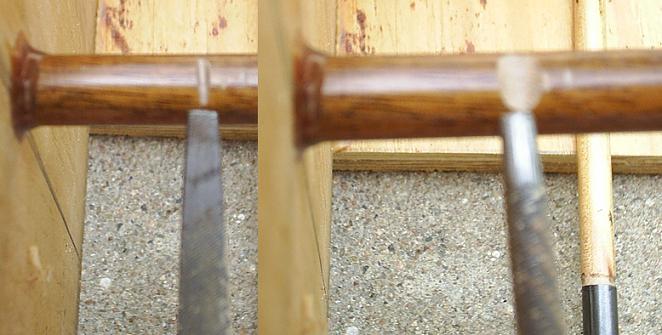
You don’t want to cut those grooves too deep because the crowns of those dowels are exactly 26 inches apart. If you widen that crown, the arrow will be sitting on rests slightly less than 26 inches apart.
Another option is that instead of cutting grooves, you can just create a groove by wrapping tape around the dowel. This is especially a good idea if you’re using nails. You can create a grove with the tape.
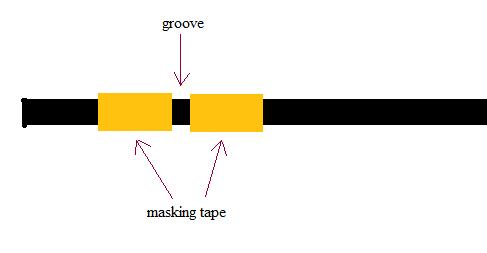
You can avoid this grooviness altogether by using hook screws instead of nails or dowels. In that case, you can screw the hook screws in or out to get the arrow to line up perfectly with the caliper.
Recommended Content:
- Best Beginner Compound Bows
- Best Archery Sets for Youth Archers Reviewed
- Top Recommended Compound Bows under $500
- Best Compound Bows for Women
- Bear Divergent EKO Review
- The Best Archery Gloves
- Best Bow Hunting Backpack
How to Use the Spine Tester
To use the spine tester, place your shaft on it with the tree rings verticle, not horizontally, because when you shoot your arrow, your nock should be lined up to where that’s how the arrow will bend when it’s shot.
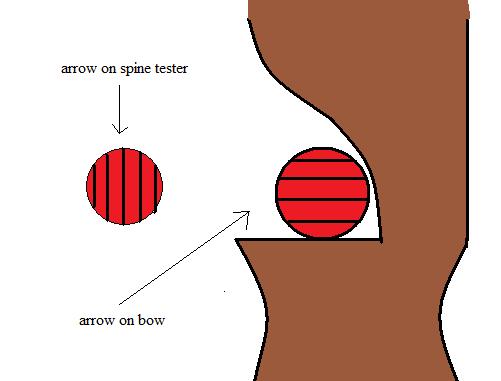
Of course if you’re using bamboo or some kind of rose shoot or whatever, ignore that. Just be sure you’re spining correctly according to where you’re going orient the nock to shoot it.
Next, zero in the caliper. That is, set the caliper to zero, lower it until it barely touches the arrow, then clamp it in place. Make sure the caliper is lined up with that 13 inch line on the plywood because you want to measure from the exact center between those two 26 inch rests.
Then put the two pound weight on the arrow as close to the caliper as you can, i.e. as close to the 13 inch line as you can.
Then open up the caliper until the little doohickie at the bottom barely touches the arrow.

Then read the caliper. It should be pretty straight forward if you’re using a digital caliper. But if you’re using a cheap one like mine, you’ll get a fraction, like 15/32″, and you have to convert it to a decimal since the spine chart uses decimals. You can find a spine chart by googling it, but here’s the one I’m using.
15 divided by 32 is 0.46875. If you look at the spine chart, that’s between “0.473 = 55#” and “0.465 = 56#,” so your spine is between 55 and 56 lbs.
Where did they come up with this chart anyway? That might be handy to know in case you’re ever in a situation where you don’t have access to the internet. Easy:
26 � deflection (in inches) = weight (in pounds)
It’s a mystery to me why this works, but there it is.
You could make your own chart if you wanted to by replacing the decimals with fractions. I just printed this chart, calculated the decimals from 9/32 to 28/32, and wrote them on the spine chart.
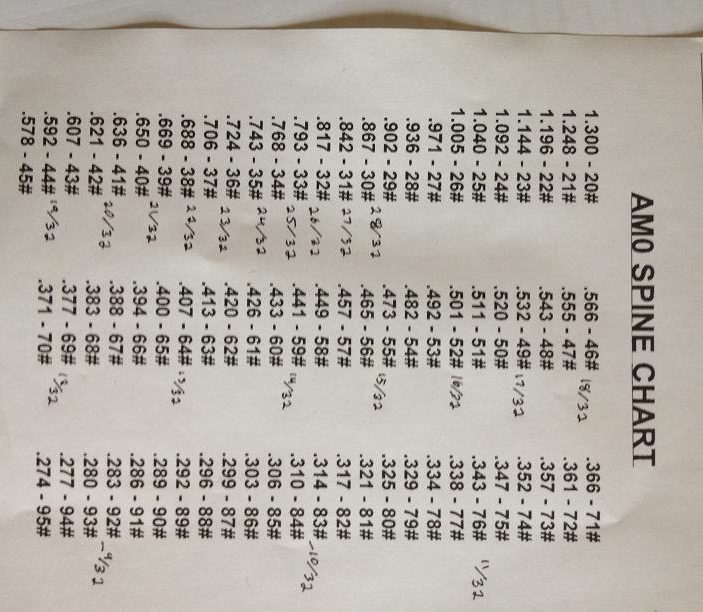
You can tape or glue this spine chart to your spine tester for ease of reference.
Notice that the fractions are closer together on the lower spines on the left and farther apart on the higher spines on the right. That means the higher your spine, the less precise your measurement will be. My caliper reads in 1/32″ intervals.
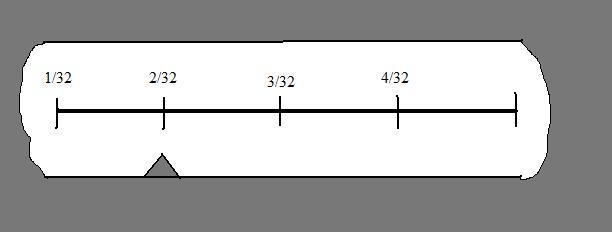
But you can get 1/64″ measurements because if the arrow is on a line, it’s a 32nd, but if the arrow is between two lines, then it’s a 64th.

That will give you a little more precision in those higher spines. Another option is to use a 4 pound weight for higher spines instead of a 2 pound weight, but then you’d need a different chart.
I read somewhere that you’d just need to double all of your inches. For example, on the AMO chart above, 0.289″ of deflection equates to 90# of spine when using a 2 lbs weight.
If you use a 4 lbs weight, 0.578″ of deflection will equate to 90# of spine. I don’t know if that’s accurate or not, but that’s what I read.
The Uses and Abuses of Spine
You may be tempted to think that if the spine you get for your arrow on the spine tester is 50# that your arrow will be perfect for your 50# bow.
But you would be mistaken to make that assumption. There are a variety of factors that influence what arrow spine will work best with your bow, including the length of the arrow, your draw length, the speed of your bow (and therefore the type of string, whether it’s a longbow or recurve, etc.), the weight of your point, how close the arrow shelf is cut to the center of the bow, etc.
The spine tester measures static spine. That’s just how much the arrow bends when you hang a weight from it. But there is a thing called “dynamic spine.”
That’s the effective spine of the arrow when shot from a bow. The best way to find out what arrow spine works best for your bow is to shoot a variety of arrows, each the same length from the same bow drawn to the same draw length with the same weight on your point, but with different static spines.
(Three Rivers Archery sells a test kit that includes four arrows with different spines, so you can experiment. An alternative is to make your own arrows.)
Calculating the dynamic spine will give you a closer estimate of what spine will work best so that you don’t have to do as much experimenting.
There are some thumb rules that will help you estimate your dynamic spine.
Arrow Length
The spine tester assumes your arrow is 28″ long. The shorter the arrow is, the higher the effective spine, and the longer, the lower.
The thumb rule is 5# for every 1″. So, if your dynamic spine is 50#, and your arrow is 29″ long, your effective spine (accounting only for arrow length) is 45#. If your arrow is 27″ long, your effective spine is 55#.
I have read this in a variety of sources, including The Traditional Bowyer’s Bible, Volume Three, p. 228-30. In what I have read, it’s ambiguous whether this thumb rule applies to arrow length or draw length or both.
After all, it’s possible for a person with a 28″ draw length to shoot a 29″ arrow or a 30″ arrow. Likewise, it’s possible for a person with a 30″ arrow to draw it to 28″ or to 29″. So I dunno.
But don’t stress out about it because we’re only trying to get a closer estimate so we can narrow the range of arrows we should test to find the perfect spine.
Weight of Point
There seems to be some disagreement out there on what the AMO chart assumes the tip weight is and how much tip weight effects dynamic spine.
Most simply say that heavier points reduce spine and lighter points increase spine, and they leave it at that. They don’t give actual figures. Gabriela Cosgrove, in her chapter on “Wooden Arrows,” in The Traditional Bowyer’s Bible Volume Three, p. 229, seems to think the spine tester assumes a 110 grain point.
She says, “Add 5 lbs for heavy broadheads(those over 110 grains).” Other sources (which I don’t have the energy to google at the moment) seemed to think the spine tester assumes a 125 grain point.
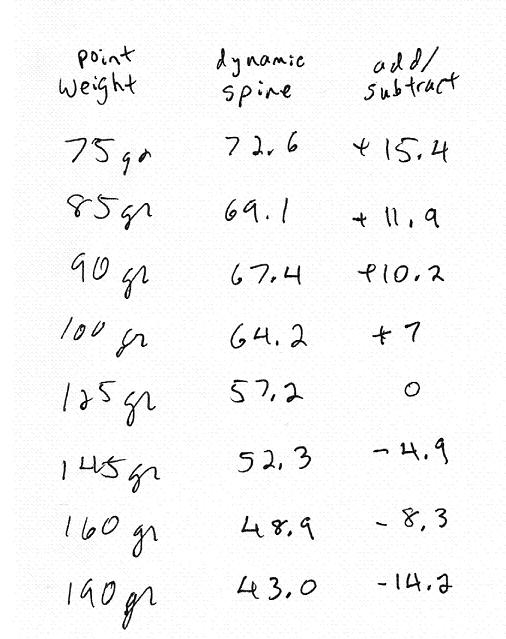
Stu Miller came up with a dynamic spine calculator where you enter all your variables into an Excel spreadsheet, and it calculates your dynamic spine.
I used his calculator to figure out how much point weight affects dynamic spine. I began with a static spine of 55# and typed in different point weights according to what is commonly sold in archery supply stores, then calculated how much weight you’d have to add or subtract from your static spine to get your dynamic spine. I came up with this chart.
Speed of Bow
Grabriela says that we should add 5 lbs for extra fast recurves (TBB, Vol. 3, p. 229) Unfortunately, I was not able to find any charts that equated speed of bow with difference in spine.
But again, we’re just estimating here, so no worries. We just need to know that the faster your bow is, the lower your effective spine, so Gabriela is telling us to add 5 pounds to whatever our static spine is to get the spine we need for our faster bow.
It has to do with the laws of inertia.
Degree of Center-Shottedness
I did find a chart that equates distance from the center of the bow to difference in spine, but I don’t want to look for it again.
Maybe I’ll edit this build along if I come across it some other time. But suffice it to say that the closer to center shot you are, the stiffer your arrow should be. The wider your grip, the lower your spine should be.
An Example
Let’s do an example. Let’s pretend like we want to estimate the spine we need for my favourite bow, which is 52# at 28″.
We begin with a static spine of 52#. I like to shoot 125 grain points, but let’s pretend like I’m going to shoot a 100 grain point.
If you look at my chart above, you’ll see that using a lighter tips effectively stiffens my spine by 7 pounds, so I need to subtract that 7 pounds from my static spine.
52# – 7# = 45#
I’m going to shoot a 29″ arrow. Since lengthening the arrow by 1 inch effectively reduces spine by 5#, I need to add 5# back to what I have so far.
45# + 5# = 50#.
Since I make wicked fast bows, my effective spine is going to be weaker by 5#, so I need to add 5# to my spine to make it stiffer.
50# + 5# = 55#.
My bow is close to center shot, but not quite there, so I think I’ll just subtract 2# to make the arrow bend better around my bow.
55# – 2# = 53#.
So the perfect spine for my 52# bow, given my variables, is probably close to 53#. But this is a very rough estimate. I still have to experiment to really find the perfect spine for my bow.
How spine affects arrow flight
The spine of your arrow will determine whether it shoots where you’re aiming or not. It’s different for a left-handed shooter and a right-handed shooter.
If you’re right-handed, and your arrow is too stiff, it’ll shoot to the left of where you’re aiming. If it’s too weak, it’ll shoot to the right. If you’re a left-handed shooter, and your arrow is too stiff, it’ll shoot to the right of where you’re aiming.
If it’s too weak, it’ll shoot to the left.
Here’s my little illustration about how spine affects arrow flight.
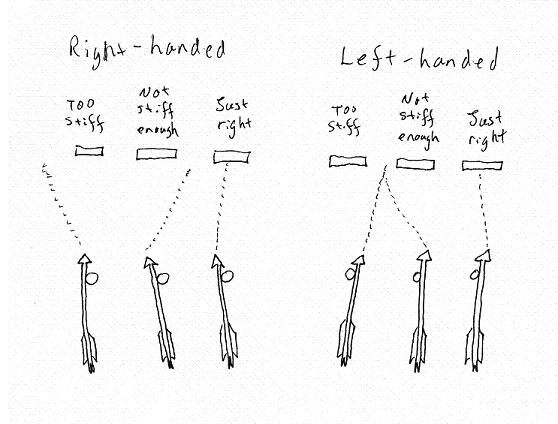
You can use this to determine whether your arrows are too stiff or not stiff enough. So experiment and find out what spine of an arrow shoots best with your bow.
When you buy shafts, they are usually grouped in 5# increments, e.g. 45-50#, 50-55#, etc. 5# makes little difference, so as long as your arrows are within 5# of each other, they should all shoot pretty consistently.
Some other spine testers
When I was on line trying to figure out what kind of spine tester to do for my build along, there were three criteria I looked for:
1. Inexpensive.
2. Easy to make.
3. Easy to use.
I wanted to maximize all three of these attributes, but most of the spine testers I found maximized two while not maximizing the other. I’m going to show you some other spine testers I found and give my opinion on how they match these criteria.
My YouTube Spine Tester
Before making the spine tester for this written tutorial, I made an even simpler one for a YouTube video.
Basically, if you have a 2×4 nailed horizontally to the wall, you can build this spine tester in about two minutes. Here’s the steps, summarizing the video:
1. Measure out three points on a 2×4 at 0″, 13″, and 26″.
2. Use a square to draw verticle lines at these points across the width of the 2×4.
3. Take a 3/4″ thick piece of plywood about 1″ x 3″, draw a line down the middle, lengthwise.
4. Screw the plywood into the 2×4 at the 13″ mark, and line the verticle line on the 2×4 up with the line on the plywood.
Make it to where the plywood overlaps the 2×4 by about 1.5″, and the other 1.5″ sticks up above the 2×4.
At this point, the spine tester is basically done. You just need two more ingredients to use it. Here’s how you use it.
5. Put an arrow on the nails.
6. Use a squeeze clamp to clamp a caliper onto the plywood so that it lines up with the 13″ line, and the bottom of the caliper barely touches the arrow.
7. Now, put a 2 lbs weight on the arrow as close to the caliper as you can.
8. Now, open the caliper until the little doohickie at the bottom touches the arrow.
9. Read the caliper, and that tells you what the deflection is.
10. Read the spine off an AMO Spine Chart.
The YouTube spine tester was much easier and faster to build than the one I did for the written tutorial because I didn’t have to cut any plywood, I didn’t use dowels, I didn’t put any feet on it, etc. But it works exactly the same.
Inexpensive.
The only thing that cost money was the caliper, the hook screw, and the nails. But I already had a caliper because I use it for other things, like bow laminations and bamboo backing. I got the weights for free, so this spine tester almost cost me nothing.
Easy to make.
The YouTube spine tester excels in this area. It is probably the easiest spine tester to make that I could think of.
Easy to use.
It is not the easiest spine tester to use. It would be easier if I used a digital caliper. The spine testers that use an arm sitting on a pivot that swings up and down are much easier to use than using calipers because you can put the spine weights directly on the scale.
You don’t even have to look at a chart. And you don’t have to adjust a caliper. The micrometer ones are also easier to use.
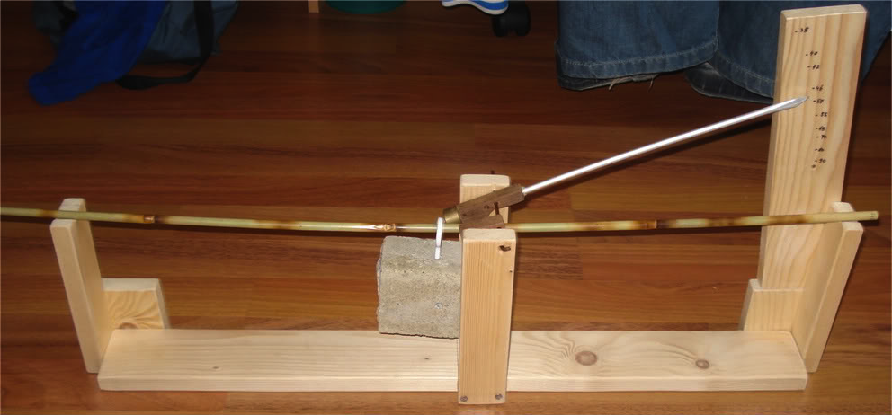
Sailor’s Spine Tester
Let’s talk about the spine tester that inspired mine.
Inexpensive. Most of these materials can be gotten for free, and depending on what you have lying around the house, it might be completely free.
Instead of using a squeeze clamp like I did to hold the caliper, he uses a magnet. I had two magnets from radio shack, but they didn’t work as well as the squeeze clamp because whenever I tried to operate the caliper, it would move.
Easy to make. His spine tester is not as easy to make as mine. If you’ve ever tried to get a piece of wood to sit upright on a flat surface without any play, and still get them to be perfectly 26″ apart, you’ll know it’s not easy.
Maybe it’s my lack of wood working skills, but hammering a nail into a pencil mark is a lot easier. Another option I’ve considered (and I’ve seen others do this) is use a couple of shelf brackets. That would make Sailor’s spine tester easier to build.
Easy to use. His spine tester is just as easy to use as mine since they both work the same. The only difficulty I had with his method was the magnet and the caliper not staying in place as well as with the squeeze clamp.
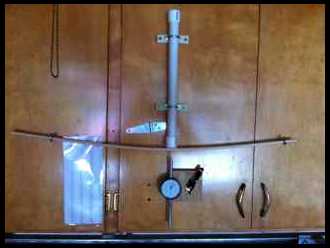
The Thin Man Spine Tester
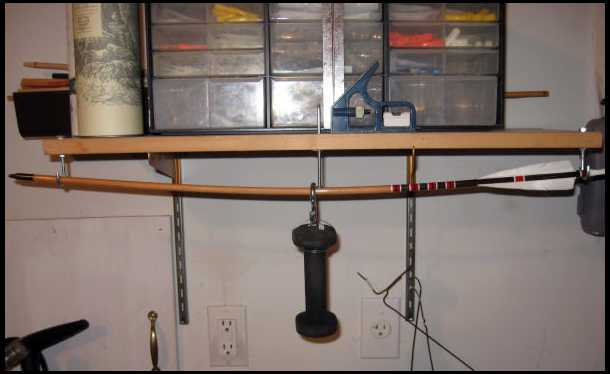
Thin Man, from the Leatherwall, got the idea for this spinetester from Neilbilly (also from the Leatherwall). I’m using Thin Man’s because he’s got a better picture, but here is a link to Neilbilly’s spine tester.
There’s a hole drilled in the shelf at the 13″ mark, and that nail just sits on the arrow. When you put the weight on the arrow, the nail slides down.
There’s a carpenter’s square on the shelf next to the nail. To get the deflection, you just find the difference between the initial position of the nail and the final position.
Inexpensive. If you already have a carpenter’s square, this one should be dirt cheap. If you don’t, the carpenter’s square might be costly.
Easy to make.
This one is pretty easy to make if you have a shelf you don’t mind poking a hole in and as long as you have a drill.
Easy to use.
Mechanically, this one is very easy to use. The difficulty is in the fact that you get two different measurements, and you have to subtract one from the other to get your deflection.
There is no zeroing this one. That might be somewhat of a pain if you have a lot of arrows to spine.
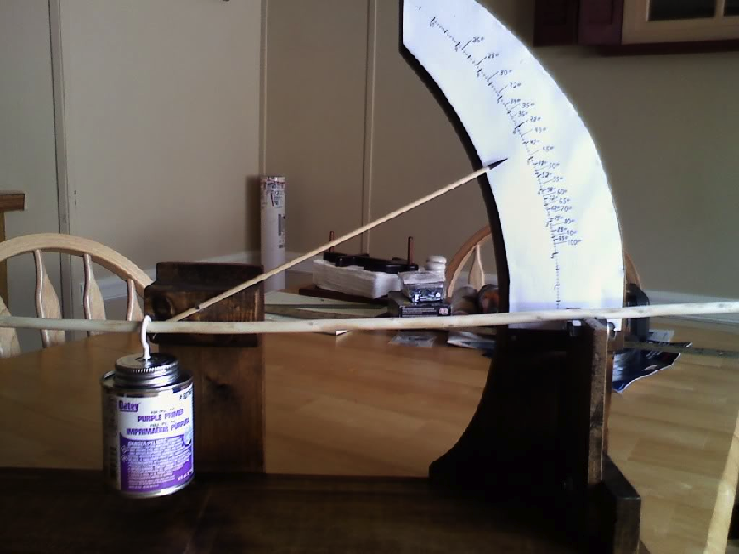
The Lombard Spine tester
This one was made by Lombard from the Leatherwall and can be found here.
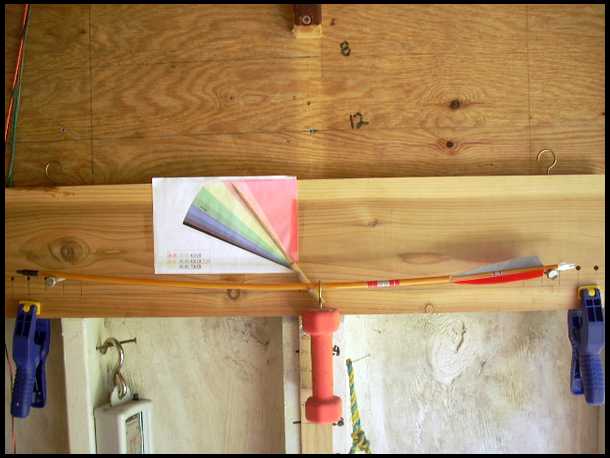
Inexpensive. This one is probably less expensive than mine because he doesn’t even use a caliper. I’m neglecting the cost of the weight since any weight would do on most of these spine testers.
Easy to make. I question whether the needle is easy to make, but everything else is simple.
Easy to use. This one beats all the others in being easy to use. His scale has the spines written right on it, so you don’t even need a chart. And if you scroll down on the thread, he posts a big picture of it, so you can download it and print it for yourself. The only difficulty I see in using this tester is zeroing it out. I’m not sure how he does that.
Stumpkiller’s Spine Tester
This one gets extra kudos from me because of his mechanism for calibrating it. Do you see that little screw on the bottom of the business end of the clothes pin?
That’s an adjustment screw. You can turn that screw and zero the spine tester before applying the weight. Awesome! See the clothes pin up close on this thread on the Leatherwall.
Inexpensive. This one looks very inexpensive. I can’t see anything on it that would be very costly at all.
Easy to make. This one might not be easy to make. I’d like to know how he got that clothes pin mounted without there being a lot of play.
It looks like he’s got a screw through the spring in the clothes pin to pivot on, but it would have to be a pretty fat screw to avoid play.
Maybe it’s a bolt. This spine tester has a lot of parts which would add to the difficulty of making this, but the cool factor might make it worth it.
Easy to use. This one appears to be very easy to use. You could use a different scale with just the spine weights on there so you wouldn’t have to use a chart.
The Van/TX Spine Tester

Van/TX from the Leatherwall made this one. It works basically just like the other ones with a swinging arm.
Inexpensive. Dirt cheap. All those materials could be acquired for free at a construction site or on craigslist.
Easy to make. No. Look at the wood working skills that had to have gone into that. I could not have made such a pretty spine tester.
Easy to use. Very easy to use. It looks like he’s got an adjustment knob on the right end of the arrow. You turn it to raise and lower the arrow to zero out the tester before adding weight. Cool.
The Stykzz Spine Tester
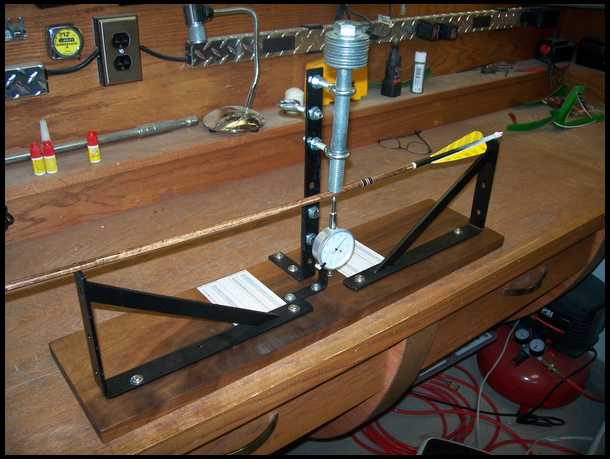
I’ve seen a lot of variations of this spine tester. This one was made by Stykzz on the Leatherwall, but I think Jim Hill came up with the original idea.
Here is Jim Hill’s spine tester along with lots of pictures and details about how it was made and how it works.
Inexpensive. You can get a micrometer at Harbor Freights for about $10. The bolt and washers might actually cost more than the micrometer. You’re going to have to spend money on eye bolts, too.
Easy to make. Not hard, but it’s a little more involved than mine.
Easy to use. Very easy to use. Accurate, too. You see, in mine (and in most others) you can’t put the weight exactly in the same place as you put the measuring device, but with this spine tester you can.
Here’s a much simpler version of the same thing.
This one was posted by a guy on the leatherwall, but I can’t remember who or where or I’d give credit and provide a link. When I find it again, I’ll do that. Anyway, that’s a pvc pipe he filled with lead, BB’s, or something for the weight.
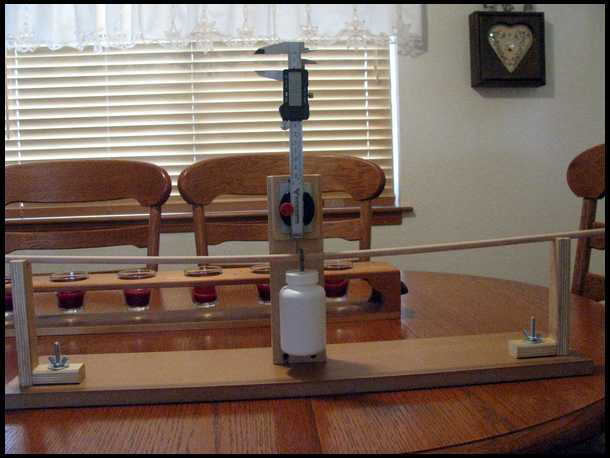
The Spine-O-Matic Spine Tester
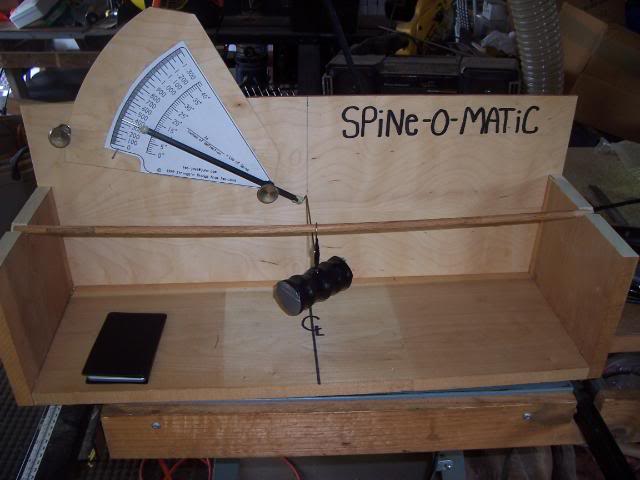
2_Smithereenz on Archery talk made this one, though it’s not his design. There are more pictures on this thread. For details on how to make it, see this pdf document.
Inexpensive. Quite so!
Easy to make. Nothing with a pointer on a pivot is easy to make in my opinion. At least nowhere near as easy to make as my tester.
Easy to use. Very easy to use. These pointer-type spine testers are the easiest to use in my opinion.
The DarkSoul Spine Tester
I saw this one on a bamboo arrow tutorial on Paleoplanet. There’s more detail about it there. Something about the pointing mechanism appeals to me.
Inexpensive. I don’t see any parts you couldn’t get for free except maybe a screw or a nail. The weight is a brick with a hook screw in it.
Easy to make. Not as easy as mine, but if you like pointers, this one seems easy enough. It might be a trick getting that brick to exactly 2 lbs, but he says he’s more concerned about consistency than accuracy.
Easy to use.
There doesn’t seem to be an easy way to calibrate it in case you use arrows with different diameters or that are slightly warped. Judging by one of the pics on the build along, I’m guessing it may not be as easy to put the arrow on this one as on other’s like it.
The CherokeeKC Spine Tester
CherokeeKC was kind enough to provide a tutorial showing how to build this.
I don’t feel like filling out the three criteria anymore. I’m sure by now you can figure that out as easily as I could. It’s not as if I made this spine tester.
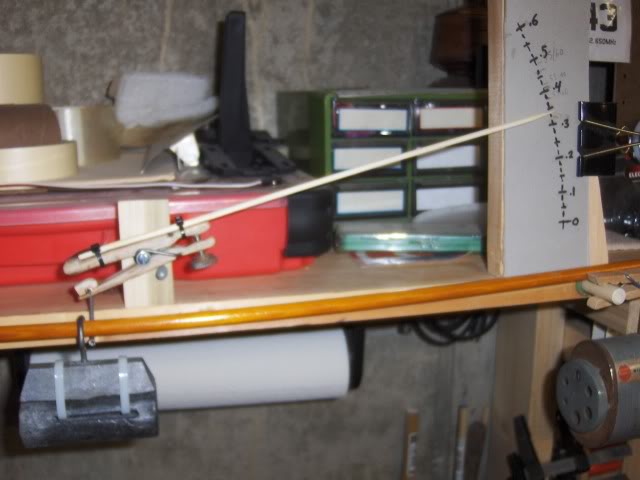
Design your own pointer system
The first spine tester I made used a protractor and a pointer that was set up basically like this.
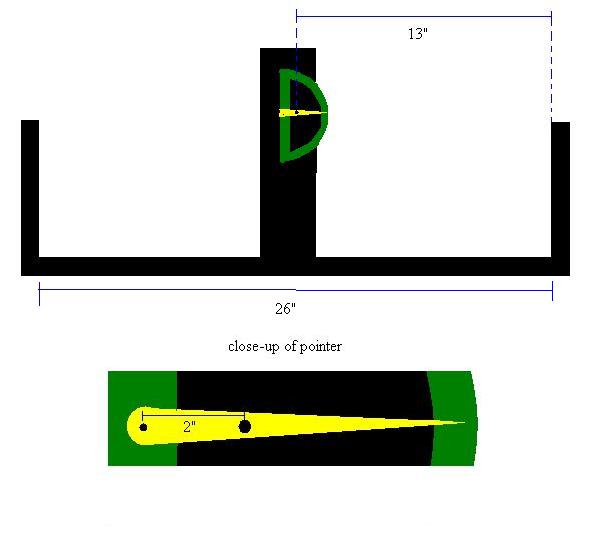
I got the idea from a guy on the internet, but I can’t find his plans anymore. There used to be a chart that converted the angle of the pointer to spine, assuming 2 inches between the pivot of the pointer and the place where the pointer touched the arrow.
But it’s not hard to make your own chart with a little trigonometry.
Remember that Sin θ = opposite/hypotenuse for any right triangle.
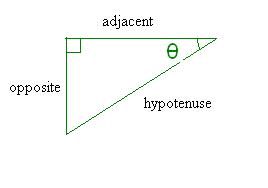
And you can see that between the plane of the arrow at rest, and the arrow with a 2 lbs weight on it, there’s a right triangle with the pointer providing the hypotenuse and the deflection being the side opposite the angle.

The protractor gives you the angle of deflection, and you know the hypotenuse because you designed it, so just plug in the numbers. You’re looking for the “opposite” from the angle θ.
Sin θ = opposite/hypotenuse, so opposite = hypotenuse x Sin θ.
So, from the angle of deflection, you can figure out the deflection of the arrow in inches and use the AMO Spine Chart to figure out the spine weight.
Or better yet, you can make your own chart that takes you directly from the angle of deflection to the spine weight.
The AMO Spine Chart gives you the amount of deflection in inches (which is your “opposite” side) and equates it with spine weight. So you can figure out what angle goes with each spine weight by using the chart and solving for θ.
θ = Sin^-1 (opposite/hypotenuse)
Let’s do an example. According to the AMO Spine Chart, a 60# spine is equal to 0.433″ of deflection. So…
θ = Sin^-1 (0.433″/2″) = 12.5 degrees.
So now you know that 12.5 degrees of deflection is equal to 60# of spine weight, assuming 2″ between the pivot of your arm and where it touches the arrow.
Or, you could figure out what the spine of your arrow is for each degree of deflection. Let’s find out what 15 degrees of deflection gets us.
Sin 15° = opposite/2″
so…
opposite = 2″ x Sin 15° = 0.518″
Looking at the AMO Spine Chart, 0.518″ of deflection is about 50# of spine weight. So you could make your own chart that equates degrees with spine weight.
Or better yet, you could calculate the spine weight for each degree of deflection, then use your protractor to draw your own scale with the spine weights written right on the scale. That way, you won’t even need a chart.
I should tell you that using 1″ instead of 2″ for the distance between your pivot and where your pointer touches your arrow will give you better precision.
And if you don’t want to do a lot of calculating, you can cheat with this handy dandy circle with a radius of 1″ that will give you the length of the opposite side for every angle as you slide the point around on the circumference of the circle.
You can slide it around by putting your mouse on the point, holding down the right button, and dragging it. We didn’t have that when I was in school!
Conclusion
There’s about a gazillion other spine testers out there. If you want to see more, search google, and search the archery discussion forums, like Tradgang, Paleoplanet, Archerytalk, the Leatherwall, etc. Try “spine tester,” “homemade spine tester,” “diy spine tester,” etc.
Before I go, I wanted to tell you one last thing. The only purpose of having a standardized spine chart is ease of communication. If you were going to making a spine tester with a pointer, you don’t even need to use degrees, deflection, spine weight, or any of that.
You can simply find the arrow that shoots best from your bow, spine it, and lable your scale with, “My bow.” Or you could have a scale with various things like, “My Roy Hall bow,” “My Paul Kloster bow,” “My favourite recurve,” “My favourite longbow,” etc.
That would make it easier for you to make arrows to match your various bows, though it would not make it easier for you to communicate with other people, like if you wanted somebody to send you arrows or you wanted to send them arrows.
Another thing is that it’s more important that all of your arrows be matched in spine and in weight than it is that your arrows be spined correctly for your bow.
After all, consistency is essential for accurate shooting, but if your arrows are spined wrong, you can compensate by the way you aim, and as long as they are all wrong in the same way, you can predict where they will shoot.
Disclaimer: Sam Harper owns the rights to this article’s images and written content.


Conversation | 3 comments:
Thank you for a very helpful and well explained article. Not without a sense of humour as well.
I’m glad you enjoyed it! However, it’s important to give credit where credit is due. Sam Harper deserves all the recognition as the original author of this guide.
Well done! I have been looking for the data that is in this article for a while, and it is well presented! I saw stumpkiller’s tester on a discussion board years ago and I liked the idea of an adjustable dial, so I used a toothpaste cap, a woodscrew, glue and scrap wood to make my zero adjustment mechanism. if you are using shafts you gathered yourself, there will be some variance in diameter. I need the equations and how to use them so I can know the amo if I use a longer or shorter span for the tester.